User Manual
Page 3
Contents Troubleshooting 76 General 76 Do you hear abnormal sounds from the refrigerator? 80 SmartThings 82 Smart Grid (applicable models only) 83 LIMITED WARRANTY (U.S.A.) 84 SAMSUNG REFRIGERATOR 84 Warranty Information (CANADA) 87 If your refrigerator needs service 87 Limited Warranty for Original Purchaser 87 Obligation to the Original Owner 88 Exclusions of the Warranty 88 Regulatory Notice 89 FCC Notice 89 IC Notice 90 Open Source Announcement 91 Untitled-7 3 English 3 2020-04-21 2:17:12
Contents Troubleshooting 76 General 76 Do you hear abnormal sounds from the refrigerator? 80 SmartThings 82 Smart Grid (applicable models only) 83 LIMITED WARRANTY (U.S.A.) 84 SAMSUNG REFRIGERATOR 84 Warranty Information (CANADA) 87 If your refrigerator needs service 87 Limited Warranty for Original Purchaser 87 Obligation to the Original Owner 88 Exclusions of the Warranty 88 Regulatory Notice 89 FCC Notice 89 IC Notice 90 Open Source Announcement 91 Untitled-7 3 English 3 2020-04-21 2:17:12

User Manual
Page 4
...know about the safety instructions • This appliance is not intended for their safety. Safety information Safety information Before using your new Samsung Refrigerator, please read this manual. • If you have been given supervision or instruction concerning use of the grounding plug can ... of the appliance by a person responsible for use by persons (including children) with the appliance. • Because the following instructions cover various models, the characteristics of the extension cord should be AC 115-120 V, 10 A, or more. If a grounding adapter is used, make sure ...
...know about the safety instructions • This appliance is not intended for their safety. Safety information Safety information Before using your new Samsung Refrigerator, please read this manual. • If you have been given supervision or instruction concerning use of the grounding plug can ... of the appliance by a person responsible for use by persons (including children) with the appliance. • Because the following instructions cover various models, the characteristics of the extension cord should be AC 115-120 V, 10 A, or more. If a grounding adapter is used, make sure ...

User Manual
Page 16
... in this manual. • Any servicing must be performed by a qualified technician. • Dispose of the product packaging material in this manual, depending on the model and the country. WARNING • Use the refrigerator only for its intended purpose as described in compliance with the local regulations. • To prevent electric...
... in this manual. • Any servicing must be performed by a qualified technician. • Dispose of the product packaging material in this manual, depending on the model and the country. WARNING • Use the refrigerator only for its intended purpose as described in compliance with the local regulations. • To prevent electric...

User Manual
Page 17
Type B 01 02 04 05 10 11 06 01 Auto Ice Maker 03 Autofill Pitcher * 05 Cool Select Zone 07 Door bins 09 Water filter 11 Ice bucket * * applicable models only Untitled-7 17 07 08 09 02 Foldable shelf 04 Main panel 06 Freezer 08 Slide in shelf 10 Ice Maker * English 17 2020-04-21 2:17:13 Installation
Type B 01 02 04 05 10 11 06 01 Auto Ice Maker 03 Autofill Pitcher * 05 Cool Select Zone 07 Door bins 09 Water filter 11 Ice bucket * * applicable models only Untitled-7 17 07 08 09 02 Foldable shelf 04 Main panel 06 Freezer 08 Slide in shelf 10 Ice Maker * English 17 2020-04-21 2:17:13 Installation

User Manual
Page 18
Installation 18 English Untitled-7 18 2020-04-21 2:17:13 This is normal. Door bins (applicable models only) Your refrigerator ships with door bins of order, contact a local Samsung service center. • If the door is left open for too long, the top internal LED will blink. If the door bins for your...
Installation 18 English Untitled-7 18 2020-04-21 2:17:13 This is normal. Door bins (applicable models only) Your refrigerator ships with door bins of order, contact a local Samsung service center. • If the door is left open for too long, the top internal LED will blink. If the door bins for your...

User Manual
Page 20
... mm) Height "C" 68 7/8" (1749 mm) D Overall Height "D" 70" (1777 mm) Depth "E" 36" (913 mm) 01 04 02 02 03 05 07 06 08 09 10 Model 01 02 03 04 05 06 07 08 09 10 RF28* 2" (50 mm) 125° 62 1/8" (1578 mm) 13 2/8" (335 mm) 35 6/8" (908 mm) 28...
... mm) Height "C" 68 7/8" (1749 mm) D Overall Height "D" 70" (1777 mm) Depth "E" 36" (913 mm) 01 04 02 02 03 05 07 06 08 09 10 Model 01 02 03 04 05 06 07 08 09 10 RF28* 2" (50 mm) 125° 62 1/8" (1578 mm) 13 2/8" (335 mm) 35 6/8" (908 mm) 28...
User Manual
Page 25
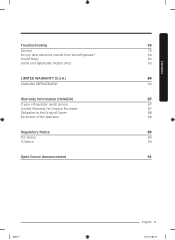
...-04-21 2:17:16 Disconnect the wire connectors (x2) on the floor. NOTE Be careful not to remove one of the connectors differs with the model. Make sure to drop the clamp on the right door. The position of the doors may fall and cause physical injury. • Make sure the...
...-04-21 2:17:16 Disconnect the wire connectors (x2) on the floor. NOTE Be careful not to remove one of the connectors differs with the model. Make sure to drop the clamp on the right door. The position of the doors may fall and cause physical injury. • Make sure the...
User Manual
Page 31
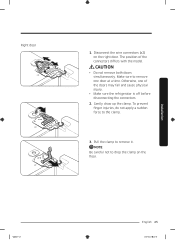
NOTE The design of the handles to the handle screws. Attach the handle to the handle screws on your model. Installation 3 2 2 1 Untitled-7 31 For type B handle: Insert the hook on the middle of the handle to its designated hole on each face each handle respectively, ...
NOTE The design of the handles to the handle screws. Attach the handle to the handle screws on your model. Installation 3 2 2 1 Untitled-7 31 For type B handle: Insert the hook on the middle of the handle to its designated hole on each face each handle respectively, ...

User Manual
Page 38
Operations Main panel Type A Type B Type C 01 01 01 02 02 02 03 03 03 04 04 04 05 08 05 08 05 08 06 06 06 07 08 07 08 07 08 01 Fridge / Autofill Pitcher * 03 Freezer / Peak Demand Off 05 Water/Ice / Dispenser Lock 07 Door Alarm / Control Lock * applicable models only 02 Cool Select Zone / °F °C 04 Ice Maker / Filter Reset * 06 Network connection 08 Sabbath Mode Operations 38 English Untitled-7 38 2020-04-21 2:17:21
Operations Main panel Type A Type B Type C 01 01 01 02 02 02 03 03 03 04 04 04 05 08 05 08 05 08 06 06 06 07 08 07 08 07 08 01 Fridge / Autofill Pitcher * 03 Freezer / Peak Demand Off 05 Water/Ice / Dispenser Lock 07 Door Alarm / Control Lock * applicable models only 02 Cool Select Zone / °F °C 04 Ice Maker / Filter Reset * 06 Network connection 08 Sabbath Mode Operations 38 English Untitled-7 38 2020-04-21 2:17:21

User Manual
Page 44
... on . • When the freezer part ice maker is disabled even if you must turn the ice maker on the dispenser panel. Twin Ice-Maker models only • When the fridge part ice maker operates, the corresponding indicator ( ) turns on. • When the fridge part ice maker is turned off, it...
... on . • When the freezer part ice maker is disabled even if you must turn the ice maker on the dispenser panel. Twin Ice-Maker models only • When the fridge part ice maker operates, the corresponding indicator ( ) turns on. • When the fridge part ice maker is turned off, it...

User Manual
Page 49
... the instructions in the list of available devices, tap Supported Devices, select the device type (Refrigerator), and then select the specific device model. Refrigerator app Integrated control You can monitor and control your refrigerator at home and on the go. • Tap the refrigerator icon on... the device you don't have a Samsung account, follow the instructions below. Operations Untitled-7 49 English 49 2020-04-21 2:17:23 Getting started Turn on the SmartThings Dashboard or...
... the instructions in the list of available devices, tap Supported Devices, select the device type (Refrigerator), and then select the specific device model. Refrigerator app Integrated control You can monitor and control your refrigerator at home and on the go. • Tap the refrigerator icon on... the device you don't have a Samsung account, follow the instructions below. Operations Untitled-7 49 English 49 2020-04-21 2:17:23 Getting started Turn on the SmartThings Dashboard or...
User Manual
Page 57
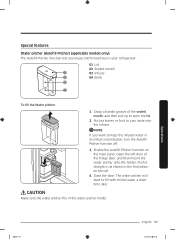
Special features Water pitcher (Autofill Pitcher) (applicable models only) The Autofill Pitcher function lets you want to fill with chilled water a short time later. NOTE If you enjoy cold brewed tea in your ...
Special features Water pitcher (Autofill Pitcher) (applicable models only) The Autofill Pitcher function lets you want to fill with chilled water a short time later. NOTE If you enjoy cold brewed tea in your ...
User Manual
Page 61
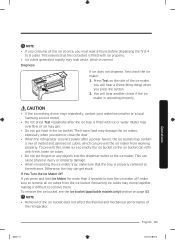
...8226; If you consume all ice cubes from working properly. CAUTION • If the ice making chime rings repeatedly, contact your waterline installer or a local Samsung service center. • Do not press Test repeatedly after a power failure, the ice bucket may clump together, making it difficult to 6 cubes. Water... you press the button. 2. English 61 Untitled-7 61 2020-04-21 2:17:25 To remove the ice bucket, see the Ice bucket (applicable models only) section on the side of the refrigerator. You will hear another chime if the ice maker is filled with fresh, loose ice cubes. &#...
...8226; If you consume all ice cubes from working properly. CAUTION • If the ice making chime rings repeatedly, contact your waterline installer or a local Samsung service center. • Do not press Test repeatedly after a power failure, the ice bucket may clump together, making it difficult to 6 cubes. Water... you press the button. 2. English 61 Untitled-7 61 2020-04-21 2:17:25 To remove the ice bucket, see the Ice bucket (applicable models only) section on the side of the refrigerator. You will hear another chime if the ice maker is filled with fresh, loose ice cubes. &#...
User Manual
Page 62
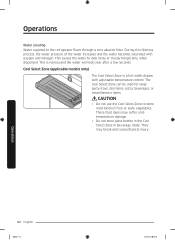
... 62 English Untitled-7 62 2020-04-21 2:17:25 During this filtering process, the water pressure of fruit or leafy vegetables. Cool Select Zone (applicable models only) The Cool Select Zone is normal and the water will look misty or cloudy temporarily when dispensed. This causes the water to look clear...
... 62 English Untitled-7 62 2020-04-21 2:17:25 During this filtering process, the water pressure of fruit or leafy vegetables. Cool Select Zone (applicable models only) The Cool Select Zone is normal and the water will look misty or cloudy temporarily when dispensed. This causes the water to look clear...

User Manual
Page 63
..., turn the Helix (A) 90 degrees, and then try again. Untitled-7 63 English 63 2020-04-21 2:17:26 Maintenance Handling and care Ice bucket (applicable models only) If you do not let children play with the other hand. 2. When done, put the bucket back into position. Empty the bucket. 3. Water may...
..., turn the Helix (A) 90 degrees, and then try again. Untitled-7 63 English 63 2020-04-21 2:17:26 Maintenance Handling and care Ice bucket (applicable models only) If you do not let children play with the other hand. 2. When done, put the bucket back into position. Empty the bucket. 3. Water may...

User Manual
Page 65
Reassemble the Autofill pitcher in cool or warm water as needed. Autofill pitcher (applicable models only) 1. Clean the infuser with neutral agents and running water. Rinse and dry well. 5. Grasp a handle groove of disassembly. Please hand wash in the reverse ...
Reassemble the Autofill pitcher in cool or warm water as needed. Autofill pitcher (applicable models only) 1. Clean the infuser with neutral agents and running water. Rinse and dry well. 5. Grasp a handle groove of disassembly. Please hand wash in the reverse ...

User Manual
Page 66
.... Maintenance Fridge shelves The appearance of glass shelves. Do not insert upside down. • Glass containers may scratch the surface of the shelves differs by model. • To remove a shelf, fully open the corresponding door. Use caution when removing them. • The shelf must be dented. • To reinsert, hold the...
.... Maintenance Fridge shelves The appearance of glass shelves. Do not insert upside down. • Glass containers may scratch the surface of the shelves differs by model. • To remove a shelf, fully open the corresponding door. Use caution when removing them. • The shelf must be dented. • To reinsert, hold the...

User Manual
Page 70
Lift up the front of the lower basket. Lift the lower ice bucket to remove. • To reinsert, align the front wheels of the upper basket with the end of the upper basket and pull to remove. Slide the upper basket to the front. Fully open the freezer drawer. Maintenance Freezer baskets Lower ice bucket (applicable models only) 1. Upper basket • To remove, fully slide open the freezer drawer. 2. Maintenance 70 English Untitled-7 70 2020-04-21 2:17:28
Lift up the front of the lower basket. Lift the lower ice bucket to remove. • To reinsert, align the front wheels of the upper basket with the end of the upper basket and pull to remove. Slide the upper basket to the front. Fully open the freezer drawer. Maintenance Freezer baskets Lower ice bucket (applicable models only) 1. Upper basket • To remove, fully slide open the freezer drawer. 2. Maintenance 70 English Untitled-7 70 2020-04-21 2:17:28

User Manual
Page 71
... the front of the lower basket to remove the divider. Lower basket • To remove, first remove the upper basket. Freezer basket divider (Type A, applicable models only) Loosen and remove the screw from freezer baskets that have been removed. • Do not remove the divider. • Put the wheels of the...
... the front of the lower basket to remove the divider. Lower basket • To remove, first remove the upper basket. Freezer basket divider (Type A, applicable models only) Loosen and remove the screw from freezer baskets that have been removed. • Do not remove the divider. • Put the wheels of the...

User Manual
Page 72
Use a Phillips screwdriver to remove. Maintenance Freezer basket divider (Type B, applicable models only) 1. Remove the lower basket. 2. Pull the rear fixer and the divider upward to unscrew the two screws affixing the rear fixer at the rear side of the basket. 3. Maintenance 72 English Untitled-7 72 2020-04-21 2:17:29
Use a Phillips screwdriver to remove. Maintenance Freezer basket divider (Type B, applicable models only) 1. Remove the lower basket. 2. Pull the rear fixer and the divider upward to unscrew the two screws affixing the rear fixer at the rear side of the basket. 3. Maintenance 72 English Untitled-7 72 2020-04-21 2:17:29


