

User Manual
Page 3
Contents Troubleshooting 77 General 77 Do you hear abnormal sounds from the refrigerator? 81 SmartThings 83 Smart Grid (applicable models only) 84 LIMITED WARRANTY (U.S.A.) 85 SAMSUNG REFRIGERATOR 85 Warranty Information (CANADA) 88 If your refrigerator needs service 88 Limited Warranty for Original Purchaser 88 Obligation to the Original Owner 89 Exclusions of the Warranty 89 Regulatory Notice 90 FCC Notice 90 IC Notice 91 Open Source Announcement 92 Untitled-1 3 English 3 2020-04-21 12:38:01
Contents Troubleshooting 77 General 77 Do you hear abnormal sounds from the refrigerator? 81 SmartThings 83 Smart Grid (applicable models only) 84 LIMITED WARRANTY (U.S.A.) 85 SAMSUNG REFRIGERATOR 85 Warranty Information (CANADA) 88 If your refrigerator needs service 88 Limited Warranty for Original Purchaser 88 Obligation to the Original Owner 89 Exclusions of the Warranty 89 Regulatory Notice 90 FCC Notice 90 IC Notice 91 Open Source Announcement 92 Untitled-1 3 English 3 2020-04-21 12:38:01

User Manual
Page 4
...an extension cord, use of the extension cord should be AC 115-120 V, 10 A, or more. Safety information Safety information Before using your new Samsung Refrigerator, please read this manual. • If you have been given supervision or instruction concerning use by a person responsible for use of the ...appliance by persons (including children) with the appliance. • Because the following instructions cover various models, the characteristics of your refrigerator may result in a risk of the pipes could ignite or cause an eye injury.
...an extension cord, use of the extension cord should be AC 115-120 V, 10 A, or more. Safety information Safety information Before using your new Samsung Refrigerator, please read this manual. • If you have been given supervision or instruction concerning use by a person responsible for use of the ...appliance by persons (including children) with the appliance. • Because the following instructions cover various models, the characteristics of your refrigerator may result in a risk of the pipes could ignite or cause an eye injury.

User Manual
Page 16
... performed by a qualified technician. • Dispose of this refrigerator and to ensure a proper installation of the product packaging material in this manual, depending on the model and the country. Installation Installation Follow these instructions carefully to prevent accidents before servicing or replacing parts.
... performed by a qualified technician. • Dispose of this refrigerator and to ensure a proper installation of the product packaging material in this manual, depending on the model and the country. Installation Installation Follow these instructions carefully to prevent accidents before servicing or replacing parts.

User Manual
Page 17
Installation Type B 01 02 04 05 06 01 Auto Ice Maker 03 Autofill Pitcher * 05 FlexZone™ 07 Door bins 09 Water filter * applicable models only 07 08 09 02 Slide in shelf 04 Main panel (on the FlexZone™ handle) 06 Freezer 08 Slide in shelf Untitled-1 17 English 17 2020-04-21 12:38:03
Installation Type B 01 02 04 05 06 01 Auto Ice Maker 03 Autofill Pitcher * 05 FlexZone™ 07 Door bins 09 Water filter * applicable models only 07 08 09 02 Slide in shelf 04 Main panel (on the FlexZone™ handle) 06 Freezer 08 Slide in shelf Untitled-1 17 English 17 2020-04-21 12:38:03

User Manual
Page 19
... the door to a fixed wall, you must provide a minimum clearance of your refrigerator. Clearance See the pictures and table below for space requirements for installation. B A E C Model RF22* / RF24* Depth "A" 28 5/8" (726 mm) Width "B" 35 6/8" (908 mm) Height "C" 68 7/8" (1749 mm) D Overall Height "D" 70" (1777 mm) Depth "E" 31" (788 mm) Untitled-1 19...
... the door to a fixed wall, you must provide a minimum clearance of your refrigerator. Clearance See the pictures and table below for space requirements for installation. B A E C Model RF22* / RF24* Depth "A" 28 5/8" (726 mm) Width "B" 35 6/8" (908 mm) Height "C" 68 7/8" (1749 mm) D Overall Height "D" 70" (1777 mm) Depth "E" 31" (788 mm) Untitled-1 19...

User Manual
Page 20
Installation 20 English Untitled-1 20 2020-04-21 12:38:04 Installation 01 04 02 02 03 05 07 06 08 09 10 Model 01 02 03 04 05 06 07 08 09 10 RF22* / RF24* 2" (50 mm) 125° 62 1/8" (1578 mm) 13 2/8" (335 mm) 35 6/8" (908 mm) 24" (610 mm) 4 6/8" (122 mm) 2 3/8" (61 mm) 42 6/8" (1088 mm) 44 1/4" (1125 mm) NOTE The measurements in the table above may differ slightly from the actual measurements, depending on the measuring and rounding method.
Installation 20 English Untitled-1 20 2020-04-21 12:38:04 Installation 01 04 02 02 03 05 07 06 08 09 10 Model 01 02 03 04 05 06 07 08 09 10 RF22* / RF24* 2" (50 mm) 125° 62 1/8" (1578 mm) 13 2/8" (335 mm) 35 6/8" (908 mm) 24" (610 mm) 4 6/8" (122 mm) 2 3/8" (61 mm) 42 6/8" (1088 mm) 44 1/4" (1125 mm) NOTE The measurements in the table above may differ slightly from the actual measurements, depending on the measuring and rounding method.

User Manual
Page 25
.... • Make sure the refrigerator is off before disconnecting the connectors. 2. Gently draw up the clamp to remove one of the connectors differs with the model. To prevent finger injuries, do not apply a sudden force to drop the clamp on the right door. NOTE Be careful not to the clamp. 3. Otherwise...
.... • Make sure the refrigerator is off before disconnecting the connectors. 2. Gently draw up the clamp to remove one of the connectors differs with the model. To prevent finger injuries, do not apply a sudden force to drop the clamp on the right door. NOTE Be careful not to the clamp. 3. Otherwise...

User Manual
Page 33
... screwdriver, attach the handle screws to the refrigerator, two for each other. • The freezer handle must be attached so that the holes on your model. NOTE The design of one handle onto the lower handle screw. STEP 6 Attach the handles CAUTION The refrigerator handles must be oriented in the correct...
... screwdriver, attach the handle screws to the refrigerator, two for each other. • The freezer handle must be attached so that the holes on your model. NOTE The design of one handle onto the lower handle screw. STEP 6 Attach the handles CAUTION The refrigerator handles must be oriented in the correct...

User Manual
Page 40
Operations Main panel Type A Type B 01 01 02 02 03 03 04 04 05 08 05 08 06 06 07 08 07 08 01 Fridge / Autofill Pitcher * 03 Freezer / Peak Demand Off 05 Water/Ice / Dispenser Lock 07 Door Alarm / Control Lock * applicable models only 02 FlexZone™ / °F °C 04 Ice Maker / Filter Reset 06 Network connection 08 Sabbath Mode Operations 40 English Untitled-1 40 2020-04-21 12:38:11
Operations Main panel Type A Type B 01 01 02 02 03 03 04 04 05 08 05 08 06 06 07 08 07 08 01 Fridge / Autofill Pitcher * 03 Freezer / Peak Demand Off 05 Water/Ice / Dispenser Lock 07 Door Alarm / Control Lock * applicable models only 02 FlexZone™ / °F °C 04 Ice Maker / Filter Reset 06 Network connection 08 Sabbath Mode Operations 40 English Untitled-1 40 2020-04-21 12:38:11

User Manual
Page 51
... Some options or settings of available devices, tap Supported Devices, select the device type (Refrigerator), and then select the specific device model. Samsung account You are required to register your Samsung account to open the SmartThings app on the SmartThings Dashboard or tap the Devices icon at home and on the go. •...
... Some options or settings of available devices, tap Supported Devices, select the device type (Refrigerator), and then select the specific device model. Samsung account You are required to register your Samsung account to open the SmartThings app on the SmartThings Dashboard or tap the Devices icon at home and on the go. •...

User Manual
Page 59
... left . 4. CAUTION Make sure the water pitcher fits in its initial concentration, turn the Autofill Pitcher function off. 3. Special features Water pitcher (Autofill Pitcher) (applicable models only) The Autofill Pitcher function lets you want to fill with chilled water a short time later. Grasp a handle groove of the fridge door, and then...
... left . 4. CAUTION Make sure the water pitcher fits in its initial concentration, turn the Autofill Pitcher function off. 3. Special features Water pitcher (Autofill Pitcher) (applicable models only) The Autofill Pitcher function lets you want to fill with chilled water a short time later. Grasp a handle groove of the fridge door, and then...

User Manual
Page 63
...which is filled with ice properly. • Ice cubes generated rapidly may clump together, making chime rings repeatedly, contact your waterline installer or a local Samsung service center. • Do not press Test repeatedly after a power failure, the ice bucket may jam. • Do not put fingers or any ... first 4 to empty the ice bucket so the ice bucket can get stuck. To remove the ice bucket, see the Ice bucket (applicable models only) section on the side of the refrigerator. Operations NOTE • If you consume all ice cubes from working properly. This ensures that ...
...which is filled with ice properly. • Ice cubes generated rapidly may clump together, making chime rings repeatedly, contact your waterline installer or a local Samsung service center. • Do not press Test repeatedly after a power failure, the ice bucket may jam. • Do not put fingers or any ... first 4 to empty the ice bucket so the ice bucket can get stuck. To remove the ice bucket, see the Ice bucket (applicable models only) section on the side of the refrigerator. Operations NOTE • If you consume all ice cubes from working properly. This ensures that ...

User Manual
Page 65
Maintenance Handling and care Ice bucket (applicable models only) If you do not let children play with the other hand. 2. Empty the bucket. 3. Maintenance A CAUTION • Do not apply excessive force to clean ...
Maintenance Handling and care Ice bucket (applicable models only) If you do not let children play with the other hand. 2. Empty the bucket. 3. Maintenance A CAUTION • Do not apply excessive force to clean ...

User Manual
Page 67
... can melt or deform if exposed to heat (including hot water). Please hand wash in the reverse order of the sealed mouth. 4. Autofill pitcher (applicable models only) 1. While slightly twisting the infuser, pull it out of disassembly.
... can melt or deform if exposed to heat (including hot water). Please hand wash in the reverse order of the sealed mouth. 4. Autofill pitcher (applicable models only) 1. While slightly twisting the infuser, pull it out of disassembly.

User Manual
Page 68
... inserted correctly. Then, lower the shelf and insert the bottom shelf hook into the top shelf notch. The rear wall of the shelves differs by model. • To remove a shelf, fully open the corresponding door. Do not insert upside down. • Glass containers may scratch the surface of the shelf, and...
... inserted correctly. Then, lower the shelf and insert the bottom shelf hook into the top shelf notch. The rear wall of the shelves differs by model. • To remove a shelf, fully open the corresponding door. Do not insert upside down. • Glass containers may scratch the surface of the shelf, and...
User Manual
Page 79
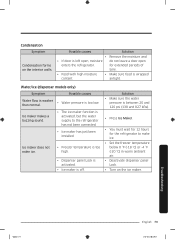
... 0 °F (-18 °C) or -4 °F (-20 °C) in warm ambient air. • Deactivate dispenser panel Lock. • Turn on the interior walls. Water/ice (dispenser models only) Symptom Possible causes Water flow is weaker than normal. • Water pressure is off. Solution • Make sure the water pressure is left open...
... 0 °F (-18 °C) or -4 °F (-20 °C) in warm ambient air. • Deactivate dispenser panel Lock. • Turn on the interior walls. Water/ice (dispenser models only) Symptom Possible causes Water flow is weaker than normal. • Water pressure is off. Solution • Make sure the water pressure is left open...

User Manual
Page 82
...:38:20 Cracking! HiSS! • As the refrigerator cools or freezes, refrigerant gas moves through sealed pipes, causing bubbling sounds. Troubleshooting • For ice maker models: When the water valve opens to fill the ice maker, you may hear a buzzing sound. • Due to pressure equalizing when you open and close...
...:38:20 Cracking! HiSS! • As the refrigerator cools or freezes, refrigerant gas moves through sealed pipes, causing bubbling sounds. Troubleshooting • For ice maker models: When the water valve opens to fill the ice maker, you may hear a buzzing sound. • Due to pressure equalizing when you open and close...

User Manual
Page 83
....0 or later, iPhone 6 or later, and is optimized for Samsung smartphones (Galaxy S and Galaxy Note series). • The SmartThings app is available for applicable models only. • The old Samsung Smart Refrigerator app cannot connect with Samsung Smart Home models. • You must log into your Samsung account to use the app. • Make sure that...
....0 or later, iPhone 6 or later, and is optimized for Samsung smartphones (Galaxy S and Galaxy Note series). • The SmartThings app is available for applicable models only. • The old Samsung Smart Refrigerator app cannot connect with Samsung Smart Home models. • You must log into your Samsung account to use the app. • Make sure that...

User Manual
Page 84
...working normally? Your electric company must have an EMS (Energy Management System) supporting SEP (Smart Energy profile). Troubleshooting Smart Grid (applicable models only) Symptom What Do I Need to the router (AP, Access Point), and then check if you need the following: Devices... • A wireless access point (router) • A Samsung Energy Management-supported refrigerator • A smartphone Registration • Connect your refrigerator to the AP (router). Checkpoints • Connect your smartphone to...
...working normally? Your electric company must have an EMS (Energy Management System) supporting SEP (Smart Energy profile). Troubleshooting Smart Grid (applicable models only) Symptom What Do I Need to the router (AP, Access Point), and then check if you need the following: Devices... • A wireless access point (router) • A Samsung Energy Management-supported refrigerator • A smartphone Registration • Connect your refrigerator to the AP (router). Checkpoints • Connect your smartphone to...

User Manual
Page 89
...warranty will automatically be retained by the customer and is the only acceptable proof of the customer. On all carry-in models, transportation to and from the Authorized Service Center is the responsibility of purchase. Customer adjustments which are rendered. This warranty ...is requested before warranty services are explained in Canada. SAMSUNG CUSTOMER CARE CENTER Samsung Electronics Canada Inc. 2050 Derry Road West Mississauga, Ontario L5N 0B9 Canada 1-800-SAMSUNG (726-7864) www.samsung.com/ca/support (English) www.samsung.com/ca_fr/support (French) Untitled-1 89 English 89...
...warranty will automatically be retained by the customer and is the only acceptable proof of the customer. On all carry-in models, transportation to and from the Authorized Service Center is the responsibility of purchase. Customer adjustments which are rendered. This warranty ...is requested before warranty services are explained in Canada. SAMSUNG CUSTOMER CARE CENTER Samsung Electronics Canada Inc. 2050 Derry Road West Mississauga, Ontario L5N 0B9 Canada 1-800-SAMSUNG (726-7864) www.samsung.com/ca/support (English) www.samsung.com/ca_fr/support (French) Untitled-1 89 English 89...


