User Manual
Page 9
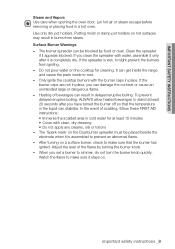
... placed beside the electrode when it is assembled to make sure it stays on the Dual burner spreader must be blocked by turning the burner knob. - Only ignite the cooktop burners with water, assemble it only after you set a burner to stand at least 10 minutes • Cover ... by food or dust. important safety instructions _9 To prevent delayed eruptive boiling, ALWAYS allow heated beverages to simmer, do not turn the burner knob quickly. Watch the flame to rust. - important safety instructions Steam and Vapors Use care when opening the oven door. Use only dry pot holders...
... placed beside the electrode when it is assembled to make sure it stays on the Dual burner spreader must be blocked by turning the burner knob. - Only ignite the cooktop burners with water, assemble it only after you set a burner to stand at least 10 minutes • Cover ... by food or dust. important safety instructions _9 To prevent delayed eruptive boiling, ALWAYS allow heated beverages to simmer, do not turn the burner knob quickly. Watch the flame to rust. - important safety instructions Steam and Vapors Use care when opening the oven door. Use only dry pot holders...
User Manual
Page 14
...range can be hazardous. This will save cleaning time and prevent hazardous accumulations of -range cooking. They could ignite and burn you keep the knob in contact with hot surfaces. Using pots or pans larger than the grate on . Never leave the surface burners unattended at HIGH flame settings.... Select cookware having flat bottoms large enough to Off and wait until the gas already emitted has dissipated. If ignition fails, turn the knob to cover the burner grates. Keep pot holders away from the range when frying. When using glass cookware, make sure it does not ...
...range can be hazardous. This will save cleaning time and prevent hazardous accumulations of -range cooking. They could ignite and burn you keep the knob in contact with hot surfaces. Using pots or pans larger than the grate on . Never leave the surface burners unattended at HIGH flame settings.... Select cookware having flat bottoms large enough to Off and wait until the gas already emitted has dissipated. If ignition fails, turn the knob to cover the burner grates. Keep pot holders away from the range when frying. When using glass cookware, make sure it does not ...

User Manual
Page 16
... buildup. Do not use the oven for use aluminum foil or foil liners anywhere in gas ovens. Stored items can damage the surface burner control knobs and even the kitchen counter. Trim excess fat from the range when opening the door of a hot oven. If a grease fire should be damaged or...
... buildup. Do not use the oven for use aluminum foil or foil liners anywhere in gas ovens. Stored items can damage the surface burner control knobs and even the kitchen counter. Trim excess fat from the range when opening the door of a hot oven. If a grease fire should be damaged or...
User Manual
Page 19
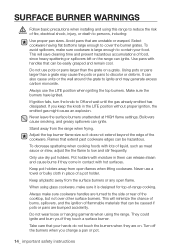
... WARRANTY 82 20 Overview 22 Lighting a gas surface burner 22 Manually lighting a gas surface burner 22 Flame size selection 23 Gas surface burners and control knobs 24 Cookware usage 24 Center burner grate 25 Wok grate 26 Using the griddle 28 Oven control panels and displays 31 Setting the clock 32...
... WARRANTY 82 20 Overview 22 Lighting a gas surface burner 22 Manually lighting a gas surface burner 22 Flame size selection 23 Gas surface burners and control knobs 24 Cookware usage 24 Center burner grate 25 Wok grate 26 Using the griddle 28 Oven control panels and displays 31 Setting the clock 32...

User Manual
Page 20
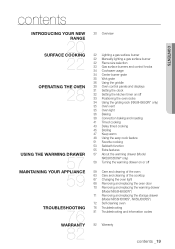
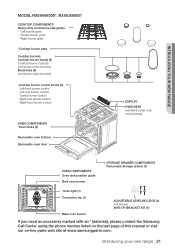
... burners Cooktop burner heads (5) Cooktop burner cups (5) (not shown under burners) Electrodes (5) (not shown under burners) Flat surface Concave line Common use * Cooktop burner control knobs (5) - Center burner control - Left-rear burner control - introducing your new range Right-rear burner control - Left-front burner control -
... burners Cooktop burner heads (5) Cooktop burner cups (5) (not shown under burners) Electrodes (5) (not shown under burners) Flat surface Concave line Common use * Cooktop burner control knobs (5) - Center burner control - Left-rear burner control - introducing your new range Right-rear burner control - Left-front burner control -
User Manual
Page 21
... oven burner ADJUSTABLE LEVELING LEGS (4) (not shown) ANTI-TIP BRACKET KIT (1) If you need an accessory marked with an * (asterisk), please contact the Samsung Call Center using the phone number listed on the last page of this manual or visit our on-line parts web site at www.samsungparts... Right-front burner control OVEN COMPONENTS *Oven racks (2) Removable oven bottom Removable oven door DISPLAY OVEN VENT (centered under burners) *Cooktop burner control knobs (5) - Center burner control - Right-rear burner control - introducing your new range _21 Left-front burner control -
... oven burner ADJUSTABLE LEVELING LEGS (4) (not shown) ANTI-TIP BRACKET KIT (1) If you need an accessory marked with an * (asterisk), please contact the Samsung Call Center using the phone number listed on the last page of this manual or visit our on-line parts web site at www.samsungparts... Right-front burner control OVEN COMPONENTS *Oven racks (2) Removable oven bottom Removable oven door DISPLAY OVEN VENT (centered under burners) *Cooktop burner control knobs (5) - Center burner control - Right-rear burner control - introducing your new range _21 Left-front burner control -

User Manual
Page 22
...the desired setting. The flames should always stay under the cookware. Always watch the flames when adjusting the heat setting with the control knob(s). surface cooking BEFORE USING THE SURFACE BURNERS, make sure to follow all surface burners are positioned and assembled properly. 1. LIGHTING A ... caution when manually lighting a surface burner. 1. The flames should always match the size of the surface burner and turn the control knob to the LITE position. FLAME SIZE SELECTION Flames larger than the bottom of the cookware will hear a "clicking" sound indicating the electronic...
...the desired setting. The flames should always stay under the cookware. Always watch the flames when adjusting the heat setting with the control knob(s). surface cooking BEFORE USING THE SURFACE BURNERS, make sure to follow all surface burners are positioned and assembled properly. 1. LIGHTING A ... caution when manually lighting a surface burner. 1. The flames should always match the size of the surface burner and turn the control knob to the LITE position. FLAME SIZE SELECTION Flames larger than the bottom of the cookware will hear a "clicking" sound indicating the electronic...
User Manual
Page 23
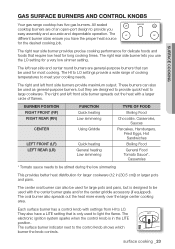
... but they are of cooking temperatures to be used for larger cookware (12 in the LITE position. Each surface burner has a control knob with the center burner grate and/or the center griddle accessory (if equipped). The surface burner indicator next to light the flame. The... center oval burner can also be used to the control knob shows which burner the knob controls. The right rear side burner provides precise cooking performance for delicate foods and foods that can be stirred during the...
... but they are of cooking temperatures to be used for larger cookware (12 in the LITE position. Each surface burner has a control knob with the center burner grate and/or the center griddle accessory (if equipped). The surface burner indicator next to light the flame. The... center oval burner can also be used to the control knob shows which burner the knob controls. The right rear side burner provides precise cooking performance for delicate foods and foods that can be stirred during the...

User Manual
Page 63
... WARNING control panel. maintaining your appliance _63 Pull the control knobs straight off the surface burner control valve stems. Do not clean the control knobs in death, personal injury, or product damage. 4. Replace the control knobs in the OFF position by pushing them straight onto the control... Surface burner controls 1. See page 55. 5. Do not use spray cleaners on a damp, soft cloth. Clean the control knobs in the OFF position. 2. Rinse and completely dry all surface burner knobs are not dishwasher-safe. 3. Make sure all surfaces (including back and stem hole).
... WARNING control panel. maintaining your appliance _63 Pull the control knobs straight off the surface burner control valve stems. Do not clean the control knobs in death, personal injury, or product damage. 4. Replace the control knobs in the OFF position by pushing them straight onto the control... Surface burner controls 1. See page 55. 5. Do not use spray cleaners on a damp, soft cloth. Clean the control knobs in the OFF position. 2. Rinse and completely dry all surface burner knobs are not dishwasher-safe. 3. Make sure all surfaces (including back and stem hole).

User Manual
Page 65
maintaining your appliance The caps on top of the range cooktop. 10. maintaining your appliance _65 Replace burner grates on Precise simmer burner (RR) and inside Double-ring Burner (RF) can be interchangeably used. Precise Simmer Burner (RR) Flat surface Concave line 9. Push in and turn each surface burner control knob to the LITE position, let each burner light, and then set each control knob back to a burner setting to make sure each burner operates properly.
maintaining your appliance The caps on top of the range cooktop. 10. maintaining your appliance _65 Replace burner grates on Precise simmer burner (RR) and inside Double-ring Burner (RF) can be interchangeably used. Precise Simmer Burner (RR) Flat surface Concave line 9. Push in and turn each surface burner control knob to the LITE position, let each burner light, and then set each control knob back to a burner setting to make sure each burner operates properly.

User Manual
Page 76
... level. Check and level the range. (See the Installation Instructions.) The kitchen cabinets are square and provide sufficient room for at 1-800-SAMSUNG (1800-726-7864). Press the OFF/CLEAR pad and restart the oven. Make sure the electrical plug is electrical and could ignite the.... PROBLEM You smell gas. It is plugged into the electrical outlet. Replace the fuse or reset the circuit breaker. The surface burner knob is not plugged into a live, properly grounded outlet. If you cannot reach your gas supplier from your range. 76_ troubleshooting See the...
... level. Check and level the range. (See the Installation Instructions.) The kitchen cabinets are square and provide sufficient room for at 1-800-SAMSUNG (1800-726-7864). Press the OFF/CLEAR pad and restart the oven. Make sure the electrical plug is electrical and could ignite the.... PROBLEM You smell gas. It is plugged into the electrical outlet. Replace the fuse or reset the circuit breaker. The surface burner knob is not plugged into a live, properly grounded outlet. If you cannot reach your gas supplier from your range. 76_ troubleshooting See the...
User Manual
Page 77
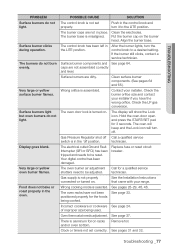
... Surface burner components and See page 64. The oven door lock is not set correctly. The display will turn the control knob to be reset. technician. technician. The oven racks have the wrong orifice. Oven thermostat needs adjustment. Surface burner clicks during... operation. Display goes blank. POSSIBLE CAUSE SOLUTION The control knob is turned on the burner head. The burner base is selected. Align the burner base. After the burner lights, turn off...
... Surface burner components and See page 64. The oven door lock is not set correctly. The display will turn the control knob to be reset. technician. technician. The oven racks have the wrong orifice. Oven thermostat needs adjustment. Surface burner clicks during... operation. Display goes blank. POSSIBLE CAUSE SOLUTION The control knob is turned on the burner head. The burner base is selected. Align the burner base. After the burner lights, turn off...


