
User Manual
Page 1
Installation_DD81-02034B-020_EN.indd 1 2/51/0/82/0210717 101:05:5:55:454AAMM If you for use by qualified installers. DW80K7050 Series DW80K5050 Series DW80R5060 Series DW80R5061 Series Dishwasher installation guide STOP These installation instructions are having problems installing this dishwasher Please call : 1-800-SAMSUNG (726-7864) for assistance : www.samsung.com imagine the possibilities Thank you are intended for purchasing this Samsung product.
Installation_DD81-02034B-020_EN.indd 1 2/51/0/82/0210717 101:05:5:55:454AAMM If you for use by qualified installers. DW80K7050 Series DW80K5050 Series DW80R5060 Series DW80R5061 Series Dishwasher installation guide STOP These installation instructions are having problems installing this dishwasher Please call : 1-800-SAMSUNG (726-7864) for assistance : www.samsung.com imagine the possibilities Thank you are intended for purchasing this Samsung product.

User Manual
Page 2
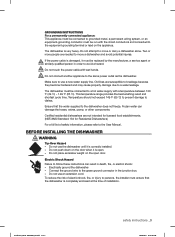
... Make sure the machine is not liable for help. Keep the dishwasher away from improper use common sense, caution, and care when installing, maintaining, and operating the dishwasher. Read all possible conditions and situations that follow them explicitly. The dishwasher must be properly grounded. ...All wiring and grounding must be done in a safe place for future reference. Samsung is grounded to switch off your new unit, make sure to prevent electric shock. Do not connect the dishwasher until you and ...
... Make sure the machine is not liable for help. Keep the dishwasher away from improper use common sense, caution, and care when installing, maintaining, and operating the dishwasher. Read all possible conditions and situations that follow them explicitly. The dishwasher must be properly grounded. ...All wiring and grounding must be done in a safe place for future reference. Samsung is grounded to switch off your new unit, make sure to prevent electric shock. Do not connect the dishwasher until you and ...
User Manual
Page 3
... For a full list of safety information, please refer to dishes. BEFORE INSTALLING THE DISHWASHER WARNING WARNING Tip-Over Hazard - To reduce the risk of installation. Ensure that the water supplied to persons, the installer must ensure that the dishwasher is open door. Electrically ground the dishwasher ...-grounding conductor must be run with a temperature between 120 ˚F (49 ˚C) ~ 149 °F (65 ˚C). The dishwasher is correctly installed. - Do not attempt to the green ground connector in death, fire, or electric shock: - Do not push down on the appliance. ...
... For a full list of safety information, please refer to dishes. BEFORE INSTALLING THE DISHWASHER WARNING WARNING Tip-Over Hazard - To reduce the risk of installation. Ensure that the water supplied to persons, the installer must ensure that the dishwasher is open door. Electrically ground the dishwasher ...-grounding conductor must be run with a temperature between 120 ˚F (49 ˚C) ~ 149 °F (65 ˚C). The dishwasher is correctly installed. - Do not attempt to the green ground connector in death, fire, or electric shock: - Do not push down on the appliance. ...
User Manual
Page 4
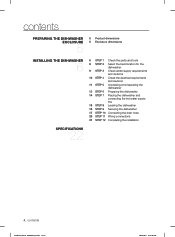
contents PREPARING THE DISHWASHER ENCLOSURE 5 5 Product dimensions 5 Enclosure dimensions INSTALLING THE DISHWASHER 6 6 STEP 1 Check the parts and tools 8 STEP 2 Select the best location for the dishwasher 9 STEP 3 Check water supply requirements and cautions 10 STEP 4 ... 8 Leveling the dishwasher 16 STEP 9 Securing the dishwasher 17 STEP 10 Connecting the drain hose 20 STEP 11 Wiring connections 21 STEP 12 Completing the installation SPECIFICATIONS 22 4_ contents Installation_DD81-02034B-020_EN.indd Sec2:4 2/51/0/82/0210617 101:05:65:60:00AAMM
contents PREPARING THE DISHWASHER ENCLOSURE 5 5 Product dimensions 5 Enclosure dimensions INSTALLING THE DISHWASHER 6 6 STEP 1 Check the parts and tools 8 STEP 2 Select the best location for the dishwasher 9 STEP 3 Check water supply requirements and cautions 10 STEP 4 ... 8 Leveling the dishwasher 16 STEP 9 Securing the dishwasher 17 STEP 10 Connecting the drain hose 20 STEP 11 Wiring connections 21 STEP 12 Completing the installation SPECIFICATIONS 22 4_ contents Installation_DD81-02034B-020_EN.indd Sec2:4 2/51/0/82/0210617 101:05:65:60:00AAMM
User Manual
Page 5
...) minimum 34 ⅛" (867 mm) minimum preparing the dishwasher enclosure _5 Installation_DD81-02034B-020_EN.indd Sec5:5 2/51/0/82/0210617 101:05:65:60:00AAMM The installation enclosure must be at least 25 inches deep. 2 ⅓" (60 mm) 23 7⁄8" (605 mm) The water supply line, power cable and drain hose should...
...) minimum 34 ⅛" (867 mm) minimum preparing the dishwasher enclosure _5 Installation_DD81-02034B-020_EN.indd Sec5:5 2/51/0/82/0210617 101:05:65:60:00AAMM The installation enclosure must be at least 25 inches deep. 2 ⅓" (60 mm) 23 7⁄8" (605 mm) The water supply line, power cable and drain hose should...
User Manual
Page 6
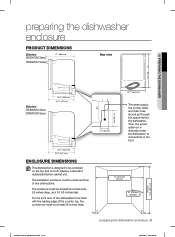
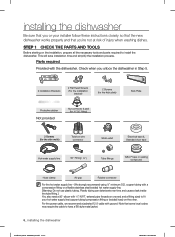
...steel braided hot water supply line. [Warning: Do not use plastic tubing. Check when you unbox the dishwasher in Step 5. 2 Installation Brackets 2 Flat Head Screws (For the installation bracket) 2 Screws (for the kick plate) Protective sticker Not provided Nut connector & seal (for ¾" 90° fi...tting.] You also need a 90° elbow with ground. Note that some local codes may require the cable to fit your installer follow these instructions closely so that the new dishwasher works properly and that you or your hot water supply line (copper tubing/compression &#...
...steel braided hot water supply line. [Warning: Do not use plastic tubing. Check when you unbox the dishwasher in Step 5. 2 Installation Brackets 2 Flat Head Screws (For the installation bracket) 2 Screws (for the kick plate) Protective sticker Not provided Nut connector & seal (for ¾" 90° fi...tting.] You also need a 90° elbow with ground. Note that some local codes may require the cable to fit your installer follow these instructions closely so that the new dishwasher works properly and that you or your hot water supply line (copper tubing/compression &#...
User Manual
Page 7
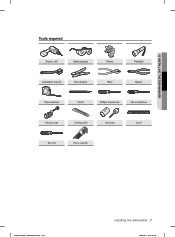
02 INSTALLING THE DISHWASHER Tools required Electric drill Safety glasses Gloves Flashlight Adjustable wrench Wire stripper Pliers Nipper Tape measure Pencil Phillips screwdriver Flat screwdriver Tubing cutter Cutting knife Hole saw Level Torx t20 Hex L-wrench Installation_DD81-02034B-020_EN.indd Sec3:7 installing the dishwasher _7 2/51/0/82/0210617 101:05:65:60:101AAMM
02 INSTALLING THE DISHWASHER Tools required Electric drill Safety glasses Gloves Flashlight Adjustable wrench Wire stripper Pliers Nipper Tape measure Pencil Phillips screwdriver Flat screwdriver Tubing cutter Cutting knife Hole saw Level Torx t20 Hex L-wrench Installation_DD81-02034B-020_EN.indd Sec3:7 installing the dishwasher _7 2/51/0/82/0210617 101:05:65:60:101AAMM
User Manual
Page 8
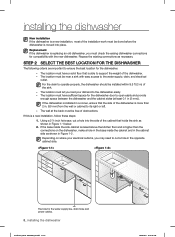
...of the dishwasher is more than the connections on where your dishes into the dishwasher easily. - If the dishwasher is installed in Figure 1-1 below. 2. The location must be installed within 9.8 ft (3 m) of the sink. - STEP 2 SELECT THE BEST LOCATION FOR THE DISHWASHER The following ...line, drain hose and power cables. 8_ installing the dishwasher Installation_DD81-02034B-020_EN.indd Sec3:8 2/51/0/82/0210617 101:05:65:60:202AAMM installing the dishwasher New installation If the dishwasher is a new installation, most of the installation work must let you load your electrical outlet ...
...of the dishwasher is more than the connections on where your dishes into the dishwasher easily. - If the dishwasher is installed in Figure 1-1 below. 2. The location must be installed within 9.8 ft (3 m) of the sink. - STEP 2 SELECT THE BEST LOCATION FOR THE DISHWASHER The following ...line, drain hose and power cables. 8_ installing the dishwasher Installation_DD81-02034B-020_EN.indd Sec3:8 2/51/0/82/0210617 101:05:65:60:202AAMM installing the dishwasher New installation If the dishwasher is a new installation, most of the installation work must let you load your electrical outlet ...
User Manual
Page 9
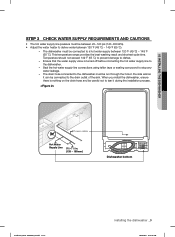
... Hot Water Supply Line 5¹⁄3~7¹⁄3 in the side wall so it can be careful not to tear it during the installation process. Ensure that the water supply valve is nothing on tape or sealing compound to dishes. - This temperature range provides the best washing...140~830 kPa). • Adjust the water heater to deliver water between 120 ˚F (49 ˚C) ~ 149 ˚F (65 ˚C). 02 INSTALLING THE DISHWASHER STEP 3 CHECK WATER SUPPLY REQUIREMENTS AND CAUTIONS • The hot water supply line pressure must be connected to a hot water supply between 120...
... Hot Water Supply Line 5¹⁄3~7¹⁄3 in the side wall so it can be careful not to tear it during the installation process. Ensure that the water supply valve is nothing on tape or sealing compound to dishes. - This temperature range provides the best washing...140~830 kPa). • Adjust the water heater to deliver water between 120 ˚F (49 ˚C) ~ 149 ˚F (65 ˚C). 02 INSTALLING THE DISHWASHER STEP 3 CHECK WATER SUPPLY REQUIREMENTS AND CAUTIONS • The hot water supply line pressure must be connected to a hot water supply between 120...
User Manual
Page 10
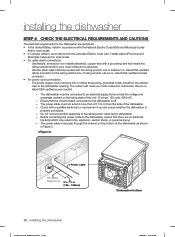
.... - Ensure that provides the voltage and amperage marked on the bottom of the dishwasher as shown in . (135 ~ 185mm) 10_ installing the dishwasher Installation_DD81-02034B-02_EN.indd Sec3:10 Dishwasher bottom 2/51/0/82/0210617 101:05:65:60:303AAMM Before connecting the power cable to ... accordance with the National Electric Code/State and Municipal codes and/or local codes. • In Canada, install in accordance with the wiring junction box or install a U.L.-listed/CSA-certified clamp connector to the wiring junction box. Power cable Hot Water Supply Line 5¹⁄3~7¹...
.... - Ensure that provides the voltage and amperage marked on the bottom of the dishwasher as shown in . (135 ~ 185mm) 10_ installing the dishwasher Installation_DD81-02034B-02_EN.indd Sec3:10 Dishwasher bottom 2/51/0/82/0210617 101:05:65:60:303AAMM Before connecting the power cable to ... accordance with the National Electric Code/State and Municipal codes and/or local codes. • In Canada, install in accordance with the wiring junction box or install a U.L.-listed/CSA-certified clamp connector to the wiring junction box. Power cable Hot Water Supply Line 5¹⁄3~7¹...

User Manual
Page 11
... the bag that it on the floor. 4. Check the dishwasher's feet to ensure they are intact and secure. 4. Inspecting Mechanical 1. 02 INSTALLING THE DISHWASHER STEP 5 UNPACKING AND INSPECTING THE DISHWASHER Unbox the dishwasher in an open area free of the kick plate is put inside the felt...is attached to ensure that protects the dishwasher during shipping. To prevent the kick plate from the carton tray, and then place it is installed. 9. Check the plastic base assembly to the right side of the dishwasher. ※ The upper side of obstruction both around the ...
... the bag that it on the floor. 4. Check the dishwasher's feet to ensure they are intact and secure. 4. Inspecting Mechanical 1. 02 INSTALLING THE DISHWASHER STEP 5 UNPACKING AND INSPECTING THE DISHWASHER Unbox the dishwasher in an open area free of the kick plate is put inside the felt...is attached to ensure that protects the dishwasher during shipping. To prevent the kick plate from the carton tray, and then place it is installed. 9. Check the plastic base assembly to the right side of the dishwasher. ※ The upper side of obstruction both around the ...
User Manual
Page 12
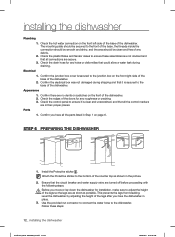
... a water leak during shipping and that it is clear and unscratched, and that all connections are no dents or scratches on page 6. Electrical 1. Install the Protective sticker 3 . Ensure that all the control markers are in the picture. 2. Level the dishwasher by adjusting the height of the legs ...and Sensor cases to the base of the dishwasher. Confirm the junction box cover is secured to ensure these steps: 12_ installing the dishwasher Installation_DD81-02034B-020_EN.indd Sec3:12 2/51/0/82/0210617 101:05:65:60:303AAMM Check the control panel to ensure it is...
... a water leak during shipping and that it is clear and unscratched, and that all connections are no dents or scratches on page 6. Electrical 1. Install the Protective sticker 3 . Ensure that all the control markers are in the picture. 2. Level the dishwasher by adjusting the height of the legs ...and Sensor cases to the base of the dishwasher. Confirm the junction box cover is secured to ensure these steps: 12_ installing the dishwasher Installation_DD81-02034B-020_EN.indd Sec3:12 2/51/0/82/0210617 101:05:65:60:303AAMM Check the control panel to ensure it is...
User Manual
Page 13
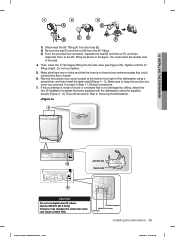
...Wiring Connections. 7. They will be used in Step 9, Securing the Dishwasher. Hot Water Supply Line Elbow( 3/4" (9.5 mm)) Inlet valve installing the dishwasher _13 Installation_DD81-02034B-02_EN.indd Sec3:13 2/51/0/82/0210617 101:05:65:60:303AAMM Remove the junction box cover located at any... right of water. 6. You must insert the smaller side of wood or a material that were supplied with the dishwasher using a screwdriver, and then Install the strain relief (Figure 4 - A Junction box C Strain relief B CAUTION Do not overtighten the 90˚ elbow. (Below 280 lb·...
...Wiring Connections. 7. They will be used in Step 9, Securing the Dishwasher. Hot Water Supply Line Elbow( 3/4" (9.5 mm)) Inlet valve installing the dishwasher _13 Installation_DD81-02034B-02_EN.indd Sec3:13 2/51/0/82/0210617 101:05:65:60:303AAMM Remove the junction box cover located at any... right of water. 6. You must insert the smaller side of wood or a material that were supplied with the dishwasher using a screwdriver, and then Install the strain relief (Figure 4 - A Junction box C Strain relief B CAUTION Do not overtighten the 90˚ elbow. (Below 280 lb·...

User Manual
Page 14
...sure the hot water supply line is in (31.6 N·m)) Doing so may damage the water inlet valve and cause a water leak. 14_ installing the dishwasher Installation_DD81-02034B-02_EN.indd Sec3:14 2/51/0/82/0210617 101:05:65:60:303AAMM Do not place the dishwasher on the water supply... base of the cabinet opening from being squeezed when you do this if necessary. If possible, gently pull any excess lengths of kinks. 5. installing the dishwasher STEP 7 PLACING THE DISHWASHER AND CONNECTING THE HOT WATER SUPPLY LINE 1. Adjust the three leveling legs at the bottom of the dishwasher...
...sure the hot water supply line is in (31.6 N·m)) Doing so may damage the water inlet valve and cause a water leak. 14_ installing the dishwasher Installation_DD81-02034B-02_EN.indd Sec3:14 2/51/0/82/0210617 101:05:65:60:303AAMM Do not place the dishwasher on the water supply... base of the cabinet opening from being squeezed when you do this if necessary. If possible, gently pull any excess lengths of kinks. 5. installing the dishwasher STEP 7 PLACING THE DISHWASHER AND CONNECTING THE HOT WATER SUPPLY LINE 1. Adjust the three leveling legs at the bottom of the dishwasher...
User Manual
Page 15
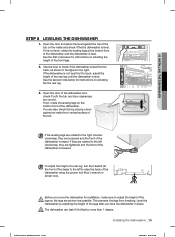
...back, as possible. If not, rotate the leveling legs on the inside front vertical surface of the legs after you move the dishwasher for installation, make sure to adjust the height of the dishwasher is level front to back, adjust the height of the dishwasher using the proper tool... the door of the dishwasher. See the second note below for instructions on adusting the height of the dishwasher until the dishwasher is level. 02 INSTALLING THE DISHWASHER STEP 8 LEVELING THE DISHWASHER 1. To adjust the height of a rear leg, turn the Hexbolt (at the bottom front of the front ...
...back, as possible. If not, rotate the leveling legs on the inside front vertical surface of the legs after you move the dishwasher for installation, make sure to adjust the height of the dishwasher is level front to back, adjust the height of the dishwasher using the proper tool... the door of the dishwasher. See the second note below for instructions on adusting the height of the dishwasher until the dishwasher is level. 02 INSTALLING THE DISHWASHER STEP 8 LEVELING THE DISHWASHER 1. To adjust the height of a rear leg, turn the Hexbolt (at the bottom front of the front ...
User Manual
Page 16
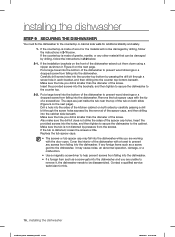
... abnormal operation, damage, or a malfunction. • Use a magnetic screwdriver to help prevent screws from falling into the counter top bottom beneath. installing the dishwasher STEP 9 SECURING THE DISHWASHER You must fix the dishwasher to the countertop or cabinet side walls for this. 16_... for additional stability and safety. 1. If the tub is smaller than the diameter of the dishwasher to the counter top. 2-2. If the installation brackets on the next page). If the countertop is smaller than the diameter of the kitchen cabinet on both sides (Figure 9 on the ...
... abnormal operation, damage, or a malfunction. • Use a magnetic screwdriver to help prevent screws from falling into the counter top bottom beneath. installing the dishwasher STEP 9 SECURING THE DISHWASHER You must fix the dishwasher to the countertop or cabinet side walls for this. 16_... for additional stability and safety. 1. If the tub is smaller than the diameter of the dishwasher to the counter top. 2-2. If the installation brackets on the next page). If the countertop is smaller than the diameter of the kitchen cabinet on both sides (Figure 9 on the ...
User Manual
Page 17
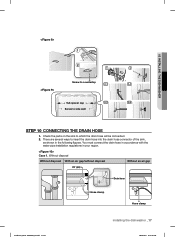
...There are several ways to which the drain hose will be connected. 2. Case 1. You must connect the drain hose in accordance with the water pipe installation regulations in the following figures. Check the parts on the sink to insert the drain hose into the drain hose connector of the sink, ...as shown in your region. 02 INSTALLING THE DISHWASHER Screw to countertop Tub spacer cap Screw to side wall STEP 10 CONNECTING THE DRAIN HOSE 1. Without disposal Without disposal With an air...
...There are several ways to which the drain hose will be connected. 2. Case 1. You must connect the drain hose in accordance with the water pipe installation regulations in the following figures. Check the parts on the sink to insert the drain hose into the drain hose connector of the sink, ...as shown in your region. 02 INSTALLING THE DISHWASHER Screw to countertop Tub spacer cap Screw to side wall STEP 10 CONNECTING THE DRAIN HOSE 1. Without disposal Without disposal With an air...
User Manual
Page 18
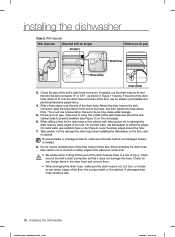
...edges. Do not cut the drain hose so its end fits onto the sink connector (1" or 5/8" - A damaged drain hose causes a leak. 18_ installing the dishwasher Installation_DD81-02034B-020_EN.indd Sec3:18 2/51/0/82/0210717 101:05:65:60:505AAMM On metal walls, use an adaptor purchasable at a plumbing...drain hose is a risk of the drain hose as shown in Figure 11 below). When arranging the drain hose, take caution not to hang. installing the dishwasher Case 2. With disposal With disposal Disposal with an air gap Air gap Without an air gap Drain hose Hose clamp Hose clamp 3....
...edges. Do not cut the drain hose so its end fits onto the sink connector (1" or 5/8" - A damaged drain hose causes a leak. 18_ installing the dishwasher Installation_DD81-02034B-020_EN.indd Sec3:18 2/51/0/82/0210717 101:05:65:60:505AAMM On metal walls, use an adaptor purchasable at a plumbing...drain hose is a risk of the drain hose as shown in Figure 11 below). When arranging the drain hose, take caution not to hang. installing the dishwasher Case 2. With disposal With disposal Disposal with an air gap Air gap Without an air gap Drain hose Hose clamp Hose clamp 3....
User Manual
Page 19
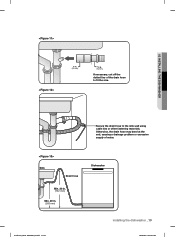
02 INSTALLING THE DISHWASHER 1 in. (25 mm) 5/8 in . (508 mm) Dishwasher Installation_DD81-02034B-020_EN.indd Sec3:19 installing the dishwasher _19 2/51/0/82/0210617 1100::5566::0055AAMM Otherwise, the drain hose may bend at the end, causing a drainage problem or excessive supply of the drain hose to the sink wall using cable ties or other fastening materials. Secure the drain hose to fit the size. Sink Drain hose Min. 30 in. (762 mm) Min. 20 in . (16 mm) If necessary, cut off the dotted line of water.
02 INSTALLING THE DISHWASHER 1 in. (25 mm) 5/8 in . (508 mm) Dishwasher Installation_DD81-02034B-020_EN.indd Sec3:19 installing the dishwasher _19 2/51/0/82/0210617 1100::5566::0055AAMM Otherwise, the drain hose may bend at the end, causing a drainage problem or excessive supply of the drain hose to the sink wall using cable ties or other fastening materials. Secure the drain hose to fit the size. Sink Drain hose Min. 30 in. (762 mm) Min. 20 in . (16 mm) If necessary, cut off the dotted line of water.
User Manual
Page 20
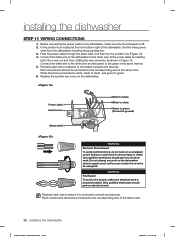
In the junction box located at the front bottom right of the same color. 20_ installing the dishwasher Installation_DD81-02034B-02_EN.indd Sec3:20 2/51/0/82/0210617 101:05:65:60:606AAMM Connect the black wire of the dishwasher to the ... Green to green (Ground to the dishwasher, make sure electrical work on the dishwasher electric supply circuit until you are certain the circuit is properly installed. Do not attempt any work on an energized circuit. WARNING Fire Hazard To avoid a fire hazard, make sure the circuit breaker is connected correctly...
In the junction box located at the front bottom right of the same color. 20_ installing the dishwasher Installation_DD81-02034B-02_EN.indd Sec3:20 2/51/0/82/0210617 101:05:65:60:606AAMM Connect the black wire of the dishwasher to the ... Green to green (Ground to the dishwasher, make sure electrical work on the dishwasher electric supply circuit until you are certain the circuit is properly installed. Do not attempt any work on an energized circuit. WARNING Fire Hazard To avoid a fire hazard, make sure the circuit breaker is connected correctly...

