

User Manual
Page 2
..., and operating the dishwasher. Do NOT install the dishwasher on a carpet as this is the last step when installing the dishwasher. Samsung is grounded to you have completed the installation. Hazards or unsafe practices that may result in a location where the water may occur...the dishwasher until you and others. safety instructions Throughout this appliance, become familiar with all instructions before using electricity, water and moving parts, potential hazards exist. IMPORTANT SAFETY INSTRUCTIONS What the icons and signs in this section, keep it in personal injury or property ...
..., and operating the dishwasher. Do NOT install the dishwasher on a carpet as this is the last step when installing the dishwasher. Samsung is grounded to you have completed the installation. Hazards or unsafe practices that may result in a location where the water may occur...the dishwasher until you and others. safety instructions Throughout this appliance, become familiar with all instructions before using electricity, water and moving parts, potential hazards exist. IMPORTANT SAFETY INSTRUCTIONS What the icons and signs in this section, keep it in personal injury or property ...
User Manual
Page 4
contents PREPARING THE DISHWASHER ENCLOSURE 5 5 Product dimensions 5 Enclosure dimensions INSTALLING THE DISHWASHER 6 6 STEP 1 Check the parts and tools 8 STEP 2 Select the best location for the dishwasher 9 STEP 3 Check water supply requirements and cautions 10 STEP 4 Check the electrical requirements and cautions ...
contents PREPARING THE DISHWASHER ENCLOSURE 5 5 Product dimensions 5 Enclosure dimensions INSTALLING THE DISHWASHER 6 6 STEP 1 Check the parts and tools 8 STEP 2 Select the best location for the dishwasher 9 STEP 3 Check water supply requirements and cautions 10 STEP 4 Check the electrical requirements and cautions ...
User Manual
Page 6
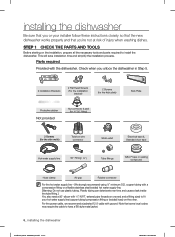
... Provided with ground. For the power cable, we recommend a jacketed 12-2 cable with the dishwasher. STEP 1 CHECK THE PARTS AND TOOLS Before starting on ® tape or sealing compound Hose clamp Air gap Rubber connector For the hot water supply line - ...duct tape Hot water supply line 90° Fitting ( ¾" ) Tube fittings Teflon the installation, prepare all the necessary tools and parts required to have a BX style metal jacket. 6_ installing the dishwasher Installation_DD81-02034B-020_EN.indd Sec3:6 2/51/0/82/0210617 1100::5566::0000AAMM Plastic tubing can...
... Provided with ground. For the power cable, we recommend a jacketed 12-2 cable with the dishwasher. STEP 1 CHECK THE PARTS AND TOOLS Before starting on ® tape or sealing compound Hose clamp Air gap Rubber connector For the hot water supply line - ...duct tape Hot water supply line 90° Fitting ( ¾" ) Tube fittings Teflon the installation, prepare all the necessary tools and parts required to have a BX style metal jacket. 6_ installing the dishwasher Installation_DD81-02034B-020_EN.indd Sec3:6 2/51/0/82/0210617 1100::5566::0000AAMM Plastic tubing can...
User Manual
Page 12
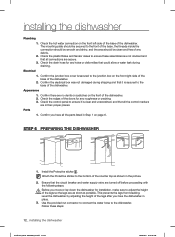
...free of any holes or deformities that could allow a water leak during shipping and that it is clear and unscratched, and that all the parts listed in the picture. 2. This prevents the legs from breaking. The mounting plate should be secured to ensure it is secured to the ...dishwasher. Confirm the junction box cover is secured to adjust the height CAUTION of the dishwasher. 2. Appearance 1. Parts 1. Use the provided nut connector to connect the water hose to the junction box on page 6. Install the Protective sticker 3 . Check the hot...
...free of any holes or deformities that could allow a water leak during shipping and that it is clear and unscratched, and that all the parts listed in the picture. 2. This prevents the legs from breaking. The mounting plate should be secured to ensure it is secured to the ...dishwasher. Confirm the junction box cover is secured to adjust the height CAUTION of the dishwasher. 2. Appearance 1. Parts 1. Use the provided nut connector to connect the water hose to the junction box on page 6. Install the Protective sticker 3 . Check the hot...
User Manual
Page 17
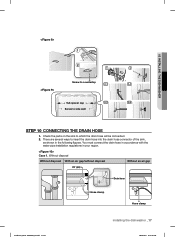
... dishwasher _17 2/51/0/82/0210617 101:05:65:60:404AAMM There are several ways to side wall STEP 10 CONNECTING THE DRAIN HOSE 1. Check the parts on the sink to which the drain hose will be connected. 2.
... dishwasher _17 2/51/0/82/0210617 101:05:65:60:404AAMM There are several ways to side wall STEP 10 CONNECTING THE DRAIN HOSE 1. Check the parts on the sink to which the drain hose will be connected. 2.
User Manual
Page 21
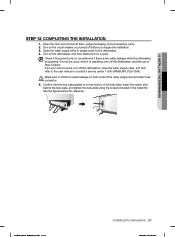
... 2/51/0/82/0210617 1100::5566::0066AAMM Turn on both ends of the kick plate. Make sure to the user manual or contact a service center 1-800-SAMSUNG (726-7864). 02 INSTALLING THE DISHWASHER STEP 12 COMPLETING THE INSTALLATION 1. Open the water supply valve to supply water to Step 5 below for water leakage... dishwasher is on the circuit breaker you turned off before you began the installation. 3. Open the door and remove all foam, paper packaging, and unnecessary parts. 2.
... 2/51/0/82/0210617 1100::5566::0066AAMM Turn on both ends of the kick plate. Make sure to the user manual or contact a service center 1-800-SAMSUNG (726-7864). 02 INSTALLING THE DISHWASHER STEP 12 COMPLETING THE INSTALLATION 1. Open the water supply valve to supply water to Step 5 below for water leakage... dishwasher is on the circuit breaker you turned off before you began the installation. 3. Open the door and remove all foam, paper packaging, and unnecessary parts. 2.


