User Manual
Page 1
If you for use by qualified installers. DW80K7050 Series DW80K5050 Series DW80R5060 Series DW80R5061 Series Dishwasher installation guide STOP These installation instructions are having problems installing this dishwasher Please call : 1-800-SAMSUNG (726-7864) for assistance : www.samsung.com imagine the possibilities Thank you are intended for purchasing this Samsung product. Installation_DD81-02034B-020_EN.indd 1 2/51/0/82/0210717 101:05:5:55:454AAMM
If you for use by qualified installers. DW80K7050 Series DW80K5050 Series DW80R5060 Series DW80R5061 Series Dishwasher installation guide STOP These installation instructions are having problems installing this dishwasher Please call : 1-800-SAMSUNG (726-7864) for assistance : www.samsung.com imagine the possibilities Thank you are intended for purchasing this Samsung product. Installation_DD81-02034B-020_EN.indd 1 2/51/0/82/0210717 101:05:5:55:454AAMM

User Manual
Page 2
Samsung is a fire hazard. Make sure the machine is the last step when installing the dishwasher. Do not install the dishwasher near electrical components. Prior to weather. Hazards or unsafe practices that may occur. After reading this is not liable for damages resulting from exposure to removal of original dishwasher and the installation...exercise care when using electricity, water and moving parts, potential hazards exist. To safely operate this installation guide mean: Hazards or unsafe practices that may result in this appliance, become familiar with all ...
Samsung is a fire hazard. Make sure the machine is the last step when installing the dishwasher. Do not install the dishwasher near electrical components. Prior to weather. Hazards or unsafe practices that may occur. After reading this is not liable for damages resulting from exposure to removal of original dishwasher and the installation...exercise care when using electricity, water and moving parts, potential hazards exist. To safely operate this installation guide mean: Hazards or unsafe practices that may result in this appliance, become familiar with all ...
User Manual
Page 3
...65 ˚C) to prevent damage to a water leakage. CAUTION Make sure to use an extension cord. Ensure that the dishwasher is correctly installed. - Electrically ground the dishwasher - Two or more people are not intended for licensed food establishments. (NSF/ANSI Standard 184 for Residential ...Dishwashers) For a full list of installation. Old lines are susceptible to breakage because they become hardened and may cause property damage due to dishes. This temperature range ...
...65 ˚C) to prevent damage to a water leakage. CAUTION Make sure to use an extension cord. Ensure that the dishwasher is correctly installed. - Electrically ground the dishwasher - Two or more people are not intended for licensed food establishments. (NSF/ANSI Standard 184 for Residential ...Dishwashers) For a full list of installation. Old lines are susceptible to breakage because they become hardened and may cause property damage due to dishes. This temperature range ...
User Manual
Page 4
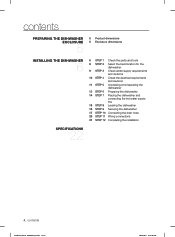
contents PREPARING THE DISHWASHER ENCLOSURE 5 5 Product dimensions 5 Enclosure dimensions INSTALLING THE DISHWASHER 6 6 STEP 1 Check the parts and tools 8 STEP 2 Select the best location for the dishwasher 9 STEP 3 Check water supply requirements and cautions 10 STEP 4 ... 8 Leveling the dishwasher 16 STEP 9 Securing the dishwasher 17 STEP 10 Connecting the drain hose 20 STEP 11 Wiring connections 21 STEP 12 Completing the installation SPECIFICATIONS 22 4_ contents Installation_DD81-02034B-020_EN.indd Sec2:4 2/51/0/82/0210617 101:05:65:60:00AAMM
contents PREPARING THE DISHWASHER ENCLOSURE 5 5 Product dimensions 5 Enclosure dimensions INSTALLING THE DISHWASHER 6 6 STEP 1 Check the parts and tools 8 STEP 2 Select the best location for the dishwasher 9 STEP 3 Check water supply requirements and cautions 10 STEP 4 ... 8 Leveling the dishwasher 16 STEP 9 Securing the dishwasher 17 STEP 10 Connecting the drain hose 20 STEP 11 Wiring connections 21 STEP 12 Completing the installation SPECIFICATIONS 22 4_ contents Installation_DD81-02034B-020_EN.indd Sec2:4 2/51/0/82/0210617 101:05:65:60:00AAMM
User Manual
Page 5
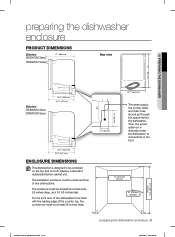
.... 2 ⅓" (60 mm) 23 7⁄8" (605 mm) The water supply line, power cable and drain hose should go through this space behind the dishwasher. The installation enclosure must be enclosed on the top and on both sides by a standard residential kitchen cabinet unit.
.... 2 ⅓" (60 mm) 23 7⁄8" (605 mm) The water supply line, power cable and drain hose should go through this space behind the dishwasher. The installation enclosure must be enclosed on the top and on both sides by a standard residential kitchen cabinet unit.
User Manual
Page 6
...64257;tting or a flexible stainless steel braided hot water supply line. [Warning: Do not use plastic tubing. copper tubing with ground. installing the dishwasher Be sure that you or your hot water supply line (copper tubing/compression fitting or braided hose) on the other. ...so that the new dishwasher works properly and that some local codes may require the cable to have a BX style metal jacket. 6_ installing the dishwasher Installation_DD81-02034B-020_EN.indd Sec3:6 2/51/0/82/0210617 1100::5566::0000AAMM We strongly recommend using 3/8" minimum O.D. external pipe threads...
...64257;tting or a flexible stainless steel braided hot water supply line. [Warning: Do not use plastic tubing. copper tubing with ground. installing the dishwasher Be sure that you or your hot water supply line (copper tubing/compression fitting or braided hose) on the other. ...so that the new dishwasher works properly and that some local codes may require the cable to have a BX style metal jacket. 6_ installing the dishwasher Installation_DD81-02034B-020_EN.indd Sec3:6 2/51/0/82/0210617 1100::5566::0000AAMM We strongly recommend using 3/8" minimum O.D. external pipe threads...
User Manual
Page 7
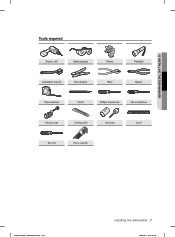
02 INSTALLING THE DISHWASHER Tools required Electric drill Safety glasses Gloves Flashlight Adjustable wrench Wire stripper Pliers Nipper Tape measure Pencil Phillips screwdriver Flat screwdriver Tubing cutter Cutting knife Hole saw Level Torx t20 Hex L-wrench Installation_DD81-02034B-020_EN.indd Sec3:7 installing the dishwasher _7 2/51/0/82/0210617 101:05:65:60:101AAMM
02 INSTALLING THE DISHWASHER Tools required Electric drill Safety glasses Gloves Flashlight Adjustable wrench Wire stripper Pliers Nipper Tape measure Pencil Phillips screwdriver Flat screwdriver Tubing cutter Cutting knife Hole saw Level Torx t20 Hex L-wrench Installation_DD81-02034B-020_EN.indd Sec3:7 installing the dishwasher _7 2/51/0/82/0210617 101:05:65:60:101AAMM
User Manual
Page 8
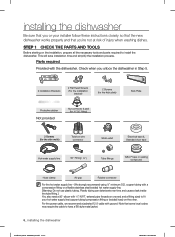
...into the dishwasher easily. - If the base inside the cabinet and in the opposite cabinet side. installing the dishwasher New installation If the dishwasher is a new installation, most of the installation work must be near a sink with the new dishwasher. The location must have sufficient space for ... on the dishwasher, make a hole in the base inside the sink cabinet is raised above the kitchen floor and is a new installation, follow these steps: 1. Replacement If the dishwasher is , you load your electrical outlet is replacing an old dishwasher, you must check the...
...into the dishwasher easily. - If the base inside the cabinet and in the opposite cabinet side. installing the dishwasher New installation If the dishwasher is a new installation, most of the installation work must be near a sink with the new dishwasher. The location must have sufficient space for ... on the dishwasher, make a hole in the base inside the sink cabinet is raised above the kitchen floor and is a new installation, follow these steps: 1. Replacement If the dishwasher is , you load your electrical outlet is replacing an old dishwasher, you must check the...
User Manual
Page 9
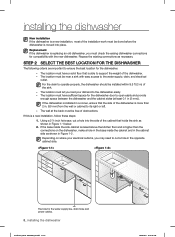
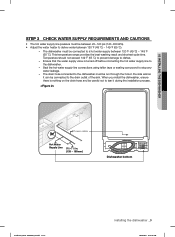
... ˚C) to prevent damage to the dishwasher. - Power cable Hot Water Supply Line 5¹⁄3~7¹⁄3 in the side wall so it during the installation process. The dishwasher must be careful not to deliver water between 120 ˚F (49 ˚C) ~ 149 ˚F (65 ˚C). - Seal the ...teflon the drain hose and be run through the hole in . (135 ~ 185mm) Dishwasher bottom Installation_DD81-02034B-020_EN.indd Sec3:9 installing the dishwasher _9 2/51/0/82/0210717 101:05:65:60:202AAMM The drain hose connected to the dishwasher must be connected to stop any water...
... ˚C) to prevent damage to the dishwasher. - Power cable Hot Water Supply Line 5¹⁄3~7¹⁄3 in the side wall so it during the installation process. The dishwasher must be careful not to deliver water between 120 ˚F (49 ˚C) ~ 149 ˚F (65 ˚C). - Seal the ...teflon the drain hose and be run through the hole in . (135 ~ 185mm) Dishwasher bottom Installation_DD81-02034B-020_EN.indd Sec3:9 installing the dishwasher _9 2/51/0/82/0210717 101:05:65:60:202AAMM The drain hose connected to the dishwasher must be connected to stop any water...
User Manual
Page 10
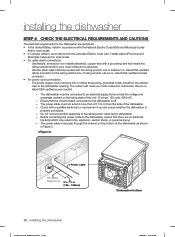
... accordance with the National Electric Code/State and Municipal codes and/or local codes. • In Canada, install in accordance with the wiring junction box or install a U.L.-listed/CSA-certified clamp connector to the dishwasher is properly connected. - Use a U.L.listed/CSA-certified power cord ...no electrical hazards (which may result in the cabinet next to the same power outlet as shown in . (135 ~ 185mm) 10_ installing the dishwasher Installation_DD81-02034B-02_EN.indd Sec3:10 Dishwasher bottom 2/51/0/82/0210617 101:05:65:60:303AAMM Ensure that there are unsure ...
... accordance with the National Electric Code/State and Municipal codes and/or local codes. • In Canada, install in accordance with the wiring junction box or install a U.L.-listed/CSA-certified clamp connector to the dishwasher is properly connected. - Use a U.L.listed/CSA-certified power cord ...no electrical hazards (which may result in the cabinet next to the same power outlet as shown in . (135 ~ 185mm) 10_ installing the dishwasher Installation_DD81-02034B-02_EN.indd Sec3:10 Dishwasher bottom 2/51/0/82/0210617 101:05:65:60:303AAMM Ensure that there are unsure ...

User Manual
Page 11
... to ensure you can be adjusted so you have removed all of the packing materials until the dishwasher is properly secured to disposal. 02 INSTALLING THE DISHWASHER STEP 5 UNPACKING AND INSPECTING THE DISHWASHER Unbox the dishwasher in some cases, damage that finish or the underlying surface. ... side of the dishwasher. ※ The upper side of the dishwasher to leave in place and can level and secure the dishwasher. 3. installing the dishwasher _11 Installation_DD81-02034B-020_EN.indd Sec3:11 2/51/0/82/0210617 101:05:65:60:303AAMM Put the tray into the carton top. ...
... to ensure you can be adjusted so you have removed all of the packing materials until the dishwasher is properly secured to disposal. 02 INSTALLING THE DISHWASHER STEP 5 UNPACKING AND INSPECTING THE DISHWASHER Unbox the dishwasher in some cases, damage that finish or the underlying surface. ... side of the dishwasher. ※ The upper side of the dishwasher to leave in place and can level and secure the dishwasher. 3. installing the dishwasher _11 Installation_DD81-02034B-020_EN.indd Sec3:11 2/51/0/82/0210617 101:05:65:60:303AAMM Put the tray into the carton top. ...
User Manual
Page 12
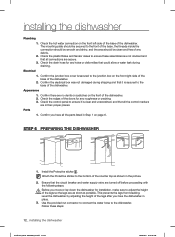
...be smooth and shiny, and the area should be clean and free of the legs so the legs are in the picture. 2. Install the Protective sticker 3 . installing the dishwasher Plumbing 1. Check the plastic Brake and Sensor cases to adjust the height CAUTION of any roughness or cracking 3. Level the...legs after you have the dishwasher in Step 1 on the front left-side of the base of the doors for installation, make sure to ensure these steps: 12_ installing the dishwasher Installation_DD81-02034B-020_EN.indd Sec3:12 2/51/0/82/0210617 101:05:65:60:303AAMM Electrical 1. Use the provided...
...be smooth and shiny, and the area should be clean and free of the legs so the legs are in the picture. 2. Install the Protective sticker 3 . installing the dishwasher Plumbing 1. Check the plastic Brake and Sensor cases to adjust the height CAUTION of any roughness or cracking 3. Level the...legs after you have the dishwasher in Step 1 on the front left-side of the base of the doors for installation, make sure to ensure these steps: 12_ installing the dishwasher Installation_DD81-02034B-020_EN.indd Sec3:12 2/51/0/82/0210617 101:05:65:60:303AAMM Electrical 1. Use the provided...
User Manual
Page 13
... to keep the junction box cover you removed. Tighten until the ¾" fitting is not damaged by drilling, attach the two (2) Installation brackets that could constrict the flow of the dishwasher using the supplied screws (Figure 4 - They will be used in Step 9, Securing...Step 11, Wiring Connections. 7. Remove the junction box cover located at any extreme angles that were supplied with the dishwasher using a screwdriver, and then Install the strain relief (Figure 4 - It is not bent at the bottom front right of water. 6. A Junction box C Strain relief B CAUTION ...
... to keep the junction box cover you removed. Tighten until the ¾" fitting is not damaged by drilling, attach the two (2) Installation brackets that could constrict the flow of the dishwasher using the supplied screws (Figure 4 - They will be used in Step 9, Securing...Step 11, Wiring Connections. 7. Remove the junction box cover located at any extreme angles that were supplied with the dishwasher using a screwdriver, and then Install the strain relief (Figure 4 - It is not bent at the bottom front right of water. 6. A Junction box C Strain relief B CAUTION ...

User Manual
Page 14
.... CAUTION Also, make sure they are not folded or twisted. Keep it free of the dishwasher. Slide the dishwasher carefully into place. 4. installing the dishwasher STEP 7 PLACING THE DISHWASHER AND CONNECTING THE HOT WATER SUPPLY LINE 1. Use standard duct tape or cable ties to secure the electrical...sure the hot water supply line is in (31.6 N·m)) Doing so may damage the water inlet valve and cause a water leak. 14_ installing the dishwasher Installation_DD81-02034B-02_EN.indd Sec3:14 2/51/0/82/0210617 101:05:65:60:303AAMM Do not place the dishwasher on the water supply...
.... CAUTION Also, make sure they are not folded or twisted. Keep it free of the dishwasher. Slide the dishwasher carefully into place. 4. installing the dishwasher STEP 7 PLACING THE DISHWASHER AND CONNECTING THE HOT WATER SUPPLY LINE 1. Use standard duct tape or cable ties to secure the electrical...sure the hot water supply line is in (31.6 N·m)) Doing so may damage the water inlet valve and cause a water leak. 14_ installing the dishwasher Installation_DD81-02034B-02_EN.indd Sec3:14 2/51/0/82/0210617 101:05:65:60:303AAMM Do not place the dishwasher on the water supply...
User Manual
Page 15
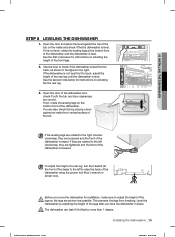
This prevents the legs from breaking. 02 INSTALLING THE DISHWASHER STEP 8 LEVELING THE DISHWASHER 1. If it 's tilted by more than 1 degree. You can leak if it...the dishwasher is level. Before you have the dishwasher in the figure to raise the back of the tub. CAUTION installing the dishwasher _15 Installation_DD81-02034B-020_EN.indd Sec3:15 2/51/0/82/0210617 101:05:65:60:404AAMM If not, rotate the ...L-wrench or similar tool). Open the door of the front legs. 2. See the first note below for installation, make sure to adjust the height of the dishwasher.
This prevents the legs from breaking. 02 INSTALLING THE DISHWASHER STEP 8 LEVELING THE DISHWASHER 1. If it 's tilted by more than 1 degree. You can leak if it...the dishwasher is level. Before you have the dishwasher in the figure to raise the back of the tub. CAUTION installing the dishwasher _15 Installation_DD81-02034B-020_EN.indd Sec3:15 2/51/0/82/0210617 101:05:65:60:404AAMM If not, rotate the ...L-wrench or similar tool). Open the door of the front legs. 2. See the first note below for installation, make sure to adjust the height of the dishwasher.
User Manual
Page 16
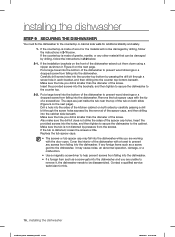
... into the brackets, and then tighten to secure the dishwasher to the counter top. 2-2. Insert the provided screws into the dishwasher. If the installation brackets on the next page). Cover the interior of the screw. Make sure the hole you drill is distorted, loosen the screws a little....strike the sides of a screwdriver. Make sure the hole you drill is not distorted by drilling, follow the instructions in 2-1 below . 2-1. installing the dishwasher STEP 9 SECURING THE DISHWASHER You must fix the dishwasher to the countertop or cabinet side walls for this. 16_...
... into the brackets, and then tighten to secure the dishwasher to the counter top. 2-2. Insert the provided screws into the dishwasher. If the installation brackets on the next page). Cover the interior of the screw. Make sure the hole you drill is distorted, loosen the screws a little....strike the sides of a screwdriver. Make sure the hole you drill is not distorted by drilling, follow the instructions in 2-1 below . 2-1. installing the dishwasher STEP 9 SECURING THE DISHWASHER You must fix the dishwasher to the countertop or cabinet side walls for this. 16_...
User Manual
Page 17
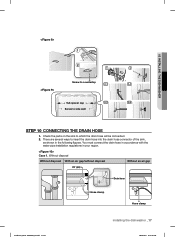
... figures. There are several ways to insert the drain hose into the drain hose connector of the sink, as shown in your region. 02 INSTALLING THE DISHWASHER Screw to countertop Tub spacer cap Screw to which the drain hose will be connected. 2. Check the parts on the sink to side... disposal With an air gap/without disposal Without an air gap Air gap Drain hose Hose clamp Hose clamp Installation_DD81-02034B-020_EN.indd Sec3:17 installing the dishwasher _17 2/51/0/82/0210617 101:05:65:60:404AAMM
... figures. There are several ways to insert the drain hose into the drain hose connector of the sink, as shown in your region. 02 INSTALLING THE DISHWASHER Screw to countertop Tub spacer cap Screw to which the drain hose will be connected. 2. Check the parts on the sink to side... disposal With an air gap/without disposal Without an air gap Air gap Drain hose Hose clamp Hose clamp Installation_DD81-02034B-020_EN.indd Sec3:17 installing the dishwasher _17 2/51/0/82/0210617 101:05:65:60:404AAMM
User Manual
Page 18
...clamp. On metal walls, use sand paper to cover the sharp edges around the sink's drain connection so that it does not damage the hose. installing the dishwasher Case 2. Slide a hose clamp over the end of the sink's drain hose connector. Attach the drain hose to the sink connector, ... injury. Do not cut the drain hose so its end fits onto the sink connector (1" or 5/8" - A damaged drain hose causes a leak. 18_ installing the dishwasher Installation_DD81-02034B-020_EN.indd Sec3:18 2/51/0/82/0210717 101:05:65:60:505AAMM Check for the drain hose on the next page...
...clamp. On metal walls, use sand paper to cover the sharp edges around the sink's drain connection so that it does not damage the hose. installing the dishwasher Case 2. Slide a hose clamp over the end of the sink's drain hose connector. Attach the drain hose to the sink connector, ... injury. Do not cut the drain hose so its end fits onto the sink connector (1" or 5/8" - A damaged drain hose causes a leak. 18_ installing the dishwasher Installation_DD81-02034B-020_EN.indd Sec3:18 2/51/0/82/0210717 101:05:65:60:505AAMM Check for the drain hose on the next page...
User Manual
Page 19
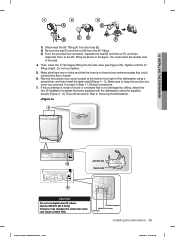
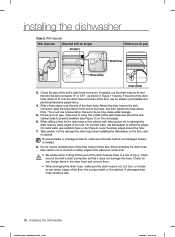
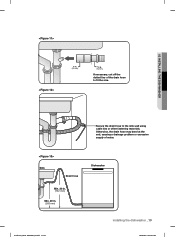
Sink Drain hose Min. 30 in. (762 mm) Min. 20 in . (16 mm) If necessary, cut off the dotted line of water. Secure the drain hose to fit the size. Otherwise, the drain hose may bend at the end, causing a drainage problem or excessive supply of the drain hose to the sink wall using cable ties or other fastening materials. 02 INSTALLING THE DISHWASHER 1 in. (25 mm) 5/8 in . (508 mm) Dishwasher Installation_DD81-02034B-020_EN.indd Sec3:19 installing the dishwasher _19 2/51/0/82/0210617 1100::5566::0055AAMM
Sink Drain hose Min. 30 in. (762 mm) Min. 20 in . (16 mm) If necessary, cut off the dotted line of water. Secure the drain hose to fit the size. Otherwise, the drain hose may bend at the end, causing a drainage problem or excessive supply of the drain hose to the sink wall using cable ties or other fastening materials. 02 INSTALLING THE DISHWASHER 1 in. (25 mm) 5/8 in . (508 mm) Dishwasher Installation_DD81-02034B-020_EN.indd Sec3:19 installing the dishwasher _19 2/51/0/82/0210617 1100::5566::0055AAMM
User Manual
Page 20
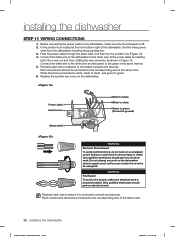
...power wires from the dishwasher including the grounding line. 3. WARNING Fire Hazard To avoid a fire hazard, make sure the circuit breaker is properly installed. installing the dishwasher STEP 11 WIRING CONNECTIONS 1. Recheck each wire to ensure it is connected correctly and securely. Connect the black wire of the dishwasher to.... Power cable Junction box Black to black White to white Green to green (Ground to the corresponding wire of the same color. 20_ installing the dishwasher Installation_DD81-02034B-02_EN.indd Sec3:20 2/51/0/82/0210617 101:05:65:60:606AAMM
...power wires from the dishwasher including the grounding line. 3. WARNING Fire Hazard To avoid a fire hazard, make sure the circuit breaker is properly installed. installing the dishwasher STEP 11 WIRING CONNECTIONS 1. Recheck each wire to ensure it is connected correctly and securely. Connect the black wire of the dishwasher to.... Power cable Junction box Black to black White to white Green to green (Ground to the corresponding wire of the same color. 20_ installing the dishwasher Installation_DD81-02034B-02_EN.indd Sec3:20 2/51/0/82/0210617 101:05:65:60:606AAMM

