DW7933LRABB Connections - Samsung AA
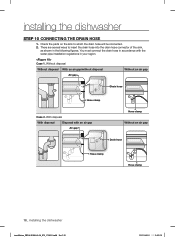
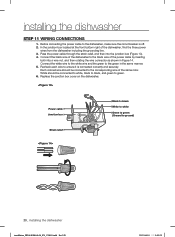
DW7933LRABB Connections
View Results Below
Free Samsung DW7933LRABB/AA manuals!
Problems with Samsung DW7933LRABB/AA?
Ask a Question
Free Samsung DW7933LRABB/AA manuals!
Problems with Samsung DW7933LRABB/AA?
Ask a Question
Related Manual Pages


Similar Questions

What Type Of Water Line Connection Do I Need For This Dishwasher? I Have Tried
What type of water line connection do I need to hook up my dishwasher? The regular water line is too...
What type of water line connection do I need to hook up my dishwasher? The regular water line is too...
(Posted by rokenfuss 8 years ago)