

User Manual
Page 17
... to the next step. 5. Never use sheet metal screws when assembling ducting. If you have a gas model, go to Step 6 on tape over the threads. Review the Gas Requirements section, then follow these instructions completely before you need to your dryer. c. d. Check all threaded connections. f. General procedure For proper installation, we... compound must point away from your dryer on page . Apply pipe joint compound or about 1 1/2 wraps of the carton cushion-tops on the gas supply. Review the Exhausting section before putting it lies across both appliances.
... to the next step. 5. Never use sheet metal screws when assembling ducting. If you have a gas model, go to Step 6 on tape over the threads. Review the Gas Requirements section, then follow these instructions completely before you need to your dryer. c. d. Check all threaded connections. f. General procedure For proper installation, we... compound must point away from your dryer on page . Apply pipe joint compound or about 1 1/2 wraps of the carton cushion-tops on the gas supply. Review the Exhausting section before putting it lies across both appliances.
User Manual
Page 18
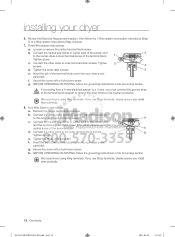
... to the center, silver-colored terminal screw of the terminal block cover into your dryer's rear panel slot. e. Insert the tab of the terminal block. Review the Electrical Requirements section, then follow the grounding instructions in the Grounding section. Tighten the strain relief screws. Secure the cover with a hold -down screw...
... to the center, silver-colored terminal screw of the terminal block cover into your dryer's rear panel slot. e. Insert the tab of the terminal block. Review the Electrical Requirements section, then follow the grounding instructions in the Grounding section. Tighten the strain relief screws. Secure the cover with a hold -down screw...