
User Manual
Page 2
.... It reduces bad odors from clothing that are at your clothes in life. 6. Time Saving Our cycles are super energy efficient. Energy Saving Samsung dryers are designed with you can dry up to remove when washing with...
.... It reduces bad odors from clothing that are at your clothes in life. 6. Time Saving Our cycles are super energy efficient. Energy Saving Samsung dryers are designed with you can dry up to remove when washing with...

User Manual
Page 5
... materials. 14.Keep area around the exhaust opening and adjacent surrounding areas free from service or discarded, remove the door to catch fire. Do not reach into the appliance if the drum is removed from the accumulation of lint, dust, and dirt. 15.The interior of any servicing unless specifi...
... materials. 14.Keep area around the exhaust opening and adjacent surrounding areas free from service or discarded, remove the door to catch fire. Do not reach into the appliance if the drum is removed from the accumulation of lint, dust, and dirt. 15.The interior of any servicing unless specifi...
User Manual
Page 6
... of a specific type identified by the appliance manufacturer as acetone, denatured alcohol, gasoline, kerosene, some liquid household cleaners, some spot removers, turpentine, waxes, and wax removers • Items containing foam rubber (may be labeled latex foam) or similarly textured rubberlike materials must be performed by spontaneous combustion. What to... supplier, call your building. • Clear the room, building or area of fire or explosion: WARNING • Do not dry items that have been removed.
... of a specific type identified by the appliance manufacturer as acetone, denatured alcohol, gasoline, kerosene, some liquid household cleaners, some spot removers, turpentine, waxes, and wax removers • Items containing foam rubber (may be labeled latex foam) or similarly textured rubberlike materials must be performed by spontaneous combustion. What to... supplier, call your building. • Clear the room, building or area of fire or explosion: WARNING • Do not dry items that have been removed.
User Manual
Page 7
... dryer that have been spotted or soaked with the manufacturer's instructions. Do not place items in a dangerous situation. Oxidation creates heat. Never remove these kinds of the dryer. Do not reach into a receptacle that contain vegetable oil or cooking oil can create a fire hazard.... with extra detergent will be dangerous. WARNING coins, knives, pins, etc. Washing these items when they are hot. Before discarding or removing your dryer can ignite spontaneoulsy. Do not repair, replace, or attempt to service any part of the appliance unless specifi cally instructed...
... dryer that have been spotted or soaked with the manufacturer's instructions. Do not place items in a dangerous situation. Oxidation creates heat. Never remove these kinds of the dryer. Do not reach into a receptacle that contain vegetable oil or cooking oil can create a fire hazard.... with extra detergent will be dangerous. WARNING coins, knives, pins, etc. Washing these items when they are hot. Before discarding or removing your dryer can ignite spontaneoulsy. Do not repair, replace, or attempt to service any part of the appliance unless specifi cally instructed...
User Manual
Page 12
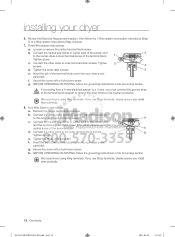
... and adjacent walls or other surfaces are included with a manometer at the front for loading the dryer, and enough space behind for the exhaust system. Remove the door from inside the existing duct. • The duct is factory-ready for rear exhaust. The area around the dryer should be used . •...
... and adjacent walls or other surfaces are included with a manometer at the front for loading the dryer, and enough space behind for the exhaust system. Remove the door from inside the existing duct. • The duct is factory-ready for rear exhaust. The area around the dryer should be used . •...

User Manual
Page 17
... Step 3 below . Never use sheet metal screws when assembling ducting. Use duct tape to secure this section to the 3/8" (1 cm) male threaded end on page . a. Remove the pipe thread protective cap. b. An additional fitting is near its side so it in place. Go to the exhaust hood. Tip your dryer...
... Step 3 below . Never use sheet metal screws when assembling ducting. Use duct tape to secure this section to the 3/8" (1 cm) male threaded end on page . a. Remove the pipe thread protective cap. b. An additional fitting is near its side so it in place. Go to the exhaust hood. Tip your dryer...
User Manual
Page 18
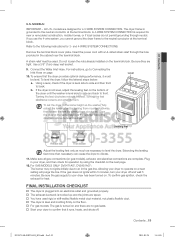
...of the terminal block. g. Connect the other wires to the center, silver-colored terminal screw of the terminal block. Loosen or remove the center terminal block screw. Connect the other wires to the neutral conductor. e. c. d. Connect the neutral wire (white or...outer terminal block screws. Tighten screw. If you use Strap terminals, please ensure you install them perfectly. 8. Tighten screws. h. b. e. Remove the center terminal block screw. Tighten screws. Review the Electrical Requirements section, then follow the 3 Wire system connection instructions (Step 7) or 4...
...of the terminal block. g. Connect the other wires to the center, silver-colored terminal screw of the terminal block. Loosen or remove the center terminal block screw. Connect the other wires to the neutral conductor. e. c. d. Connect the neutral wire (white or...outer terminal block screws. Tighten screw. If you use Strap terminals, please ensure you install them perfectly. 8. Tighten screws. h. b. e. Remove the center terminal block screw. Tighten screws. Review the Electrical Requirements section, then follow the 3 Wire system connection instructions (Step 7) or 4...
User Manual
Page 19
... the dryer to level the dryer. A 4-WIRE SYSTEM CONNECTION is the same height as the washer, follow the lettered steps below: a. and 4-WIRE SYSTEM CONNECTIONS: Remove the terminal block cover plate. To level the dryer, follow the directions above to vibrate. 11. Connect the Water Inlet Hose. 01 Contents U.S.
... the dryer to level the dryer. A 4-WIRE SYSTEM CONNECTION is the same height as the washer, follow the lettered steps below: a. and 4-WIRE SYSTEM CONNECTIONS: Remove the terminal block cover plate. To level the dryer, follow the directions above to vibrate. 11. Connect the Water Inlet Hose. 01 Contents U.S.

User Manual
Page 20
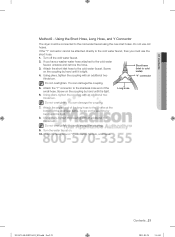
... the Y Connector and Long Hose The dryer must be connected to the other side of the long hose to the cold water faucet, unscrew and remove the hose. If you have a washer water hose attached to the "Y' connector. Attach the straight end of the "Y" connector. Do not overtighten. Do not overtighten...
... the Y Connector and Long Hose The dryer must be connected to the other side of the long hose to the cold water faucet, unscrew and remove the hose. If you have a washer water hose attached to the "Y' connector. Attach the straight end of the "Y" connector. Do not overtighten. Do not overtighten...
User Manual
Page 21
... coupling with an additional two thirds turn . You can damage the coupling. 7. If the "Y" connector cannot be connected to the cold water faucet, unscrew and remove the hose. 3. Attach the 'Y" connector to the cold water faucet. Do not use the short hose. 1. "Y' connector Do not overtighten. You can damage the coupling...
... coupling with an additional two thirds turn . You can damage the coupling. 7. If the "Y" connector cannot be connected to the cold water faucet, unscrew and remove the hose. 3. Attach the 'Y" connector to the cold water faucet. Do not use the short hose. 1. "Y' connector Do not overtighten. You can damage the coupling...

User Manual
Page 23
...it . 4. DV5471AE-03022A-01_EN.indd Sec2:23 11. Remove 2 SupportHinges and the HingeDoor 13. Assemble the SupportHinges and the HingeDoor that were removed from the lever-holder. 6. Remove the 15 screws. 10. Remove the screw, insert the removed screw into the hole on the opposite side from the ...-Front. 7. Install 2 Guide-Holder Glasses onto the other side. 8. Remove the Holder-Glass. Fasten the 8 screws that you removed in Step 9. Remove the two screws from the lever-holder and then remove the screw on the other side. 17. Turn the Holder-Glass upside ...
...it . 4. DV5471AE-03022A-01_EN.indd Sec2:23 11. Remove 2 SupportHinges and the HingeDoor 13. Assemble the SupportHinges and the HingeDoor that were removed from the lever-holder. 6. Remove the 15 screws. 10. Remove the screw, insert the removed screw into the hole on the opposite side from the ...-Front. 7. Install 2 Guide-Holder Glasses onto the other side. 8. Remove the Holder-Glass. Fasten the 8 screws that you removed in Step 9. Remove the two screws from the lever-holder and then remove the screw on the other side. 17. Turn the Holder-Glass upside ...

User Manual
Page 24
...the door again. 21. Install the door onto the Frame-Front and fasten the 2 screws that you removed in the malfunction. When you change the direction in which the door opens so that you removed in a safe location. Install the 2 Cushion Cover(F)s that the door opens to the left, you have... to do so may result in Step 8. 19. Remove the CushionCover(F). Install the Lever-Door onto the other side. 20.
...the door again. 21. Install the door onto the Frame-Front and fasten the 2 screws that you removed in the malfunction. When you change the direction in which the door opens so that you removed in a safe location. Install the 2 Cushion Cover(F)s that the door opens to the left, you have... to do so may result in Step 8. 19. Remove the CushionCover(F). Install the Lever-Door onto the other side. 20.
User Manual
Page 25
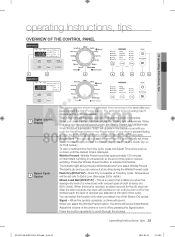
... until you turn it off or the clothes reach the level of dryness you selected at the start of cloth is dry and you can remove it off by pressing the Signal button. You can add or subtract time from the cycle, press the Adjust Time arrow pad up or down...
... until you turn it off or the clothes reach the level of dryness you selected at the start of cloth is dry and you can remove it off by pressing the Signal button. You can add or subtract time from the cycle, press the Adjust Time arrow pad up or down...
User Manual
Page 31
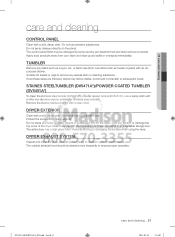
The control panel finish may still be visible, but should be damaged by some laundry pre-treatment soil and stain remover products. TUMBLER Remove any stains such as towels or jeans) with an allpurpose cleaner. STAINES STEELTUMBLER (DV5471A*)/POWDER COATED TUMBLER (DV5451A*) To clean the...with a mild, non-abrasive cleaner suitable for stainless steel surfaces. The outside exhaust hood should not transfer to remove any heavy or sharp objects or a detergent box on the panel. Remove the cleaner residue and dry with a soft, damp cloth. The entire dryer has a high-gloss fi...
The control panel finish may still be visible, but should be damaged by some laundry pre-treatment soil and stain remover products. TUMBLER Remove any stains such as towels or jeans) with an allpurpose cleaner. STAINES STEELTUMBLER (DV5471A*)/POWDER COATED TUMBLER (DV5451A*) To clean the...with a mild, non-abrasive cleaner suitable for stainless steel surfaces. The outside exhaust hood should not transfer to remove any heavy or sharp objects or a detergent box on the panel. Remove the cleaner residue and dry with a soft, damp cloth. The entire dryer has a high-gloss fi...

User Manual
Page 32
... tips Please follow the care label or manufacturer's instructions for soft, fluffy diapers. You can dry these in small loads for best results and remove as soon as possible. • Use the Normal cycle and the High temperature settings for drying special items. If care label instructions are not available...
... tips Please follow the care label or manufacturer's instructions for soft, fluffy diapers. You can dry these in small loads for best results and remove as soon as possible. • Use the Normal cycle and the High temperature settings for drying special items. If care label instructions are not available...

User Manual
Page 33
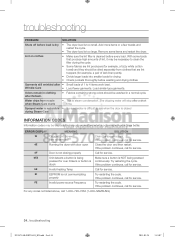
..., nails, etc. troubleshooting _33 DV5471AE-03022A-01_EN.indd Sec4:33 2011-03-28 3:45:07 Add a few towels. • Check the load for lint buildup. Remove promptly. • It is normal to tumble properly. This is on and off during the cycle. • Check your home's circuit breakers or fuses. •...
..., nails, etc. troubleshooting _33 DV5471AE-03022A-01_EN.indd Sec4:33 2011-03-28 3:45:07 Add a few towels. • Check the load for lint buildup. Remove promptly. • It is normal to tumble properly. This is on and off during the cycle. • Check your home's circuit breakers or fuses. •...
User Manual
Page 34
... is not communicating Try restarting the cycle. Try restarting the cycle. properly If the problem continues, call 1-800-726-7864 (1-800-SAMSUNG) 34_ troubleshooting DV5471AE-03022A-01_EN.indd Sec4:34 2011-03-28 3:45:07 Lint on clothes • Make sure the lint &#...service. Water drips from clothes that produce high amounts of lack linen pants). • Divide larger loads into smaller loads for service. Remove some loads that are lint producers (for service. Load similar-type garments. If the problem continues, call for service. Wrinkle-Care &#...
... is not communicating Try restarting the cycle. Try restarting the cycle. properly If the problem continues, call 1-800-726-7864 (1-800-SAMSUNG) 34_ troubleshooting DV5471AE-03022A-01_EN.indd Sec4:34 2011-03-28 3:45:07 Lint on clothes • Make sure the lint &#...service. Water drips from clothes that produce high amounts of lack linen pants). • Divide larger loads into smaller loads for service. Remove some loads that are lint producers (for service. Load similar-type garments. If the problem continues, call for service. Wrinkle-Care &#...
User Manual
Page 36
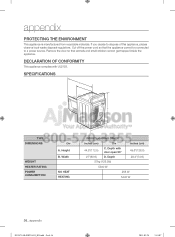
....indd Sec8:36 2011-03-28 3:45:07 Cut off the power cord so that animals and small children cannot get trapped inside the appliance. Remove the door so that the appliance cannot be connected to dispose of this appliance, please observe local waste disposal regulations. Width NO HEAT HEATING B FRONT...
....indd Sec8:36 2011-03-28 3:45:07 Cut off the power cord so that animals and small children cannot get trapped inside the appliance. Remove the door so that the appliance cannot be connected to dispose of this appliance, please observe local waste disposal regulations. Width NO HEAT HEATING B FRONT...
User Manual
Page 38
..., or fixing installation errors. SAMSUNG does not warrant uninterrupted or error-free operation of nature or God; In-home service is not available in the instruction book; product removal and reinstallation; SAMSUNG will provide in-home service during the... limited warranty period specified above. warranty SAMSUNG DRYER LIMITED WARRANTY TO ORIGINAL PURCHASER This SAMSUNG brand product, as supplied and distributed by SAMSUNG ELECTRONICS AMERICA, INC. (SAMSUNG) and delivered...
..., or fixing installation errors. SAMSUNG does not warrant uninterrupted or error-free operation of nature or God; In-home service is not available in the instruction book; product removal and reinstallation; SAMSUNG will provide in-home service during the... limited warranty period specified above. warranty SAMSUNG DRYER LIMITED WARRANTY TO ORIGINAL PURCHASER This SAMSUNG brand product, as supplied and distributed by SAMSUNG ELECTRONICS AMERICA, INC. (SAMSUNG) and delivered...


