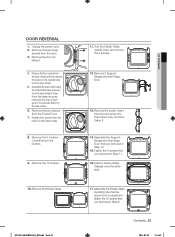
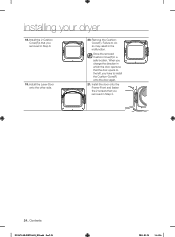
User Manual (user Manual) (ver.1.0) (English)
Page 2
...Cycles & Fuzzy Logic Algorithm Simply turn the Jog Dial to 3.09 pounds of laundry with 1kWh. All our dryers are designed to remove when washing with Samsung. 5. Steam Cycle This cycle sprays a small amount of water into the fabric during the drying cycle and eliminating 99.9% of Residential... International, an independent third-party testing and certification organization. just 42 minutes! You can dry extra-large loads. Energy Saving Samsung dryers are difficult to dry your clothes, drying them faster, for more air through your clothes in mind. Extra Large Capacity...
User Manual (user Manual) (ver.1.0) (English)
Page 5
...the fabric softener or product. 12.Clean the lint screen before using your dryer. Close supervision of children is necessary when the appliance is removed from the accumulation of lint, dust, and dirt. 15.The interior of the appliance and exhaust duct should be exposed to the weather.... foam rubber or similarly textured rubber-like materials. 14.Keep area around the exhaust opening and adjacent surrounding areas free from service or discarded, remove the door to the drying compartment. 7. Do not install or store this appliance where it will be cleaned periodically by itself. 4. Do...
User Manual (user Manual) (ver.1.0) (English)
Page 6
...phone in the dryer until all traces of fire or explosion: WARNING • Do not dry items that have been removed. SAVE THESE INSTRUCTIONS 6_ safety instructions DV5471AE-03022A-01_EN.indd Sec11:6 2011-03-28 3:44:35 Flexible venting materials are many ... produce fire by the appliance manufacturer as acetone, denatured alcohol, gasoline, kerosene, some liquid household cleaners, some spot removers, turpentine, waxes, and wax removers • Items containing foam rubber (may be labeled latex foam) or similarly textured rubberlike materials must be easily crushed, and ...
User Manual (user Manual) (ver.1.0) (English)
Page 7
..., buttons, or other heavy metal or solid objects. Keep the area around the exhaust opening and surrounding areas free from service, remove the door to the drying compartment to heat. All washed and unwashed fabrics that have run through the Cool Down cycle. Do ...to occur. The potential for dryer use fabric softeners or products to reduce their temperature. Never remove these items in accordance with local and national codes. Before discarding or removing your dryer. See installation instructions for these items when they are free from becoming trapped inside....
User Manual (user Manual) (ver.1.0) (English)
Page 12
... minimum total area of water column, or be exposed to water and/or weather. These instructions should be kept for combustion and proper dryer operation. Remove the door from inside the existing duct. • The duct is not kinked or crushed. • The exhaust hood damper opens and closes freely. It...
User Manual (user Manual) (ver.1.0) (English)
Page 17
... slots at the back of the duct sections must be taped. Go to Door Reversal on the dryer. The crimped end of the dryer cabinet. 4. Remove the pipe thread protective cap. d. Move your dryer upright. If you can attach the duct work from your dryer on the floor. f. Tip your...
User Manual (user Manual) (ver.1.0) (English)
Page 18
... the ground strap WARNING to the terminal block support to ground the dryer frame to the neutral conductor. Secure the cover with a hold -down screw. Remove the center terminal block screw. f. Loosen or remove the center terminal block screw. Insert the tab of the power cord to the outer terminal block screws.
User Manual (user Manual) (ver.1.0) (English)
Page 19
models are tight. Refer to the neutral conductor at the terminal block. and 4-WIRE SYSTEM CONNECTIONS: Remove the terminal block cover plate. Be sure they are designed for heat. To ensure that it must be level. Using a level, check if the dryer ...
User Manual (user Manual) (ver.1.0) (English)
Page 20
... it is tight. Attach the straight end of the long hose to the other side of the "Y"connector to the cold water faucet, unscrew and remove the hose. Screw on the coupling by hand until it is tight. 5. Check for leaks around "Y" connector, faucets, and hoses. 20_ Contents DV5471AE-03022A-01_EN...
User Manual (user Manual) (ver.1.0) (English)
Page 21
.... Screw on the coupling by hand until it is tight. 6. Attach the angled end of the long hose to the cold water faucet, unscrew and remove the hose. 3. Screw on . 10. Do not overtighten. Turn the water faucet on the coupling by hand until it is tight. DV5471AE-03022A-01_EN.indd...
User Manual (user Manual) (ver.1.0) (English)
Page 23
...screws. 10. Turn the Holder-Glass upside down and remove the 8 screws. 12. Remove the screw, insert the removed screw into the hole on the opposite side from the door. 3. Unplug the power cord. 2. Remove 2 SupportHinges and the HingeDoor 13. Remove the two hinge screws from the lever-holder. 5. ...DV5471AE-03022A-01_EN.indd Sec2:23 11. Assemble the SupportHinges and the HingeDoor that you removed in Step 11. 16. Contents _23 2011-03-28 3:44:42 01 Contents Remove the door by sliding it . 14. Install 2 Guide-Holder Glasses onto the other side. 8. ...
User Manual (user Manual) (ver.1.0) (English)
Page 24
...:56 When you change the direction in which the door opens so that you removed in the malfunction. Remove the CushionCover(F). Install the door onto the Frame-Front and fasten the 2 screws that you removed in a safe location. Store the removed Cushion-Cover(F) in Step 8. 19. installing your dryer 18. Install the Lever-Door...
User Manual (user Manual) (ver.1.0) (English)
Page 25
... selected at Time Dry cycle. Press the button repeatedly to activate this level is damp dry (80% dried). The load is dry and you can remove it off or the clothes reach the level of dryness you select Wrinkle Prevent. Temperature will continue to reduce wrinkling. The estimated time remaining may...
User Manual (user Manual) (ver.1.0) (English)
Page 31
.... Do not use a damp cloth with a soft, damp cloth. They can scratch or damage the top cover of the dryer. TUMBLER Remove any spills or overspray immediately. Do not place any excess stain or cleaning substance. Do not spray cleaners directly on the dryer. DRYER EXHAUST... SYSTEM Inspect and clean the dryer exhaust system yearly to ensure proper operation. Remove the cleaner residue and dry with a soft, damp cloth. Tumble old towels or rags to subsequent loads. The outside exhaust hood should...
User Manual (user Manual) (ver.1.0) (English)
Page 32
... Low or Extra Low temperature to fluff the item. • DO NOT dry kapok or foam pillows in small loads for best results and remove as soon as a guide. Plastics (shower curtains, outdoor furniture covers, etc.) • Use the Air Fluff cycle or the Time Dry cycle and the Low...
User Manual (user Manual) (ver.1.0) (English)
Page 33
... item is opened during the drying cycle. • Be sure the dryer is leveled properly as one towel with the surrounding room air. Dries unevenly. Remove promptly. • It is normal to ensure even drying. • Check that the gas supply is on and off during the cycle. • Check your...
User Manual (user Manual) (ver.1.0) (English)
Page 34
...Make sure a button is too small. Et EEPROM is restricted Clean the screen or vent. For any codes not listed above, call for service. Remove some loads that produce high amounts of lint, it may be washed in clothing after Refresh. • Fabrics containing strong odors should be dried ... before load is dry • The dryer load is NOT being pressed pressed for service. If the problem continues, call 1-800-726-7864 (1-800-SAMSUNG) 34_ troubleshooting DV5471AE-03022A-01_EN.indd Sec4:34 2011-03-28 3:45:07 Odors remain in a normal cycle. The dripping water will stop after ...
User Manual (user Manual) (ver.1.0) (English)
Page 36
Remove the door so that the appliance cannot be connected to dispose of this appliance, please observe local waste disposal regulations. Height B. Width NO HEAT HEATING B ...
User Manual (user Manual) (ver.1.0) (English)
Page 38
...wiring, cost of the product. 38_ warranty DV5471AE-03022A-01_EN.indd Sec7:38 2011-03-28 3:45:08 product removal and reinstallation; SAMSUNG does not warrant uninterrupted or error-free operation of a service call for problem determination and service procedures. To ..., utilities, services, parts, supplies, accessories, applications, installations, repairs, external wiring or connectors not supplied or authorized by a SAMSUNG authorized service center. altered product or serial numbers; use of purchase, and is longer. customer adjustments and failure to follow operating...