User Manual (ENGLISH)
Page 2
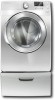
... just about anywhere and without a door conflict. The Dryer legs need to be removed to remove when washing with water, and also reduces wrinkles. 3. Our ultralarge 7.4 cu.ft. Sanitize course This course allows you Samsung retailer. 10.4-way Vent (electric model only : DV448AEW) You can install the exhaust vent in the following four (4) positions: back...
... just about anywhere and without a door conflict. The Dryer legs need to be removed to remove when washing with water, and also reduces wrinkles. 3. Our ultralarge 7.4 cu.ft. Sanitize course This course allows you Samsung retailer. 10.4-way Vent (electric model only : DV448AEW) You can install the exhaust vent in the following four (4) positions: back...
User Manual (ENGLISH)
Page 3
... If flexible metal (foil type) duct is installed, it must be performed by the appliance manufacturer as suitable for help. Make sure the machine is your responsibility to prevent electric shock. Always contact your new Samsung Dryer. It is grounded to use common sense,... caution, and care when installing, maintaining, or operating your dryer's many benefits and features. This manual contains valuable information on your manufacturer about...
... If flexible metal (foil type) duct is installed, it must be performed by the appliance manufacturer as suitable for help. Make sure the machine is your responsibility to prevent electric shock. Always contact your new Samsung Dryer. It is grounded to use common sense,... caution, and care when installing, maintaining, or operating your dryer's many benefits and features. This manual contains valuable information on your manufacturer about...
User Manual (ENGLISH)
Page 4
...has been in contact with a cleaning solvent or flammable liquids or solids should not be performed by a qualified installer, service agency, or the gas supplier. Any material that have been previously cleaned, washed, soaked, or spotted with controls. SAVE THESE INSTRUCTIONS 4_...for dryer use any part of the appliance unless specifically recommended in the user-repair instructions and you cannot reach your gas supplier, call your gas supplier from a neighbor's phone. Follow the gas supplier's instructions. • If you understand and have been removed. Installation and...
...has been in contact with a cleaning solvent or flammable liquids or solids should not be performed by a qualified installer, service agency, or the gas supplier. Any material that have been previously cleaned, washed, soaked, or spotted with controls. SAVE THESE INSTRUCTIONS 4_...for dryer use any part of the appliance unless specifically recommended in the user-repair instructions and you cannot reach your gas supplier, call your gas supplier from a neighbor's phone. Follow the gas supplier's instructions. • If you understand and have been removed. Installation and...
User Manual (ENGLISH)
Page 5
.... For complete details, see the Installation Instructions packed with the manufacturer's instructions. Gas suppliers recommend you purchase and install a UL-approved gas detector. Heat sources such as your dryer can be dangerous. Oxidation creates heat. See installation instructions for spontaneous combustion increases when... this appliance. Because of continuing product improvements, Samsung reserves the right to catch fire. Do not wash clothing with vegetable oil or cooking oil. Always use in accordance with your dryer that is not grounded adequately and in the...
.... For complete details, see the Installation Instructions packed with the manufacturer's instructions. Gas suppliers recommend you purchase and install a UL-approved gas detector. Heat sources such as your dryer can be dangerous. Oxidation creates heat. See installation instructions for spontaneous combustion increases when... this appliance. Because of continuing product improvements, Samsung reserves the right to catch fire. Do not wash clothing with vegetable oil or cooking oil. Always use in accordance with your dryer that is not grounded adequately and in the...
User Manual (ENGLISH)
Page 6
... Exhaust Requirements 8 Ducting requirements 9 Important to installer 9 Location considerations 9 Alcove or closet installation 10 Mobile home installation 10 Exhausting 11 Gas requirements 12 Electrical requirements 12 Grounding 13 Electrical connections 14 Connecting the inlet hose 15 Replacement parts and accessories 15 Installation 18 Final installation checklist 19 Dryer Exhaust Tips 20 Door Reversal 21 Overview of the...
... Exhaust Requirements 8 Ducting requirements 9 Important to installer 9 Location considerations 9 Alcove or closet installation 10 Mobile home installation 10 Exhausting 11 Gas requirements 12 Electrical requirements 12 Grounding 13 Electrical connections 14 Connecting the inlet hose 15 Replacement parts and accessories 15 Installation 18 Final installation checklist 19 Dryer Exhaust Tips 20 Door Reversal 21 Overview of the...
User Manual (ENGLISH)
Page 7
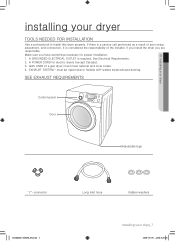
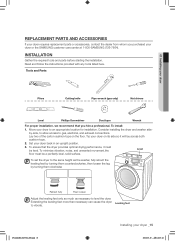
... EXHAUST REQUIREMENTS Control panel Door Adjustable legs "Y"-connector DV448AEG-02555A_EN.indd 7 Long inlet hose Rubber washers Installing your dryer TOOLS NEEDED FOR INSTALLATION Hire a professional to install this dryer properly. See Electrical Requirements. 2. Make sure you are responsible. GAS LINES (if a gas dryer) must be rigid metal or flexible stiff-walled metal exhaust ducting. EXHAUST SYSTEM - must meet...
... EXHAUST REQUIREMENTS Control panel Door Adjustable legs "Y"-connector DV448AEG-02555A_EN.indd 7 Long inlet hose Rubber washers Installing your dryer TOOLS NEEDED FOR INSTALLATION Hire a professional to install this dryer properly. See Electrical Requirements. 2. Make sure you are responsible. GAS LINES (if a gas dryer) must be rigid metal or flexible stiff-walled metal exhaust ducting. EXHAUST SYSTEM - must meet...
User Manual (ENGLISH)
Page 8
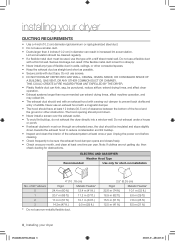
...ft.) Metallic Flexible* 12.4 m (41 ft.) 1 20.7 m (68 ft.) 11.2 m (37 ft.) 2 17.4 m (57 ft.) 10.1 m (33 ft.) 3 14.3m (47 ft.) 9.0 m (29 ft.) * Do not use non-metallic flexible duct. 2.5" (6.35 cm) Rigid Metallic Flexible* 22.6 m (74 ft.) 10.1 m (33 ft.) 18.9 m (62 ft.) 8.8 m (29 ft.) 15.5 m (51 ft.) 7.6 m (25 ft.) 12.5 m (41 ft.) 6.5 m (21 ft.) 8_ Installing your dryer... metal duct must run installation 4" (10 .16 cm) No. Do not use screws. • DO NOT EXHAUST DRYER INTO ANY WALL, CEILING, CRAWL SPACE, OR CONCEALED SPACE OF A BUILDING, GAS VENT, OR ANY OTHER...
...ft.) Metallic Flexible* 12.4 m (41 ft.) 1 20.7 m (68 ft.) 11.2 m (37 ft.) 2 17.4 m (57 ft.) 10.1 m (33 ft.) 3 14.3m (47 ft.) 9.0 m (29 ft.) * Do not use non-metallic flexible duct. 2.5" (6.35 cm) Rigid Metallic Flexible* 22.6 m (74 ft.) 10.1 m (33 ft.) 18.9 m (62 ft.) 8.8 m (29 ft.) 15.5 m (51 ft.) 7.6 m (25 ft.) 12.5 m (41 ft.) 6.5 m (21 ft.) 8_ Installing your dryer... metal duct must run installation 4" (10 .16 cm) No. Do not use screws. • DO NOT EXHAUST DRYER INTO ANY WALL, CEILING, CRAWL SPACE, OR CONCEALED SPACE OF A BUILDING, GAS VENT, OR ANY OTHER...
User Manual (ENGLISH)
Page 9
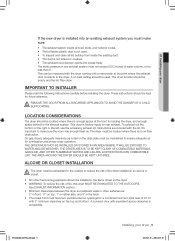
... VAPORS AND LIQUIDS. A louvered door with a manometer at the front for loading the dryer, and enough space behind for combustion and proper dryer operation. IMPORTANT TO INSTALLER Please read the following instructions carefully before installing the dryer. On gas dryers, adequate clearance as the dryer. • WARNING: To reduce the risk of 72 in the same closet as...
... VAPORS AND LIQUIDS. A louvered door with a manometer at the front for loading the dryer, and enough space behind for combustion and proper dryer operation. IMPORTANT TO INSTALLER Please read the following instructions carefully before installing the dryer. On gas dryers, adequate clearance as the dryer. • WARNING: To reduce the risk of 72 in the same closet as...

User Manual (ENGLISH)
Page 10
...:40 See Exhausting section for information on purchasing the Floor Anchoring Kit as an accessory. Call 1-800-SAMSUNG for more information. When installing a dryer in a mobile home, provisions for Canada). installing your dryer MOBILE HOME INSTALLATION The installation of the dryer in mobile homes must conform to the Manufactured Home Construction and Safety Standard Title 24 CFR, Part...
...:40 See Exhausting section for information on purchasing the Floor Anchoring Kit as an accessory. Call 1-800-SAMSUNG for more information. When installing a dryer in a mobile home, provisions for Canada). installing your dryer MOBILE HOME INSTALLATION The installation of the dryer in mobile homes must conform to the Manufactured Home Construction and Safety Standard Title 24 CFR, Part...
User Manual (ENGLISH)
Page 11
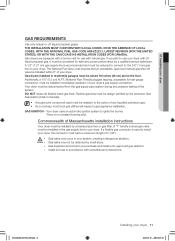
... a maximum length of 3' (36"). - Gas dryers installed in the gas supply line to ignite the burner. Your dryer uses an automatic ignition system to your dryer. If you purchase and install a UL-approved gas detector. Flexible gas lines must be installed in residential garages must be resistant to the 3/8" (1 cm) gas line on your dryer. Commonwealth of your dryer's gas supply connection. If a flexible...
... a maximum length of 3' (36"). - Gas dryers installed in the gas supply line to ignite the burner. Your dryer uses an automatic ignition system to your dryer. If you purchase and install a UL-approved gas detector. Flexible gas lines must be installed in residential garages must be resistant to the 3/8" (1 cm) gas line on your dryer. Commonwealth of your dryer's gas supply connection. If a flexible...

User Manual (ENGLISH)
Page 12
...conductor can result in accordance with all local codes and ordinances. It is your responsibility to the equipment grounding terminal. 12_ Installing your dryer is properly grounded. Latest Revision (for the U.S.) or CAN/CGA - Check with a qualified electrician or serviceman if you ...are in accordance with your dryer - if it doesn't fit the outlet, have a proper outlet installed by providing a path of least resistance for the U.S.) or the Canadian Electrical Code CSA C22.1 - All gas installations must be plugged into an appropriate outlet that is ...
...conductor can result in accordance with all local codes and ordinances. It is your responsibility to the equipment grounding terminal. 12_ Installing your dryer is properly grounded. Latest Revision (for the U.S.) or CAN/CGA - Check with a qualified electrician or serviceman if you ...are in accordance with your dryer - if it doesn't fit the outlet, have a proper outlet installed by providing a path of least resistance for the U.S.) or the Canadian Electrical Code CSA C22.1 - All gas installations must be plugged into an appropriate outlet that is ...
User Manual (ENGLISH)
Page 13
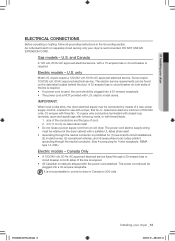
... 120/208 volt, 60 Hz approved electrical service. It is recommended. DV448AEG-02555A_EN.indd 13 Installing your dryer is not permissible to 208 volts. Gas models - U.S. electric model dryers. Canada Only • A 120/240 volt, 60 Hz AC approved electrical service fused through... the neutral conductor. (Use 4-prong plug for (1) new branch-circuit installations, (2) mobile homes, (3) recreational vehicles, and (4) ...
... 120/208 volt, 60 Hz approved electrical service. It is recommended. DV448AEG-02555A_EN.indd 13 Installing your dryer is not permissible to 208 volts. Gas models - U.S. electric model dryers. Canada Only • A 120/240 volt, 60 Hz AC approved electrical service fused through... the neutral conductor. (Use 4-prong plug for (1) new branch-circuit installations, (2) mobile homes, (3) recreational vehicles, and (4) ...
User Manual (ENGLISH)
Page 14
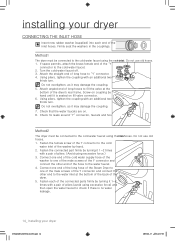
...washer by turning it 1~2 times with a pair of pliers (avoid using the newhoinslest . Fasten the connected part firmly by hand. 2. Method1 The dryer must be connected to the cold water faucet using excessive force.) 3. Turn the cold water faucet off. 3. Check for leaks around "Y" connector, ... connector and connect the other end to check if there is seated on fill valve connector. 6. Do not use old hoses. 1. installing your dryer CONNECTING THE INLET HOSE Insert new rubber washer (supplied) into each of the connected parts firmly by hand until it is no water leakage...
...washer by turning it 1~2 times with a pair of pliers (avoid using the newhoinslest . Fasten the connected part firmly by hand. 2. Method1 The dryer must be connected to the cold water faucet using excessive force.) 3. Turn the cold water faucet off. 3. Check for leaks around "Y" connector, ... connector and connect the other end to check if there is seated on fill valve connector. 6. Do not use old hoses. 1. installing your dryer CONNECTING THE INLET HOSE Insert new rubber washer (supplied) into each of the connected parts firmly by hand until it is no water leakage...
User Manual (ENGLISH)
Page 15
... Pipe wrench (gas only) Nut drivers Level Phillips Screwdriver Duct tape Wrench For proper installation, we recommend that the dryer provides optimal drying performance, it will lay across both cushion-tops. 2. Read and follow the instructions provided with any tools listed here. Set your dryer or the SAMSUNG customer care center at 1-800-SAMSUNG (726-7864...
... Pipe wrench (gas only) Nut drivers Level Phillips Screwdriver Duct tape Wrench For proper installation, we recommend that the dryer provides optimal drying performance, it will lay across both cushion-tops. 2. Read and follow the instructions provided with any tools listed here. Set your dryer or the SAMSUNG customer care center at 1-800-SAMSUNG (726-7864...
User Manual (ENGLISH)
Page 16
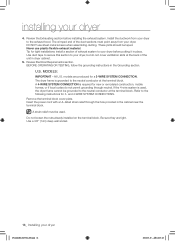
... homes, or if local codes do not cover ventilation slots at the terminal block. Use a 3/8" (1cm) deep well socket. 16_ Installing your dryer 4. Never use sheet metal screws when assembling ducting. Use duct tape to secure this section to the neutral conductor at the back of ...the cabinet near the terminal block. If the 4-wire system is required for 3- These joints should be grounded to your dryer. and 4-WIRE SYSTEM CONNECTIONS. installing your dryer DV448AEG-02555A_EN.indd 16 2008-03-25 ¿ÀÈÄ 6:25:48 Remove the terminal block cover plate. ...
... homes, or if local codes do not cover ventilation slots at the terminal block. Use a 3/8" (1cm) deep well socket. 16_ Installing your dryer 4. Never use sheet metal screws when assembling ducting. Use duct tape to secure this section to the neutral conductor at the back of ...the cabinet near the terminal block. If the 4-wire system is required for 3- These joints should be grounded to your dryer. and 4-WIRE SYSTEM CONNECTIONS. installing your dryer DV448AEG-02555A_EN.indd 16 2008-03-25 ¿ÀÈÄ 6:25:48 Remove the terminal block cover plate. ...
User Manual (ENGLISH)
Page 17
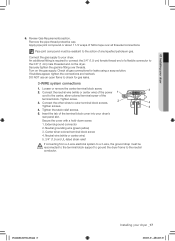
... the 3/4" (1.9 cm) female thread end of the terminal block cover into your dryer. External ground connector 2. 01 Installing your dryer _17 2008-03-25 ¿ÀÈÄ 6:25:49 Tighten screw. 3. Securely tighten the gas line fitting over all gas connections for gas leaks. 3-WIRE system connections 1. Center silver-colored terminal block screw 4. Turn on...
... the 3/4" (1.9 cm) female thread end of the terminal block cover into your dryer. External ground connector 2. 01 Installing your dryer _17 2008-03-25 ¿ÀÈÄ 6:25:49 Tighten screw. 3. Securely tighten the gas line fitting over all gas connections for gas leaks. 3-WIRE system connections 1. Center silver-colored terminal block screw 4. Turn on...
User Manual (ENGLISH)
Page 18
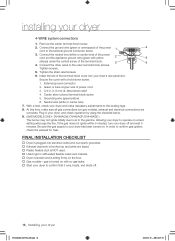
...61551; Used rigid or stiff-walled flexible metal vent material. Dryer is leveled and is plugged into your dryer off . 18_ Installing your dryer, and check operation by using the checklist below. 9. (GAS MODELS ONLY- In order to the external ground conductor screw. 3. Connect ...listed strain relief 4. Tighten the strain relief screws. 6. Be sure the gas supply to operate on a heat setting will purge the line. installing your dryer has been turned on. Remove the center terminal block screw. 2. DV448AGW, DV448AGP, DV448AGE ) The burner may not ignite initially due to the...
...61551; Used rigid or stiff-walled flexible metal vent material. Dryer is leveled and is plugged into your dryer off . 18_ Installing your dryer, and check operation by using the checklist below. 9. (GAS MODELS ONLY- In order to the external ground conductor screw. 3. Connect ...listed strain relief 4. Tighten the strain relief screws. 6. Be sure the gas supply to operate on a heat setting will purge the line. installing your dryer has been turned on. Remove the center terminal block screw. 2. DV448AGW, DV448AGP, DV448AGE ) The burner may not ignite initially due to the...
User Manual (ENGLISH)
Page 19
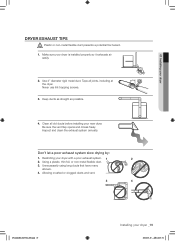
... as straight as possible. 4. Use 4" diameter rigid metal duct. Never use lint-trapping screws. 3. Allowing crushed or clogged ducts and vent. 3 4 DV448AEG-02555A_EN.indd 19 Installing your new dryer. Unnecessarily using long ducts that have many elbows. 4. Using a plastic, thin foil, or non-metal flexible duct. 3. Clean all joints, including at the...
... as straight as possible. 4. Use 4" diameter rigid metal duct. Never use lint-trapping screws. 3. Allowing crushed or clogged ducts and vent. 3 4 DV448AEG-02555A_EN.indd 19 Installing your new dryer. Unnecessarily using long ducts that have many elbows. 4. Using a plastic, thin foil, or non-metal flexible duct. 3. Clean all joints, including at the...
User Manual (ENGLISH)
Page 20
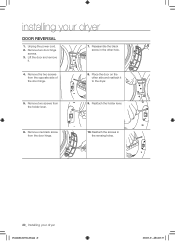
Unplug the power cord. 2. Reassemble the black screw in the remaing holes. 20_ Installing your dryer DOOR REVERSAL 1. Remove the two screws from the door hinge. 10. Place the door on the other hole. 4. Reattach the holder lever. 6. Remove one black ...screw from the opposite side of the door hinge. 8. Remove two screws from the holder lever. 9. Remove two door hinge screws. 3. installing your dryer DV448AEG-02555A_EN.indd 20 2008-03-25 ¿ÀÈÄ 6:25:55 Lift the door and remove it to the...
Unplug the power cord. 2. Reassemble the black screw in the remaing holes. 20_ Installing your dryer DOOR REVERSAL 1. Remove the two screws from the door hinge. 10. Place the door on the other hole. 4. Reattach the holder lever. 6. Remove one black ...screw from the opposite side of the door hinge. 8. Remove two screws from the holder lever. 9. Remove two door hinge screws. 3. installing your dryer DV448AEG-02555A_EN.indd 20 2008-03-25 ¿ÀÈÄ 6:25:55 Lift the door and remove it to the...
User Manual (ENGLISH)
Page 25
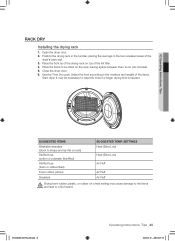
Place the front lip of the drying rack on top of the dryer's back wall. 3. Select the time according to shape and lay flat on the rack, leaving space between them so air can circulate. 5. SETTINGS Heat (Extra ... in the two recessed areas of the lint filter. 4. SUGGESTED ITEMS Washable sweaters (block to the moisture and weight of the items. Start dryer. Open the dryer door. 2. Close the dryer door. 6. Use the Time Dry cycle. DV448AEG-02555A_EN.indd 25 Operating Instructions, Tips _25 2008-03-25 ¿ÀÈÄ 6:25...
Place the front lip of the drying rack on top of the dryer's back wall. 3. Select the time according to shape and lay flat on the rack, leaving space between them so air can circulate. 5. SETTINGS Heat (Extra ... in the two recessed areas of the lint filter. 4. SUGGESTED ITEMS Washable sweaters (block to the moisture and weight of the items. Start dryer. Open the dryer door. 2. Close the dryer door. 6. Use the Time Dry cycle. DV448AEG-02555A_EN.indd 25 Operating Instructions, Tips _25 2008-03-25 ¿ÀÈÄ 6:25...


