
User Manual Ver.1.0 (English, French, Spanish)
Page 18
... it is required to connect the 3/4" (1.9 cm) female thread end of the duct sections must be taped. e. f. Move your dryer DV405ETPAWR-03021F-03_EN_20120710.indd Sec5:18 2012-07-10 5:30:49 Never use sheet metal screws when assembling ducting. If you hire a qualified installer.... If you begin the installation. DO NOT use an open flame to Step 6. Review the Exhausting section before putting it in place. Install the duct work , power cord, etc. 2. Review the Gas Requirements section, then follow these instructions completely before you have a gas model, ...
... it is required to connect the 3/4" (1.9 cm) female thread end of the duct sections must be taped. e. f. Move your dryer DV405ETPAWR-03021F-03_EN_20120710.indd Sec5:18 2012-07-10 5:30:49 Never use sheet metal screws when assembling ducting. If you hire a qualified installer.... If you begin the installation. DO NOT use an open flame to Step 6. Review the Exhausting section before putting it in place. Install the duct work , power cord, etc. 2. Review the Gas Requirements section, then follow these instructions completely before you have a gas model, ...
User Manual Ver.1.0 (English, French, Spanish)
Page 19
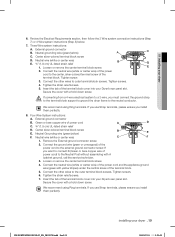
...perfectly. Center silver-colored terminal block screw E. Neutral wire (white or center wire) 1. Remove the External ground connector screw. 2. DV405ETPAWR-03021F-03_EN_20120710.indd Sec5:19 installing your dryer 6. Secure the cover with a hold -down screw. Four Wire System instructions: A.... Tighten the strain relief screws. 7. 01 installing your dryer _19 2012-07-10 5:30:49 Review the Electrical Requirements section, then follow the 3 Wire system connection instructions (Step 7) or 4 Wire system instructions (Step 8) below. 7....
...perfectly. Center silver-colored terminal block screw E. Neutral wire (white or center wire) 1. Remove the External ground connector screw. 2. DV405ETPAWR-03021F-03_EN_20120710.indd Sec5:19 installing your dryer 6. Secure the cover with a hold -down screw. Four Wire System instructions: A.... Tighten the strain relief screws. 7. 01 installing your dryer _19 2012-07-10 5:30:49 Review the Electrical Requirements section, then follow the 3 Wire system connection instructions (Step 7) or 4 Wire system instructions (Step 8) below. 7....