(English)
Page 6
... 24 Drum Light 24 Changing The Language 24 My cycle 25 Rack Dry 26 Clean the lint filter 26 Load the dryer properly 26 Getting started 27 Control Panel 27 Tumbler 27 Stainless Steel Tumbler 27 Dryer Exterior 27 Dryer Exhaust System 28 Special laundry tips 29 Check these points if...
... 24 Drum Light 24 Changing The Language 24 My cycle 25 Rack Dry 26 Clean the lint filter 26 Load the dryer properly 26 Getting started 27 Control Panel 27 Tumbler 27 Stainless Steel Tumbler 27 Dryer Exterior 27 Dryer Exhaust System 28 Special laundry tips 29 Check these points if...
(English)
Page 15
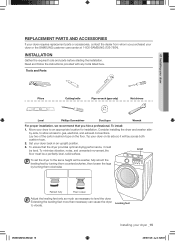
To ensure that you purchased your dryer or the SAMSUNG customer care center at 1-800-SAMSUNG (726-7864). Extending the leveling feet more than necessary can cause the dryer Leveling feet to gas, electrical, and exhaust connections. Tools and Parts Pliers ... cushion-tops. 2. Lay two of the carton cushion-tops on its side so it must be level. INSTALLATION Gather the required tools and parts before starting the installation. by turning them counterclockwise, then loosen the legs by -side, to allow access to vibrate. To set the dryer to the same height...
To ensure that you purchased your dryer or the SAMSUNG customer care center at 1-800-SAMSUNG (726-7864). Extending the leveling feet more than necessary can cause the dryer Leveling feet to gas, electrical, and exhaust connections. Tools and Parts Pliers ... cushion-tops. 2. Lay two of the carton cushion-tops on its side so it must be level. INSTALLATION Gather the required tools and parts before starting the installation. by turning them counterclockwise, then loosen the legs by -side, to allow access to vibrate. To set the dryer to the same height...
(English)
Page 18
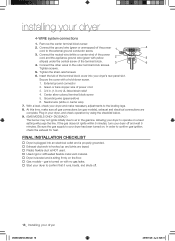
... operation by using the checklist below. 9. (GAS MODELS ONLY- Center silver-colored terminal block screw 5. gas is sitting firmly on with no gas leaks. Start your dryer to air in . (1.9 cm) UL-listed strain relief 4. Grounding wire (green/yellow) 6. Insert the tab of the power cord and the appliance ground...
... operation by using the checklist below. 9. (GAS MODELS ONLY- Center silver-colored terminal block screw 5. gas is sitting firmly on with no gas leaks. Start your dryer to air in . (1.9 cm) UL-listed strain relief 4. Grounding wire (green/yellow) 6. Insert the tab of the power cord and the appliance ground...
(English)
Page 22
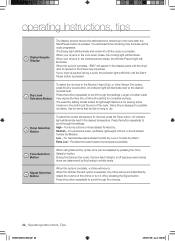
... the Wrinkle Prevent option is complete. Press the button repeatedly to scroll through the settings. When your dryer is in the display panel until the Start/ Pause button is complete, a chime will illuminate. An indicator light will illuminate next to the desired temperature. Temp Selection 4 Button To select ...is off by pressing the Time Selection button. High - Dry Level 3 Selection Button To select the dry level in the cycle after the Start/Pause button is pushed. The Less Dry setting is in the clothing at the end of the chime or turn it off because exact drying...
... the Wrinkle Prevent option is complete. Press the button repeatedly to scroll through the settings. When your dryer is in the display panel until the Start/ Pause button is complete, a chime will illuminate. An indicator light will illuminate next to the desired temperature. Temp Selection 4 Button To select ...is off by pressing the Time Selection button. High - Dry Level 3 Selection Button To select the dry level in the cycle after the Start/Pause button is pushed. The Less Dry setting is in the clothing at the end of the chime or turn it off because exact drying...
(English)
Page 23
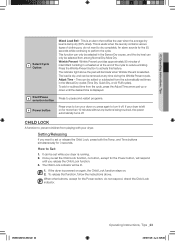
... to turn your dryer. The Child Lock indicator will be lit. 1. To release that notifies the user when the average dry level is left on . 2. Start/Pause 8 selection button 9 Power button Press to pause and restart programs. Press once to turn it off . CHILD LOCK A function to prevent children from the...
... to turn your dryer. The Child Lock indicator will be lit. 1. To release that notifies the user when the average dry level is left on . 2. Start/Pause 8 selection button 9 Power button Press to pause and restart programs. Press once to turn it off . CHILD LOCK A function to prevent children from the...
(English)
Page 24
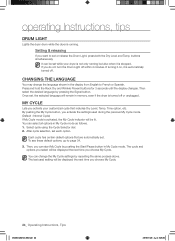
... , the selected language will be set while your customized cycle that are automatically set each option. It can start My Cycle by pressing the Signal button. Then select the desired language by pushing the Start/Pause button in My Cycle mode as follows. 1. The last used during the previous My Cycle mode...
... , the selected language will be set while your customized cycle that are automatically set each option. It can start My Cycle by pressing the Signal button. Then select the desired language by pushing the Start/Pause button in My Cycle mode as follows. 1. The last used during the previous My Cycle mode...
(English)
Page 25
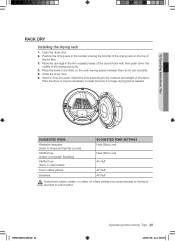
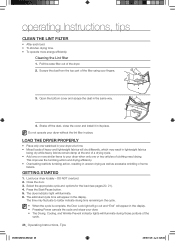
... Sneakers SUGGESTED TEMP. Position the drying rack in the two recessed areas of the dryer's back wall, then push down the middle of the items. Start the dryer.
... Sneakers SUGGESTED TEMP. Position the drying rack in the two recessed areas of the dryer's back wall, then push down the middle of the items. Start the dryer.
(English)
Page 26
Close the door. 3. Scrape the dust from the top part of the dryer. 2. Press the Start/Pause button. 5. Shake off the dust, close the cover and install it in the same way. 4. Select the appropriate cycle and options for the ... time may result in your dryer at a time. • Mixed loads of heavy and lightweight fabrics will illuminate during those portions of some fabrics. GETTING STARTED 1. The estimated cycle time will illuminate. 6. This improves the tumbling action and drying efficiency. • Overloading restricts tumbling action, resulting in uneven drying as...
Close the door. 3. Scrape the dust from the top part of the dryer. 2. Press the Start/Pause button. 5. Shake off the dust, close the cover and install it in the same way. 4. Select the appropriate cycle and options for the ... time may result in your dryer at a time. • Mixed loads of heavy and lightweight fabrics will illuminate during those portions of some fabrics. GETTING STARTED 1. The estimated cycle time will illuminate. 6. This improves the tumbling action and drying efficiency. • Overloading restricts tumbling action, resulting in uneven drying as...
(English)
Page 29
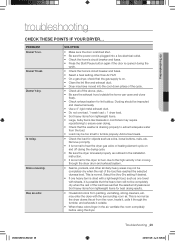
... lint filter and exhaust duct. • Dryer may have moved into a live electrical outlet. • Check the home's circuit breaker and fuses. • Press the Start/Pause button again if the door is opened during the cycle. • Check the home's circuit breaker and fuses. • Select a heat setting other than...
... lint filter and exhaust duct. • Dryer may have moved into a live electrical outlet. • Check the home's circuit breaker and fuses. • Press the Start/Pause button again if the door is opened during the cycle. • Check the home's circuit breaker and fuses. • Select a heat setting other than...

(English)
Page 30
... load is too large. The dripping water will stop after • Small loads of lint, it may be dried separately from nozzle when Steam-Care starts • This is cleaned before every load. Add more items or a few towels and restart the cycle. • Dryer load is too small...
... load is too large. The dripping water will stop after • Small loads of lint, it may be dried separately from nozzle when Steam-Care starts • This is cleaned before every load. Add more items or a few towels and restart the cycle. • Dryer load is too small...


