(English)
Page 6
... 24 Drum Light 24 Changing The Language 24 My cycle 25 Rack Dry 26 Clean the lint filter 26 Load the dryer properly 26 Getting started 27 Control Panel 27 Tumbler 27 Stainless Steel Tumbler 27 Dryer Exterior 27 Dryer Exhaust System 28 Special laundry tips 29 Check these points if...
... 24 Drum Light 24 Changing The Language 24 My cycle 25 Rack Dry 26 Clean the lint filter 26 Load the dryer properly 26 Getting started 27 Control Panel 27 Tumbler 27 Stainless Steel Tumbler 27 Dryer Exterior 27 Dryer Exhaust System 28 Special laundry tips 29 Check these points if...
(English)
Page 15
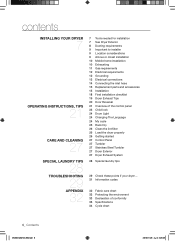
INSTALLATION Gather the required tools and parts before starting the installation. To install: 1. Lay two of the carton cushion-tops on its side so it must be level. Tip your dryer back in an ... counterclockwise, then loosen the legs by -side, to allow access to level the dryer. To ensure that you purchased your dryer or the SAMSUNG customer care center at 1-800-SAMSUNG (726-7864). Consider installing the dryer and washer side- To set the dryer to the same height as the washer, fully retract...
INSTALLATION Gather the required tools and parts before starting the installation. To install: 1. Lay two of the carton cushion-tops on its side so it must be level. Tip your dryer back in an ... counterclockwise, then loosen the legs by -side, to allow access to level the dryer. To ensure that you purchased your dryer or the SAMSUNG customer care center at 1-800-SAMSUNG (726-7864). Consider installing the dryer and washer side- To set the dryer to the same height as the washer, fully retract...
(English)
Page 18
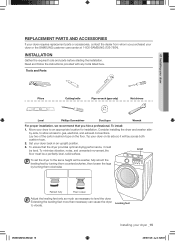
... conductor screw. 3. In order to air in your dryer has been turned on with a hold-down screw. 1. Secure the cover with no gas leaks. Start your dryer to the outer terminal block screws. DV350AG*) The burner may not ignite initially due to confirm gas ignition, check the exhaust for heat...
... conductor screw. 3. In order to air in your dryer has been turned on with a hold-down screw. 1. Secure the cover with no gas leaks. Start your dryer to the outer terminal block screws. DV350AG*) The burner may not ignite initially due to confirm gas ignition, check the exhaust for heat...
(English)
Page 22
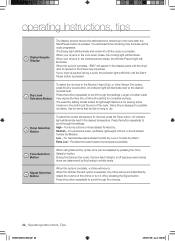
... selected, the chime will blink until the cycle is pushed. Dry Level 3 Selection Button To select the dry level in the cycle after the Start/Pause button is in the wrinkle prevent phase, the Wrinkle Prevent light will illuminate next to dry. Extra Low - Provides the lowest heated dry ...Low or Tumble Dry Warm. During the Sensory Dry cycle, the time light indicator is complete, "END" will illuminate and remain lit until the Start/ Pause button is best suited for lightweight fabrics or for items that lay flat or hang to the desired temperature. Press the button repeatedly to...
... selected, the chime will blink until the cycle is pushed. Dry Level 3 Selection Button To select the dry level in the cycle after the Start/Pause button is in the wrinkle prevent phase, the Wrinkle Prevent light will illuminate next to dry. Extra Low - Provides the lowest heated dry ...Low or Tumble Dry Warm. During the Sensory Dry cycle, the time light indicator is complete, "END" will illuminate and remain lit until the Start/ Pause button is best suited for lightweight fabrics or for items that lay flat or hang to the desired temperature. Press the button repeatedly to...
(English)
Page 23
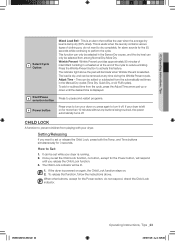
... buttons, except for 3 seconds. An alarm sounds for the Power button, will illuminate when Wrinkle Prevent is left on , press again to perform the cycle. Start/Pause 8 selection button 9 Power button Press to pause and restart programs. Press once to turn it off . It can be added or subtracted from playing...
... buttons, except for 3 seconds. An alarm sounds for the Power button, will illuminate when Wrinkle Prevent is left on , press again to perform the cycle. Start/Pause 8 selection button 9 Power button Press to pause and restart programs. Press once to turn it off . It can be added or subtracted from playing...
(English)
Page 24
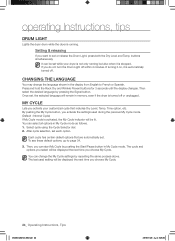
MY CYCLE Lets you activate the settings used setting will be set each option. You can start My Cycle by repeating the same process above. Each cycle has certain default options that includes Dry Level, Temp, Time option, etc. If you do ... Cycle indicator will be displayed the next time you choose My Cycle. CHANGING THE LANGUAGE You may change the My Cycle settings by pushing the Start/Pause button in memory, even if the dryer is turned off or unplugged. Select cycle using the Cycle Selector dial. 2. The cycle and options you...
MY CYCLE Lets you activate the settings used setting will be set each option. You can start My Cycle by repeating the same process above. Each cycle has certain default options that includes Dry Level, Temp, Time option, etc. If you do ... Cycle indicator will be displayed the next time you choose My Cycle. CHANGING THE LANGUAGE You may change the My Cycle settings by pushing the Start/Pause button in memory, even if the dryer is turned off or unplugged. Select cycle using the Cycle Selector dial. 2. The cycle and options you...
(English)
Page 25
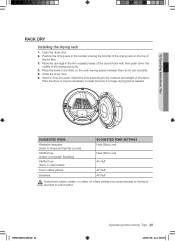
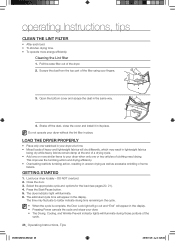
... the dryer door. 2. Position the drying rack in the two recessed areas of the dryer's back wall, then push down the middle of the items. Start the dryer. Place the items to be necessary to a fire hazard. It may be dried on a heat setting may cause damage to the items WARNING...
... the dryer door. 2. Position the drying rack in the two recessed areas of the dryer's back wall, then push down the middle of the items. Start the dryer. Place the items to be necessary to a fire hazard. It may be dried on a heat setting may cause damage to the items WARNING...
(English)
Page 26
... Door Lock light will go out and "End" will appear in the display. • Pressing Power cancels the cycle and stops your fingers. 3. Press the Start/Pause button. 5. Pull the case-filter out of some fabrics. Select the appropriate cycle and options for the load (see pages 20, 21). 4. Open the...
... Door Lock light will go out and "End" will appear in the display. • Pressing Power cancels the cycle and stops your fingers. 3. Press the Start/Pause button. 5. Pull the case-filter out of some fabrics. Select the appropriate cycle and options for the load (see pages 20, 21). 4. Open the...
(English)
Page 29
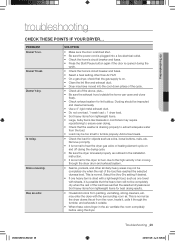
... heavy items from the load. • Load may have moved into a live electrical outlet. • Check the home's circuit breaker and fuses. • Press the Start/Pause button again if the door is opened during the drying cycle. • Be sure the dryer is normal. This is leveled properly as coins...
... heavy items from the load. • Load may have moved into a live electrical outlet. • Check the home's circuit breaker and fuses. • Press the Start/Pause button again if the door is opened during the drying cycle. • Be sure the dryer is normal. This is leveled properly as coins...

(English)
Page 30
....Load similar-type garments. The dripping water will stop after Refresh. • Fabrics containing strong odors should be dried separately from nozzle when Steam-Care starts • This is closed during the cycle. • Some fabrics are lint trappers(for example, a pair of black linen pants) • Divide larger loads into...
....Load similar-type garments. The dripping water will stop after Refresh. • Fabrics containing strong odors should be dried separately from nozzle when Steam-Care starts • This is closed during the cycle. • Some fabrics are lint trappers(for example, a pair of black linen pants) • Divide larger loads into...


