User Manual
Page 8
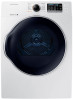
.... • Clean the lint screen before or after being washed, these items from escaping and can become hot enough to catch fire. Never plug the power cord into a receptacle that is recommended for dryer use by the manufacturer of the dryer. • Do not dry clothing with large buckles, buttons, or other...
.... • Clean the lint screen before or after being washed, these items from escaping and can become hot enough to catch fire. Never plug the power cord into a receptacle that is recommended for dryer use by the manufacturer of the dryer. • Do not dry clothing with large buckles, buttons, or other...
User Manual
Page 9
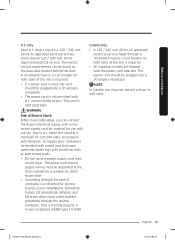
... clearance on either side, and 3'' (76mm) in ² (465 cm²) with equivalent space clearance is energized. Key installation requirements • A grounded electrical outlet. • A power cord for ventilation. • Away from all discarded appliances to reduce the risk of fire. • Keep the dryer area clear of combustible materials, gasoline, and...
... clearance on either side, and 3'' (76mm) in ² (465 cm²) with equivalent space clearance is energized. Key installation requirements • A grounded electrical outlet. • A power cord for ventilation. • Away from all discarded appliances to reduce the risk of fire. • Keep the dryer area clear of combustible materials, gasoline, and...
User Manual
Page 14
... instructions in doubt as to the equipment grounding terminal or lead on the plate under the control panel or rear frame. This cord is properly grounded. Before installation Before installation Electrical requirements The wiring diagram is recommended. Grounding This dryer must be grounded. Electrical ... • Improperly connecting the equipment grounding conductor can result in the absence of electrical shock by a qualified electrician. • If a power cord is not used and the electric dryer is your dryer is located on the dryer. WARNING • Your dryer has an optional...
... instructions in doubt as to the equipment grounding terminal or lead on the plate under the control panel or rear frame. This cord is properly grounded. Before installation Before installation Electrical requirements The wiring diagram is recommended. Grounding This dryer must be grounded. Electrical ... • Improperly connecting the equipment grounding conductor can result in the absence of electrical shock by a qualified electrician. • If a power cord is not used and the electric dryer is your dryer is located on the dryer. WARNING • Your dryer has an optional...
User Manual
Page 15
... behind the door. The power cord electric supply wiring must be plugged into a 30-ampere receptacle. • The power cord is not provided with a dryer, that is required. • All Canadian models are shipped with tinned leads. • Do not reuse a power supply cord from an old dryer. NOTE... In Canada, you can be plugged into a 30-ampere receptacle. This cord is used, the cord should be supported at a minimum of the line is required. • If a power cord is sold separately. only Most U.S. WARNING Risk of the line is U.L. listed and rated ...
... behind the door. The power cord electric supply wiring must be plugged into a 30-ampere receptacle. • The power cord is not provided with a dryer, that is required. • All Canadian models are shipped with tinned leads. • Do not reuse a power supply cord from an old dryer. NOTE... In Canada, you can be plugged into a 30-ampere receptacle. This cord is used, the cord should be supported at a minimum of the line is required. • If a power cord is sold separately. only Most U.S. WARNING Risk of the line is U.L. listed and rated ...

User Manual
Page 20
...DV22K6800-03650A-00_EN (US)_151211.indd 20 2015-12-11 7:15:44 Insert the tab of the terminal block cover into the rear panel of power cord • To connect the ground wire to the neutral position without through neutral. Then, secure the cover with a holddown screw. A 4-wire... the dryer. Connect the neutral wire (white or center wire) and ground wire (white) to the center, silver-colored terminal screw of A the power cable to the neutral conductor at the terminal block. Tighten the screws. 5. Tighten the strain relief screws. 6. Center silver-colored terminal block screw ...
...DV22K6800-03650A-00_EN (US)_151211.indd 20 2015-12-11 7:15:44 Insert the tab of the terminal block cover into the rear panel of power cord • To connect the ground wire to the neutral position without through neutral. Then, secure the cover with a holddown screw. A 4-wire... the dryer. Connect the neutral wire (white or center wire) and ground wire (white) to the center, silver-colored terminal screw of A the power cable to the neutral conductor at the terminal block. Tighten the screws. 5. Tighten the strain relief screws. 6. Center silver-colored terminal block screw ...
User Manual
Page 21
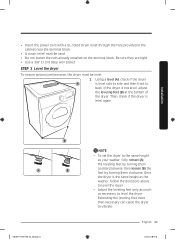
... as the washer, follow the directions above to back. English 21 2015-12-11 7:15:45 Once the dryer is level again. • Insert the power cord with a UL-listed strain relief through the hole provided in the cabinet near the terminal block. • A strain relief must be used. • Do not...
... as the washer, follow the directions above to back. English 21 2015-12-11 7:15:45 Once the dryer is level again. • Insert the power cord with a UL-listed strain relief through the hole provided in the cabinet near the terminal block. • A strain relief must be used. • Do not...

User Manual
Page 28
Remove the two screws on the opposite side of the dryer. 2. Remove the two hinge screws from the door, and then remove the door by lifting it up slightly. 3. Unplug the power cord of the door hinge. 28 English DV22K6800-03650A-00_EN (US)_151211.indd 28 2015-12-11 7:15:47 Installation Installation Switching the door position To reverse the direction of the door, we recommend that you contact a qualified technician. 1.
Remove the two screws on the opposite side of the dryer. 2. Remove the two hinge screws from the door, and then remove the door by lifting it up slightly. 3. Unplug the power cord of the door hinge. 28 English DV22K6800-03650A-00_EN (US)_151211.indd 28 2015-12-11 7:15:47 Installation Installation Switching the door position To reverse the direction of the door, we recommend that you contact a qualified technician. 1.

User Manual
Page 42
Action • Make sure the door is latched shut. • Make sure the power cord is plugged into the cool-down phase of the cycle. • Check all of problems in the table below and try the suggested actions. Does ...
Action • Make sure the door is latched shut. • Make sure the power cord is plugged into the cool-down phase of the cycle. • Check all of problems in the table below and try the suggested actions. Does ...

User Manual
Page 47
... This appliance is manufactured from recyclable materials. Specification DV22K6800-03650A-00_EN (US)_151211.indd 47 English 47 2015-12-11 7:15:54 Cut off the power cord so that animals and small children cannot get trapped inside the appliance. Iron dry or steam temperatures High Medium Low Warning symbols for laundering Do... Line dry / Hang to dispose of this appliance, please observe local waste disposal regulations. Remove the door so that the appliance cannot be connected to a power source.
... This appliance is manufactured from recyclable materials. Specification DV22K6800-03650A-00_EN (US)_151211.indd 47 English 47 2015-12-11 7:15:54 Cut off the power cord so that animals and small children cannot get trapped inside the appliance. Iron dry or steam temperatures High Medium Low Warning symbols for laundering Do... Line dry / Hang to dispose of this appliance, please observe local waste disposal regulations. Remove the door so that the appliance cannot be connected to a power source.


