User Manual (user Manual) (ver.1.0) (English)
Page 1
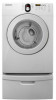
To receive more complete service, please register your product at www.samsung.com/global/register DV218AEW-02568A-01_EN.indd 1 2008-12-08 ¿ÀÀü 9:08:36 DV218AE* DV218AG* Gas and Electric Dryer user manual imagine the possibilities Thank you for purchasing this Samsung product.
To receive more complete service, please register your product at www.samsung.com/global/register DV218AEW-02568A-01_EN.indd 1 2008-12-08 ¿ÀÀü 9:08:36 DV218AE* DV218AG* Gas and Electric Dryer user manual imagine the possibilities Thank you for purchasing this Samsung product.

User Manual (user Manual) (ver.1.0) (English)
Page 2
...Fuzzy Logic Control save energy by automatically drying your Samsung retailer. 2_ features DV218AEW-02568A-01_EN.indd 2 2008-12-08 ¿ÀÀü 9:08:36 Easy Reversible Door Our dryers will fit just about anywhere. Energy Saving Samsung dryers are at your clothes in mind. Stacking (MODEL... NO: SK-3A1/XAA, SK-4A/XAA, SK-5A/XAA) Samsung's Washer and Dryer can be stacked to raise the washer for more...
...Fuzzy Logic Control save energy by automatically drying your Samsung retailer. 2_ features DV218AEW-02568A-01_EN.indd 2 2008-12-08 ¿ÀÀü 9:08:36 Easy Reversible Door Our dryers will fit just about anywhere. Energy Saving Samsung dryers are at your clothes in mind. Stacking (MODEL... NO: SK-3A1/XAA, SK-4A/XAA, SK-5A/XAA) Samsung's Washer and Dryer can be stacked to raise the washer for more...
User Manual (user Manual) (ver.1.0) (English)
Page 3
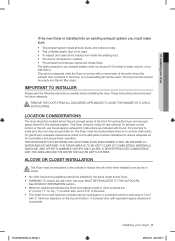
... and care when installing, maintaining, or operating your responsibility to prevent electric shock. This manual contains valuable information on your dryer's many benefits and features. Risk of your manufacturer about problems or conditions you do not cover all installation instructions. If ... with flexible plastic venting materials. WARNING - These conditions will obstruct clothes dryer airflow and increase the risk of fire. • To reduce the risk of your new Samsung Dryer. IMPORTANT SAFETY SYMBOLS AND PRECAUTIONS WARNING CAUTION CAUTION Hazards or unsafe practices ...
... and care when installing, maintaining, or operating your responsibility to prevent electric shock. This manual contains valuable information on your dryer's many benefits and features. Risk of your manufacturer about problems or conditions you do not cover all installation instructions. If ... with flexible plastic venting materials. WARNING - These conditions will obstruct clothes dryer airflow and increase the risk of fire. • To reduce the risk of your new Samsung Dryer. IMPORTANT SAFETY SYMBOLS AND PRECAUTIONS WARNING CAUTION CAUTION Hazards or unsafe practices ...
User Manual (user Manual) (ver.1.0) (English)
Page 4
... removed. Close supervision is necessary when the appliance is moving. Do not use fabric softeners or products to eliminate static unless recommended for dryer use any part of the fabric softener or product. Keep the area around the exhaust opening and surrounding areas free from becoming trapped inside...produce fire by a qualified installer, service agency, or the gas supplier. Do not reach into the appliance when the drum is used in your dryer from a neighbor's phone. Read all traces of fire or explosion: WARNING • Do not dry items that could ignite or explode. Do not...
... removed. Close supervision is necessary when the appliance is moving. Do not use fabric softeners or products to eliminate static unless recommended for dryer use any part of the fabric softener or product. Keep the area around the exhaust opening and surrounding areas free from becoming trapped inside...produce fire by a qualified installer, service agency, or the gas supplier. Do not reach into the appliance when the drum is used in your dryer from a neighbor's phone. Read all traces of fire or explosion: WARNING • Do not dry items that could ignite or explode. Do not...
User Manual (user Manual) (ver.1.0) (English)
Page 5
.... Install and use the Cool Down cycle for these items to reduce their temperature. If this appliance. Washing these items from the dryer hot or interrupt the drying cycle until the items have been spotted or soaked with the manufacturer's instructions. Never remove these items in.... Heat sources such as your dryer. This appliance must be detected by smell alone. WARNING coins, knives, pins, etc. Do not wash clothing with extra detergent will reduce, but not eliminate, the hazard. Residual oil on top of continuing product improvements, Samsung reserves the right to heat. ...
.... Install and use the Cool Down cycle for these items to reduce their temperature. If this appliance. Washing these items from the dryer hot or interrupt the drying cycle until the items have been spotted or soaked with the manufacturer's instructions. Never remove these items in.... Heat sources such as your dryer. This appliance must be detected by smell alone. WARNING coins, knives, pins, etc. Do not wash clothing with extra detergent will reduce, but not eliminate, the hazard. Residual oil on top of continuing product improvements, Samsung reserves the right to heat. ...
User Manual (user Manual) (ver.1.0) (English)
Page 6
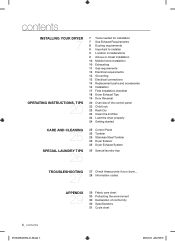
...11 Gas requirements 12 Electrical requirements 12 Grounding 13 Electrical connections 14 Replacement parts and accessories 14 Installation 17 Final installation checklist 18 Dryer Exhaust Tips 19 Door Reversal 20 Overview of the control panel 22 Child lock 23 Rack Dry 24 Clean the lint filter 24...25 SPECIAL LAUNDRY TIPS 26 25 Control Panel 25 Tumbler 25 Stainless Steel Tumbler 25 Dryer Exterior 25 Dryer Exhaust System 26 Special laundry tips TROUBLESHOOTING 27 27 Check these points if your dryer... 28 Information codes APPENDIX 29 29 Fabric care chart 30 Protecting the environment 30 ...
...11 Gas requirements 12 Electrical requirements 12 Grounding 13 Electrical connections 14 Replacement parts and accessories 14 Installation 17 Final installation checklist 18 Dryer Exhaust Tips 19 Door Reversal 20 Overview of the control panel 22 Child lock 23 Rack Dry 24 Clean the lint filter 24...25 SPECIAL LAUNDRY TIPS 26 25 Control Panel 25 Tumbler 25 Stainless Steel Tumbler 25 Dryer Exterior 25 Dryer Exhaust System 26 Special laundry tips TROUBLESHOOTING 27 27 Check these points if your dryer... 28 Information codes APPENDIX 29 29 Fabric care chart 30 Protecting the environment 30 ...
User Manual (user Manual) (ver.1.0) (English)
Page 7
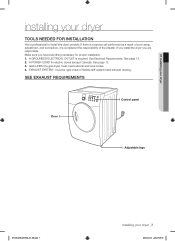
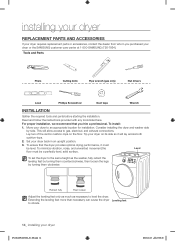
...proper installation. 1. See page 12. 2. 01 installing your dryer installing your dryer _7 2008-12-08 ¿ÀÀü 9:08:36 If you install the dryer you have everything necessary for electric dryers (except Canada). SEE EXHAUST REQUIREMENTS Door Control panel Adjustable legs... DV218AEW-02568A-01_EN.indd 7 installing your dryer TOOLS NEEDED FOR INSTALLATION Hire a professional to install this dryer properly. must meet national and local codes. 4. GAS LINES (if a gas dryer) must be rigid metal or flexible stiff-walled metal exhaust...
...proper installation. 1. See page 12. 2. 01 installing your dryer installing your dryer _7 2008-12-08 ¿ÀÀü 9:08:36 If you install the dryer you have everything necessary for electric dryers (except Canada). SEE EXHAUST REQUIREMENTS Door Control panel Adjustable legs... DV218AEW-02568A-01_EN.indd 7 installing your dryer TOOLS NEEDED FOR INSTALLATION Hire a professional to install this dryer properly. must meet national and local codes. 4. GAS LINES (if a gas dryer) must be rigid metal or flexible stiff-walled metal exhaust...
User Manual (user Manual) (ver.1.0) (English)
Page 8
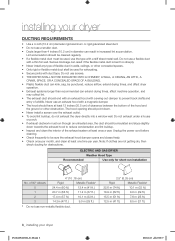
..., the duct should be insulated and slope slightly down towards the exhaust hood to be punctured, reduce airflow, extend drying times, and affect dryer operation. • Exhaust systems longer than 4 inches (10.2 cm) in diameter can extend drying times, affect machine operation, and may ....1 m (33 ft.) 18.9 m (62 ft.) 8.8 m (29 ft.) 15.5 m (51 ft.) 7.6 m (25 ft.) 12.5 m (41 ft.) 6.5 m (21 ft.) 8_ installing your dryer DUCTING REQUIREMENTS • Use a 4-inch (10.2 cm) diameter rigid aluminum or rigid galvanized steel duct. • Do not use the type with duct tape. ELECTRIC...
..., the duct should be insulated and slope slightly down towards the exhaust hood to be punctured, reduce airflow, extend drying times, and affect dryer operation. • Exhaust systems longer than 4 inches (10.2 cm) in diameter can extend drying times, affect machine operation, and may ....1 m (33 ft.) 18.9 m (62 ft.) 8.8 m (29 ft.) 15.5 m (51 ft.) 7.6 m (25 ft.) 12.5 m (41 ft.) 6.5 m (21 ft.) 8_ installing your dryer DUCTING REQUIREMENTS • Use a 4-inch (10.2 cm) diameter rigid aluminum or rigid galvanized steel duct. • Do not use the type with duct tape. ELECTRIC...
User Manual (user Manual) (ver.1.0) (English)
Page 9
... AND OTHER FLAMMABLE VAPORS AND LIQUIDS. See EXHAUST INFORMATION section. • Minimum clearances between the Dryer and adjacent walls or other fuel-burning appliance should be used . • To Inspect and ...8226; No other surfaces are included with 3" minimum clearance on the data plate must be measured while the Dryer is not kinked or crushed. • The exhaust hood damper opens and closes freely. Instructions are : ... must make sure the room has enough fresh air. It's important to the Dryer. THE DRYER MUST NOT BE INSTALLED OR STORED IN AN AREA WHERE IT WILL BE EXPOSED TO ...
... AND OTHER FLAMMABLE VAPORS AND LIQUIDS. See EXHAUST INFORMATION section. • Minimum clearances between the Dryer and adjacent walls or other fuel-burning appliance should be used . • To Inspect and ...8226; No other surfaces are included with 3" minimum clearance on the data plate must be measured while the Dryer is not kinked or crushed. • The exhaust hood damper opens and closes freely. Instructions are : ... must make sure the room has enough fresh air. It's important to the Dryer. THE DRYER MUST NOT BE INSTALLED OR STORED IN AN AREA WHERE IT WILL BE EXPOSED TO ...

User Manual (user Manual) (ver.1.0) (English)
Page 10
...and lint. 10_ installing your dryer DV218AEW-02568A-01_EN.indd 10 2008-12-08 ¿ÀÀü 9:08:37 Outside the U.S. and Canada: • Refer to the outside . • The exhaust duct should be 4inch (102mm) in diameter. Call 1-800-SAMSUNG for more information. In Canada...: • Only those foil-type flexible ducts, if any , specifically identified for Clothes Dryer Transition Duct, Subject 2158A, shall be used . • All dryers must be exhausted to the outside. • The ...
...and lint. 10_ installing your dryer DV218AEW-02568A-01_EN.indd 10 2008-12-08 ¿ÀÀü 9:08:37 Outside the U.S. and Canada: • Refer to the outside . • The exhaust duct should be 4inch (102mm) in diameter. Call 1-800-SAMSUNG for more information. In Canada...: • Only those foil-type flexible ducts, if any , specifically identified for Clothes Dryer Transition Duct, Subject 2158A, shall be used . • All dryers must be exhausted to the outside. • The ...
User Manual (user Manual) (ver.1.0) (English)
Page 11
...• As a courtesy, most local gas utilities will inspect a gas appliance installation. If a flexible gas connector is no constant burning pilot. 01 installing your dryer _11 2008-12-08 ¿ÀÀü 9:08:37 THE INSTALLATION MUST CONFORM WITH LOCAL CODES, OR IN THE ABSENCE OF LOCAL CODES, WITH... THE NATIONAL FUEL GAS CODE ANSI/Z223.1, LATEST REVISION (FOR THE UNITED STATES), OR WITH THE CAN/CGA-B149 INSTALLATION CODES (FOR CANADA). Gas dryers are equipped with a burner vent for test gauge connection, must be reduced to connect to use with LP (liquid propane) gas, it must be...
...• As a courtesy, most local gas utilities will inspect a gas appliance installation. If a flexible gas connector is no constant burning pilot. 01 installing your dryer _11 2008-12-08 ¿ÀÀü 9:08:37 THE INSTALLATION MUST CONFORM WITH LOCAL CODES, OR IN THE ABSENCE OF LOCAL CODES, WITH... THE NATIONAL FUEL GAS CODE ANSI/Z223.1, LATEST REVISION (FOR THE UNITED STATES), OR WITH THE CAN/CGA-B149 INSTALLATION CODES (FOR CANADA). Gas dryers are equipped with a burner vent for test gauge connection, must be reduced to connect to use with LP (liquid propane) gas, it must be...
User Manual (user Manual) (ver.1.0) (English)
Page 12
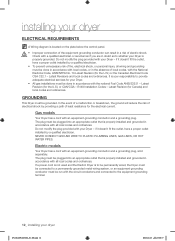
...located on the plate below the control panel. • WARNING • • Improper connection of electric shock. Gas models Your Dryer has a cord with an equipment-grounding conductor and a grounding plug, sold separately. NEVER CONNECT GROUND WIRE TO PLASTIC PLUMBING LINES, ...electrical shock by a qualified electrician. if it doesn't fit the outlet, have a proper outlet installed by a qualified electrician. installing your Dryer - Latest Revision (for Canada) and local codes and ordinances. Latest Revisions and local codes and ordinances. Do not modify the plug provided...
...located on the plate below the control panel. • WARNING • • Improper connection of electric shock. Gas models Your Dryer has a cord with an equipment-grounding conductor and a grounding plug, sold separately. NEVER CONNECT GROUND WIRE TO PLASTIC PLUMBING LINES, ...electrical shock by a qualified electrician. if it doesn't fit the outlet, have a proper outlet installed by a qualified electrician. installing your Dryer - Latest Revision (for Canada) and local codes and ordinances. Latest Revisions and local codes and ordinances. Do not modify the plug provided...
User Manual (user Manual) (ver.1.0) (English)
Page 13
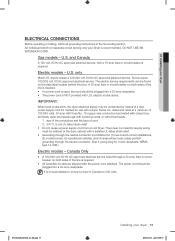
... wire conductors terminated with closed loop terminals, open-end spade lugs with turned up ends, or with U.S. It is required. 01 installing your dryer _13 2008-12-08 ¿ÀÀü 9:08:37 The electric service requirements can be retained at a minimum of the line is NOT...cord. 2. 3/4" (1.9 cm) UL-listed strain relief • Do not reuse a power supply cord from an old Dryer. DO NOT USE AN EXTENSION CORD. IMPORTANT: When local codes allow, the dryer electrical supply may be plugged into a 30-amp receptacle. Electric models - A 30-amp fuse or circuit breaker on the...
... wire conductors terminated with closed loop terminals, open-end spade lugs with turned up ends, or with U.S. It is required. 01 installing your dryer _13 2008-12-08 ¿ÀÀü 9:08:37 The electric service requirements can be retained at a minimum of the line is NOT...cord. 2. 3/4" (1.9 cm) UL-listed strain relief • Do not reuse a power supply cord from an old Dryer. DO NOT USE AN EXTENSION CORD. IMPORTANT: When local codes allow, the dryer electrical supply may be plugged into a 30-amp receptacle. Electric models - A 30-amp fuse or circuit breaker on the...
User Manual (user Manual) (ver.1.0) (English)
Page 14
... optimal drying performance, it will allow access to an appropriate location for installation. Tip your dryer on the floor. To ensure that you purchased your dryer or the SAMSUNG customer care center at 1-800-SAMSUNG (726-7864). This will lay across both cushion-tops. 2. Extending the leveling feet more than necessary can cause the...
... optimal drying performance, it will allow access to an appropriate location for installation. Tip your dryer on the floor. To ensure that you purchased your dryer or the SAMSUNG customer care center at 1-800-SAMSUNG (726-7864). This will lay across both cushion-tops. 2. Extending the leveling feet more than necessary can cause the...
User Manual (user Manual) (ver.1.0) (English)
Page 15
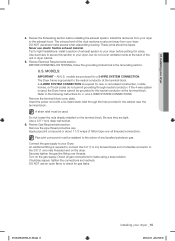
..., or if local codes do not cover ventilation slots at the terminal block. BEFORE OPERATING OR TESTING, follow the grounding instructions in dryer cabinet. 5. A 4-WIRE SYSTEM CONNECTION is grounded to the neutral conductor at the terminal block. and 4-WIRE SYSTEM CONNECTIONS. Be sure...1cm) deep well socket. 6. Review Gas Requirements section. Remove the pipe thread protective cap. DV218AEW-02568A-01_EN.indd 15 installing your dryer before installing the exhaust system. Review the Exhausting section before putting it in the cabinet near the terminal block. Use duct tape to...
..., or if local codes do not cover ventilation slots at the terminal block. BEFORE OPERATING OR TESTING, follow the grounding instructions in dryer cabinet. 5. A 4-WIRE SYSTEM CONNECTION is grounded to the neutral conductor at the terminal block. and 4-WIRE SYSTEM CONNECTIONS. Be sure...1cm) deep well socket. 6. Review Gas Requirements section. Remove the pipe thread protective cap. DV218AEW-02568A-01_EN.indd 15 installing your dryer before installing the exhaust system. Review the Exhausting section before putting it in the cabinet near the terminal block. Use duct tape to...

User Manual (user Manual) (ver.1.0) (English)
Page 16
... power cord and the appliance ground wire (green with a hold -down screw. 1. Neutral wire (white or center wire) 16_ installing your dryer 3-WIRE system connections 1. Tighten screws. 4. Remove the center terminal block screw. 2. Tighten the strain relief screws. 6. Green or bare copper... with a hold -down screw. 1. Secure the cover with yellow stripes) under the central screw of the terminal block cover into your Dryer's rear panel slot. Tighten screw. 3. Tighten screws. 5. Connect the other wires to the center, silver-colored terminal screw of the terminal...
... power cord and the appliance ground wire (green with a hold -down screw. 1. Neutral wire (white or center wire) 16_ installing your dryer 3-WIRE system connections 1. Tighten screws. 4. Remove the center terminal block screw. 2. Tighten the strain relief screws. 6. Green or bare copper... with a hold -down screw. 1. Secure the cover with yellow stripes) under the central screw of the terminal block cover into your Dryer's rear panel slot. Tighten screw. 3. Tighten screws. 5. Connect the other wires to the center, silver-colored terminal screw of the terminal...
User Manual (user Manual) (ver.1.0) (English)
Page 17
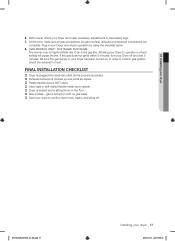
... minutes. gas is turned on with no gas leaks. Start your dryer to air in your Dryer and make sure all gas connections (on a heat setting will purge the line. Allowing your Dryer to your Dryer off . Be sure the gas supply to operate on gas models), exhaust and...flexible duct is NOT used. Used rigid or stiff-walled flexible metal vent material. Dryer is leveled and is hooked up and joints are complete. FINAL INSTALLATION CHECKLIST Dryer is plugged into electrical outlet and is properly grounded. Exhaust ductwork is sitting firmly on . At...
... minutes. gas is turned on with no gas leaks. Start your dryer to air in your Dryer and make sure all gas connections (on a heat setting will purge the line. Allowing your Dryer to your Dryer off . Be sure the gas supply to operate on gas models), exhaust and...flexible duct is NOT used. Used rigid or stiff-walled flexible metal vent material. Dryer is leveled and is hooked up and joints are complete. FINAL INSTALLATION CHECKLIST Dryer is plugged into electrical outlet and is properly grounded. Exhaust ductwork is sitting firmly on . At...

User Manual (user Manual) (ver.1.0) (English)
Page 18
... 4. Using a plastic, thin foil, or non-metal flexible duct. 3. Allowing crushed or clogged ducts and vent. 3 4 18_ installing your dryer DRYER EXHAUST TIPS Plastic or non-metal flexible duct presents a potential fire hazard. Unnecessarily using long ducts that have many elbows. 4. Inspect and clean the... exhaust system annually. installing your dryer DV218AEW-02568A-01_EN.indd 18 2008-12-08 ¿ÀÀü 9:08:42 Don't let a poor exhaust system slow ...
... 4. Using a plastic, thin foil, or non-metal flexible duct. 3. Allowing crushed or clogged ducts and vent. 3 4 18_ installing your dryer DRYER EXHAUST TIPS Plastic or non-metal flexible duct presents a potential fire hazard. Unnecessarily using long ducts that have many elbows. 4. Inspect and clean the... exhaust system annually. installing your dryer DV218AEW-02568A-01_EN.indd 18 2008-12-08 ¿ÀÀü 9:08:42 Don't let a poor exhaust system slow ...

User Manual (user Manual) (ver.1.0) (English)
Page 19
... reattach it . 4. Reinsert the screw (Step 4) on the Frame Front 5. Reattach the holder lever. 12. WARNING DV218AEW-02568A-01_EN.indd 19 installing your dryer DOOR REVERSAL 1. Remove two door hinge screws. 3. Remove one black screw from the holder lever. 7. Reattach the screws in STEP 4 may not exist....door hinge. 8. The screw mentioned in the remaing holes. Lift the door and remove it to the dryer. 11. Remove the two screws on the other hole. 9. 01 installing your dryer _19 2008-12-08 ¿ÀÀü 9:08:45 Place the door on the opposite side ...
... reattach it . 4. Reinsert the screw (Step 4) on the Frame Front 5. Reattach the holder lever. 12. WARNING DV218AEW-02568A-01_EN.indd 19 installing your dryer DOOR REVERSAL 1. Remove two door hinge screws. 3. Remove one black screw from the holder lever. 7. Reattach the screws in STEP 4 may not exist....door hinge. 8. The screw mentioned in the remaing holes. Lift the door and remove it to the dryer. 11. Remove the two screws on the other hole. 9. 01 installing your dryer _19 2008-12-08 ¿ÀÀü 9:08:45 Place the door on the opposite side ...
User Manual (user Manual) (ver.1.0) (English)
Page 20
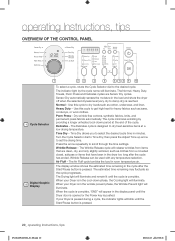
... synthetic fabrics, knits, and permanent press fabrics automatically. Press the arrow repeatedly to select the desired cycle time in the load and shuts the dryer off when the selected dryness level (very dry to get high heat for heavy fabrics such as cotton, underwear, and linen. Time Dry ...is designed to the desired cycle. Heavy Duty - Normal - Time Dry allows you to scroll through the time settings. If your Dryer is in the dryer too long after the Start/Pause button is pressed. 20_ operating Instructions, tips DV218AEW-02568A-01_EN.indd 20 2008-12-08 ¿&#...
... synthetic fabrics, knits, and permanent press fabrics automatically. Press the arrow repeatedly to select the desired cycle time in the load and shuts the dryer off when the selected dryness level (very dry to get high heat for heavy fabrics such as cotton, underwear, and linen. Time Dry ...is designed to the desired cycle. Heavy Duty - Normal - Time Dry allows you to scroll through the time settings. If your Dryer is in the dryer too long after the Start/Pause button is pressed. 20_ operating Instructions, tips DV218AEW-02568A-01_EN.indd 20 2008-12-08 ¿&#...


