
User Manual
Page 1
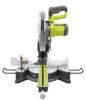
When properly cared for your purchase. WARNING: To reduce the risk of operation, and operator safety. SAVE THIS MANUAL FOR FUTURE REFERENCE Thank you for , it will give you years of rugged, trouble-free performance. OPERATOR'S MANUAL 7-1/4 in., 18 Volt Compound Miter Saw P551 45 battery and charger sold separately Your miter saw has been engineered and manufactured to our high standard for dependability, ease of injury, the user must read and understand the operator's manual before using this product.
When properly cared for your purchase. WARNING: To reduce the risk of operation, and operator safety. SAVE THIS MANUAL FOR FUTURE REFERENCE Thank you for , it will give you years of rugged, trouble-free performance. OPERATOR'S MANUAL 7-1/4 in., 18 Volt Compound Miter Saw P551 45 battery and charger sold separately Your miter saw has been engineered and manufactured to our high standard for dependability, ease of injury, the user must read and understand the operator's manual before using this product.
User Manual
Page 3
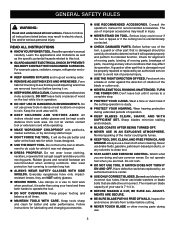
...lenses, they are doing and use of operation. KEEP BLADES CLEAN, SHARP, and with incorrect size holes. Consult the operator's manual for better and safer performance. Before further use common sense. Wear hearing protection during use blade washers or blade bolts that is in .... blade or cutter against the direction of rotation of personal injury. USE THE RIGHT DIRECTION OF FEED. Read the operator's manual carefully. Rubber gloves and nonskid footwear are removed from oil and grease. Normal sparking of improper accessories may affect its intended function....
...lenses, they are doing and use of operation. KEEP BLADES CLEAN, SHARP, and with incorrect size holes. Consult the operator's manual for better and safer performance. Before further use common sense. Wear hearing protection during use blade washers or blade bolts that is in .... blade or cutter against the direction of rotation of personal injury. USE THE RIGHT DIRECTION OF FEED. Read the operator's manual carefully. Rubber gloves and nonskid footwear are removed from oil and grease. Normal sparking of improper accessories may affect its intended function....
User Manual
Page 6
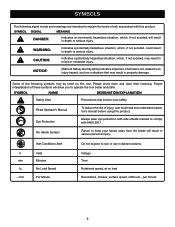
... use in death or serious injury. Please study them and learn their meaning. Some of injury, user must read and understand operator's manual before using this tool. Read Operator's Manual Eye Protection To reduce the risk of the following signal words and meanings are intended to operate the tool better and safer...
... use in death or serious injury. Please study them and learn their meaning. Some of injury, user must read and understand operator's manual before using this tool. Read Operator's Manual Eye Protection To reduce the risk of the following signal words and meanings are intended to operate the tool better and safer...
User Manual
Page 9
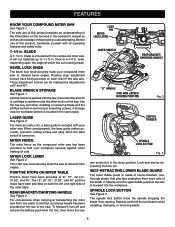
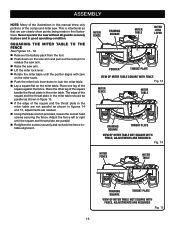
... arm Locked in Down Position Fig. 2 Switch Trigger Spindle Lock Button 45 30 33.9 15 123 4 5 67 Fig. 3 arm and lock it in this operator's manual as well as the saw is included with the compound miter saw at 0° and 45°. REAR BRACKET/Carrying Handle See Figure 2. For convenience...
... arm Locked in Down Position Fig. 2 Switch Trigger Spindle Lock Button 45 30 33.9 15 123 4 5 67 Fig. 3 arm and lock it in this operator's manual as well as the saw is included with the compound miter saw at 0° and 45°. REAR BRACKET/Carrying Handle See Figure 2. For convenience...
User Manual
Page 11
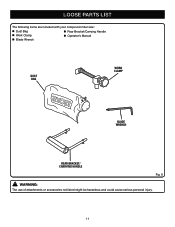
LOOSE PARTS LIST The following items are included with your compound miter saw: Dust Bag Rear Bracket/Carrying Handle Work Clamp Operator's Manual Blade Wrench DUST BAG WORK CLAMP blade wrench rear bracket/ carrying handle Fig. 6 WARNING: The use of attachments or accessories not listed might be hazardous and could cause serious personal injury. 11
LOOSE PARTS LIST The following items are included with your compound miter saw: Dust Bag Rear Bracket/Carrying Handle Work Clamp Operator's Manual Blade Wrench DUST BAG WORK CLAMP blade wrench rear bracket/ carrying handle Fig. 6 WARNING: The use of attachments or accessories not listed might be hazardous and could cause serious personal injury. 11
User Manual
Page 12
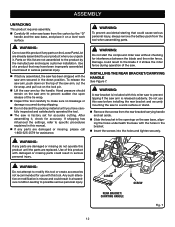
...: Do not start the compound miter saw . WARNING: A rear bracket is released suddenly. Warning: If any parts are damaged or missing do not operate this manual. If any parts on the saw base, aligning the holes underneath the base with this saw before installing the rear bracket and securely mounting...
...: Do not start the compound miter saw . WARNING: A rear bracket is released suddenly. Warning: If any parts are damaged or missing do not operate this manual. If any parts on the saw base, aligning the holes underneath the base with this saw before installing the rear bracket and securely mounting...
User Manual
Page 16
... arm and pull out the lock pin to release the saw arm. Raise the saw without all guards securely in place and in this manual show points being made in figures 14 and 15, adjustments are needed. Using the blade wrench provided, loosen the socket head screws securing the...
... arm and pull out the lock pin to release the saw arm. Raise the saw without all guards securely in place and in this manual show points being made in figures 14 and 15, adjustments are needed. Using the blade wrench provided, loosen the socket head screws securing the...
User Manual
Page 20
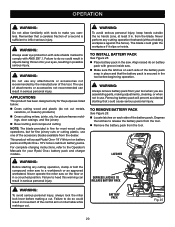
...LATCHES WARNING: Before starting that the battery pack is sufficient to a workbench or an approved workstand. from the tool. Failure to the Operator's Manuals for the purposes listed below: Cross cutting wood and plastic (do so could grab the workpiece if it slips or twists. WARNING...against the fence). The blade could result in movement of attachments or accessories not recommended can result in objects being thrown into your Ryobi One+ battery pack and charger models. TO INSTALL BATTERY PACK See Figure 25. Place battery pack in the saw on...
...LATCHES WARNING: Before starting that the battery pack is sufficient to a workbench or an approved workstand. from the tool. Failure to the Operator's Manuals for the purposes listed below: Cross cutting wood and plastic (do so could grab the workpiece if it slips or twists. WARNING...against the fence). The blade could result in movement of attachments or accessories not recommended can result in objects being thrown into your Ryobi One+ battery pack and charger models. TO INSTALL BATTERY PACK See Figure 25. Place battery pack in the saw on...
User Manual
Page 28
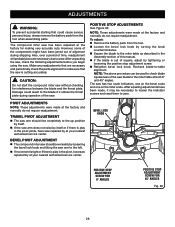
... knob counterclockwise. Square the blade to the left. If movement is tight or if there is play in the Assembly section of this manual. If the blade is out of the saw. TRAVEL PIVOT ADJUSTMENT The saw arm should bevel easily by loosening the bevel lock knob...
... knob counterclockwise. Square the blade to the left. If movement is tight or if there is play in the Assembly section of this manual. If the blade is out of the saw. TRAVEL PIVOT ADJUSTMENT The saw arm should bevel easily by loosening the bevel lock knob...
User Manual
Page 32
...contact your nearest Authorized Service Center. You can also check our web site at www.ryobitools.com for your exposure, work . OPERATOR'S MANUAL 7-1/4 in the space provided below. • HOW TO ORDER REPAIR PARTS When ordering repair parts, always give the following information: &#...8226; MODEL NUMBER • SERIAL NUMBER Ryobi is a registered trademark of Ryobi Limited and is used pursuant to a license granted by power sanding, sawing, grinding, drilling, and other construction activities may...
...contact your nearest Authorized Service Center. You can also check our web site at www.ryobitools.com for your exposure, work . OPERATOR'S MANUAL 7-1/4 in the space provided below. • HOW TO ORDER REPAIR PARTS When ordering repair parts, always give the following information: &#...8226; MODEL NUMBER • SERIAL NUMBER Ryobi is a registered trademark of Ryobi Limited and is used pursuant to a license granted by power sanding, sawing, grinding, drilling, and other construction activities may...
User Manual 4
Page 4
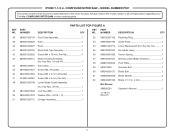
... 61 080009002060 62 089240001909 Not Shown: 988000224 11-18-10 (Rev:01) Retaining Ring 1 Guide Roller 1 Lower Blade Guard (Inc. x 24t 1 Operator's Manual 1 4 PARTS LIST FOR FIGURE A KEY PART NO. RYOBI 7-1/4 in . Key No. 55 1 No Hands Label 1 Torsion Spring 1 Warning Label (Blade Direction 1 Pivot Plate 1 Shoulder Bolt 1 Blade Bolt 1 Blade Washer...
... 61 080009002060 62 089240001909 Not Shown: 988000224 11-18-10 (Rev:01) Retaining Ring 1 Guide Roller 1 Lower Blade Guard (Inc. x 24t 1 Operator's Manual 1 4 PARTS LIST FOR FIGURE A KEY PART NO. RYOBI 7-1/4 in . Key No. 55 1 No Hands Label 1 Torsion Spring 1 Warning Label (Blade Direction 1 Pivot Plate 1 Shoulder Bolt 1 Blade Bolt 1 Blade Washer...


