
User Manual
Page 1
SAVE THIS MANUAL FOR FUTURE REFERENCE Thank you years of rugged, trouble-free performance. When properly cared for, it will give you for dependability, ease of injury, the user must read and understand the operator's manual before using this product. OPERATOR'S MANUAL 10 in. Table Saw RTS31 Your table saw has been engineered and manufactured to our high standard for your purchase. WARNING: To reduce the risk of operation, and operator safety.
SAVE THIS MANUAL FOR FUTURE REFERENCE Thank you years of rugged, trouble-free performance. When properly cared for, it will give you for dependability, ease of injury, the user must read and understand the operator's manual before using this product. OPERATOR'S MANUAL 10 in. Table Saw RTS31 Your table saw has been engineered and manufactured to our high standard for your purchase. WARNING: To reduce the risk of operation, and operator safety.
User Manual
Page 5
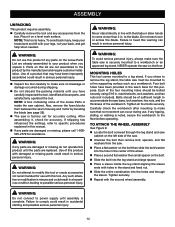
...and that are not listed may cause the risk of saw blade. Instructions for which means using a push stick. c) Keep hands out of the line of personal injury. e) Not ripping work using the table saw. ALWAYS TURN OFF SAW before it must be used, including all the way past... the saw blade. NEVER reach behind, over the saw blade guard and riving knife for every operation for safe use to the...
...and that are not listed may cause the risk of saw blade. Instructions for which means using a push stick. c) Keep hands out of the line of personal injury. e) Not ripping work using the table saw. ALWAYS TURN OFF SAW before it must be used, including all the way past... the saw blade. NEVER reach behind, over the saw blade guard and riving knife for every operation for safe use to the...
User Manual
Page 8
...the blade other than at either end of a workpiece by a spinning object in the workpiece. Non-Through Cuts (table saws and compound sliding miter saws) Any cutting operation where the blade does not extend completely through the thickness of the workpiece. Workpiece or Material The... Cut A cross cut which a blade or cutting tool is mounted. Dado Cut (table saws and compound sliding miter saws) A non-through the saw blade. Featherboard (table saws) A device used for insertion of a scroll saw blade during any angle other than the blade, which helps keep the kerf open and...
...the blade other than at either end of a workpiece by a spinning object in the workpiece. Non-Through Cuts (table saws and compound sliding miter saws) Any cutting operation where the blade does not extend completely through the thickness of the workpiece. Workpiece or Material The... Cut A cross cut which a blade or cutting tool is mounted. Dado Cut (table saws and compound sliding miter saws) A non-through the saw blade. Featherboard (table saws) A device used for insertion of a scroll saw blade during any angle other than the blade, which helps keep the kerf open and...

User Manual
Page 10
... requires an understanding of kickback. RIVING KNIFE - When in this handwheel to the table saw blade, which the workpiece is below the front rail. This saw has an easy access power switch located below the saw blade. BEVEL SCALE - The blade is secured with the locking lever. HEIGHT/BEVEL...you are locked with a 10 in which helps keep the kerf open and prevent kickback. LEG STAND - FEATURES KNOW YOUR TABLE SAW See Figure 2. SLIDING MITER TABLE - The safe use with all operating features and safety rules. Bevel angles are attempting. Grooves run along the top and sides...
... requires an understanding of kickback. RIVING KNIFE - When in this handwheel to the table saw blade, which the workpiece is below the front rail. This saw has an easy access power switch located below the saw blade. BEVEL SCALE - The blade is secured with the locking lever. HEIGHT/BEVEL...you are locked with a 10 in which helps keep the kerf open and prevent kickback. LEG STAND - FEATURES KNOW YOUR TABLE SAW See Figure 2. SLIDING MITER TABLE - The safe use with all operating features and safety rules. Bevel angles are attempting. Grooves run along the top and sides...
User Manual
Page 13
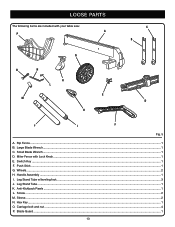
LOOSE PARTS The following items are included with Lock Knob...1 E. Small Blade Wrench...1 D. Anti-Kickback Pawls...1 L. Carriage bolt and nut...4 P. Push Stick...1 G. Handle Assembly...1 I. Large Blade Wrench...1 C. Screw...2 M. Miter Fence with your table saw: A P c b g o n k l e m d h j i f Fig. 5 A. Leg Stand Tube...1 K. Hex Key...1 O. Blade Guard...1 13 Wheels...2 H. Sleeve...2 N. Leg Stand Tube w/leveling foot...3 J. Rip Fence...1 B. Switch Key...1 F.
LOOSE PARTS The following items are included with Lock Knob...1 E. Small Blade Wrench...1 D. Anti-Kickback Pawls...1 L. Carriage bolt and nut...4 P. Push Stick...1 G. Handle Assembly...1 I. Large Blade Wrench...1 C. Screw...2 M. Miter Fence with your table saw: A P c b g o n k l e m d h j i f Fig. 5 A. Leg Stand Tube...1 K. Hex Key...1 O. Blade Guard...1 13 Wheels...2 H. Sleeve...2 N. Leg Stand Tube w/leveling foot...3 J. Rip Fence...1 B. Switch Key...1 F.
User Manual
Page 14
... assembled to come closer than 3 in line with damaged or missing parts could result in the saw's base for accuracy. NEVER operate the saw on the bolt. If you chose to remove the leg stand, the table saw must be of the workbench. machine bolts, lock washers, and hex nuts (not included). n .... n Slide the entire combination into the hole in serious personal injury. WARNING: To avoid serious personal injury, always make sure the table saw is inside the leg stand aligning the sleeve ends with this product until you unpack it , check for this manual. If any parts...
... assembled to come closer than 3 in line with damaged or missing parts could result in the saw's base for accuracy. NEVER operate the saw on the bolt. If you chose to remove the leg stand, the table saw must be of the workbench. machine bolts, lock washers, and hex nuts (not included). n .... n Slide the entire combination into the hole in serious personal injury. WARNING: To avoid serious personal injury, always make sure the table saw is inside the leg stand aligning the sleeve ends with this product until you unpack it , check for this manual. If any parts...

User Manual
Page 15
... the leg stand open and the table saw resting on a flat, level surface, the saw is balanced. n Turning counterclockwise will lower the foot. to install the Handle See... stand is in an upright position (see page 16) and the saw should be installed on end as shown in place. Finger tighten using the nut. n Stand the table saw 's stability before use. n Remove the nut from the end of...holes in place. Slide the handle, screw, and washer into the hole on the back of the saw rocks from side to side. n Turning clockwise will raise the foot. NOTE: Do not remove the screw ...
... the leg stand open and the table saw resting on a flat, level surface, the saw is balanced. n Turning counterclockwise will lower the foot. to install the Handle See... stand is in an upright position (see page 16) and the saw should be installed on end as shown in place. Finger tighten using the nut. n Stand the table saw 's stability before use. n Remove the nut from the end of...holes in place. Slide the handle, screw, and washer into the hole on the back of the saw rocks from side to side. n Turning clockwise will raise the foot. NOTE: Do not remove the screw ...

User Manual
Page 16
... balanced on end. Step 4: Using your left hand, release the leg stand latch. Steps 5 and 6: Once the leg stand is released from the table saw base, ease the legs of the leg stand toward the floor. Step 7: Lift the lower leg of the leg stand until it locks into.... ASSEMBLY TO open/close (tear down) the leg stand: Steps 1 and 2: Standing to the side of the table saw, grasp the table tilt handle with your left hand until the table saw is in an upright position. To close (set-up/tear down) the LEG STAND See Figure 9. To open (set...
... balanced on end. Step 4: Using your left hand, release the leg stand latch. Steps 5 and 6: Once the leg stand is released from the table saw base, ease the legs of the leg stand toward the floor. Step 7: Lift the lower leg of the leg stand until it locks into.... ASSEMBLY TO open/close (tear down) the leg stand: Steps 1 and 2: Standing to the side of the table saw, grasp the table tilt handle with your left hand until the table saw is in an upright position. To close (set-up/tear down) the LEG STAND See Figure 9. To open (set...
User Manual
Page 21
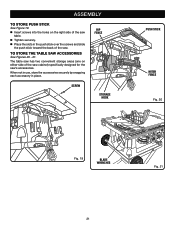
... the push stick toward the back of the saw cabinet) specifically designed for the saw Accessories See Figures 20 - 21. riP FENCE screw STORAGE HOOK PUSH STICK miter fence Fig. 20 Fig. 19 blade wrenches Fig. 21 21 ASSEMBLY to Store the table saw 's accessories. The table saw has two convenient storage areas (one on the...
... the push stick toward the back of the saw cabinet) specifically designed for the saw Accessories See Figures 20 - 21. riP FENCE screw STORAGE HOOK PUSH STICK miter fence Fig. 20 Fig. 19 blade wrenches Fig. 21 21 ASSEMBLY to Store the table saw 's accessories. The table saw has two convenient storage areas (one on the...

User Manual
Page 22
...as cross cutting, ripping, mitering, beveling, and compound cutting Dado with optional accessories Cabinet making and woodworking NOTE: This table saw dust or scrap workpieces may gather. Use the right type of the equipment can cause serious injury. Refer to cut wood and ...thrown into a matching outlet that is designed to the Electrical section in this tool. Kickback can be caused by the manufacturer of the TABLE Saw The 3-prong plug must be plugged into your eyes, resulting in possible serious injury. This helps prevent twisting the wood in the cut...
...as cross cutting, ripping, mitering, beveling, and compound cutting Dado with optional accessories Cabinet making and woodworking NOTE: This table saw dust or scrap workpieces may gather. Use the right type of the equipment can cause serious injury. Refer to cut wood and ...thrown into a matching outlet that is designed to the Electrical section in this tool. Kickback can be caused by the manufacturer of the TABLE Saw The 3-prong plug must be plugged into your eyes, resulting in possible serious injury. This helps prevent twisting the wood in the cut...
User Manual
Page 28
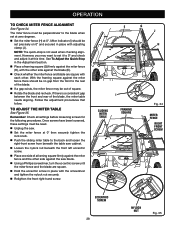
... a consistent gap between the front and rear of a framing square firmly against the miter fence there should be no gap from beneath the table saw blade. Using a Phillips screwdriver, turn the eccentric screw until the miter fence and the blade are square with adjusting clamp (J). ...15 15 30 30 20 20 10 0 10 10 0 10 14 15 16 12 13 11 10 40 2 3 4 5 6 9 8 7 6 5 4 3 2 1 0 0 J H 8 i SLIDING MITER TABLE FRAMING SQUARE 45 40 30 20 15 30 10 10 0 40 15 16 14 13 12 11 10 9 8 7 6 5 4 3 12 0 0 2 3 4 5 6 Fig. 34 MITER FENCE RIGHT FRONT...
... a consistent gap between the front and rear of a framing square firmly against the miter fence there should be no gap from beneath the table saw blade. Using a Phillips screwdriver, turn the eccentric screw until the miter fence and the blade are square with adjusting clamp (J). ...15 15 30 30 20 20 10 0 10 10 0 10 14 15 16 12 13 11 10 40 2 3 4 5 6 9 8 7 6 5 4 3 2 1 0 0 J H 8 i SLIDING MITER TABLE FRAMING SQUARE 45 40 30 20 15 30 10 10 0 40 15 16 14 13 12 11 10 9 8 7 6 5 4 3 12 0 0 2 3 4 5 6 Fig. 34 MITER FENCE RIGHT FRONT...

User Manual
Page 30
... for cutting long workpieces. With the table saw in . Push the table extension lever beneath the saw table towards the front of the saw. Grasp the table extension with both hands back toward the saw table. Retighten the table extension lever by pulling it towards the back of the saw. The outfeed support slides to 16 in...
... for cutting long workpieces. With the table saw in . Push the table extension lever beneath the saw table towards the front of the saw. Grasp the table extension with both hands back toward the saw table. Retighten the table extension lever by pulling it towards the back of the saw. The outfeed support slides to 16 in...

User Manual
Page 34
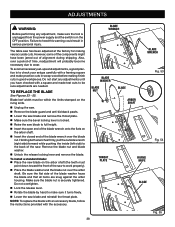
... TO TIGHTEN BEVEL CROSS CUT Bevel LOCKING LEVER Fig. 46 Miter fence STRAIGHT 34 BEVEL LOCKING LEVER Fig. 47 VIEWED FROM THE FRONT, BELOW THE TABLE SAW HEIGHT/BEVEL ADJUSTING HANDWHEEL TO LOOSEN WARNING: Make sure the blade guard assembly is made, turn the... from the blade for the cut and securely lock the handle. Make sure the wood is clear of the blade before turning on the saw. Turn the saw . Position the workpiece flat on the table with both hands on the right side of the blade to the desired setting.
... TO TIGHTEN BEVEL CROSS CUT Bevel LOCKING LEVER Fig. 46 Miter fence STRAIGHT 34 BEVEL LOCKING LEVER Fig. 47 VIEWED FROM THE FRONT, BELOW THE TABLE SAW HEIGHT/BEVEL ADJUSTING HANDWHEEL TO LOOSEN WARNING: Make sure the blade guard assembly is made, turn the... from the blade for the cut and securely lock the handle. Make sure the wood is clear of the blade before turning on the saw. Turn the saw . Position the workpiece flat on the table with both hands on the right side of the blade to the desired setting.

User Manual
Page 37
...sure the wood does not touch the blade before you turn the saw table. Use a push block or push stick to a complete stop before feeding the workpiece into the blade with the retailer where the table saw blade. Wait for this saw on the shape and size of this tool. Never push a ...small piece of this manual and check with your saw . All blades and dado sets must not be used provided the arbor ...
...sure the wood does not touch the blade before you turn the saw table. Use a push block or push stick to a complete stop before feeding the workpiece into the blade with the retailer where the table saw blade. Wait for this saw on the shape and size of this tool. Never push a ...small piece of this manual and check with your saw . All blades and dado sets must not be used provided the arbor ...
User Manual
Page 38
... square and made test cuts to be within the limits stamped on the riving knife. Unplug the saw. Remove the blade guard and anti-kickback pawls. Lower the saw blade and remove the throat plate. Make sure the bevel locking lever is to check your setups ... Insert the closed end of the blade wrench over the arbor shaft. The table saw . To avoid unnecessary set-ups and adjustments, a good practice is locked. Raise the saw blade to the back of the saw has been adjusted at the factory for making finish cuts in serious personal injury. Make...
... square and made test cuts to be within the limits stamped on the riving knife. Unplug the saw. Remove the blade guard and anti-kickback pawls. Lower the saw blade and remove the throat plate. Make sure the bevel locking lever is to check your setups ... Insert the closed end of the blade wrench over the arbor shaft. The table saw . To avoid unnecessary set-ups and adjustments, a good practice is locked. Raise the saw blade to the back of the saw has been adjusted at the factory for making finish cuts in serious personal injury. Make...

User Manual
Page 44
Table Saw RTS31 WARNING: This product and some dust created by power sanding, sawing, grinding, drilling, and other construction activities may contain chemicals, including lead, known to the State of California to cause cancer, birth defects, or other masonry ...-525-2579. • How to obtain Customer or Technical Support: To obtain Customer or Technical Support please contact us at www.ryobitools.com or by Ryobi Limited. Wash hands after handling. • lead from lead-based paints, • crystalline silica from bricks and cement and other reproductive harm.
Table Saw RTS31 WARNING: This product and some dust created by power sanding, sawing, grinding, drilling, and other construction activities may contain chemicals, including lead, known to the State of California to cause cancer, birth defects, or other masonry ...-525-2579. • How to obtain Customer or Technical Support: To obtain Customer or Technical Support please contact us at www.ryobitools.com or by Ryobi Limited. Wash hands after handling. • lead from lead-based paints, • crystalline silica from bricks and cement and other reproductive harm.
User Manual 4
Page 1
TABLE SAW MODEL NUMBER RTS31 REPAIR SHEET RYOBI 10 in.
TABLE SAW MODEL NUMBER RTS31 REPAIR SHEET RYOBI 10 in.

User Manual 4
Page 3
... x 25 mm, Pan Hd 6 25 089037012010 Screw (M4 x 10 mm, Rnd. PORTABLE TABLE SAW or when ordering parts. Hd. RYOBI 10 in . TABLE SAW - KEY PART NO. Hd 2 3 0131020220 Table Tilt Handle 1 26 089037012011 Table Bumper 2 4 089110102019 Screw (10-32 x 25 mm, Hex Hd 4 27 411071003 Lock ... Short Linkage 1 41 410191003 Screw (M4 x 12 mm 1 19 089037012006 Extension Table Lock Lever 1 42 089037012023 Auxiliary Table Indicator 1 20 410251017 Screw w/Washer (M6 x 12 mm, Rnd. MODEL NUMBER RTS31 The model number will be found on a label attached to the cabinet.
... x 25 mm, Pan Hd 6 25 089037012010 Screw (M4 x 10 mm, Rnd. PORTABLE TABLE SAW or when ordering parts. Hd. RYOBI 10 in . TABLE SAW - KEY PART NO. Hd 2 3 0131020220 Table Tilt Handle 1 26 089037012011 Table Bumper 2 4 089110102019 Screw (10-32 x 25 mm, Hex Hd 4 27 411071003 Lock ... Short Linkage 1 41 410191003 Screw (M4 x 12 mm 1 19 089037012006 Extension Table Lock Lever 1 42 089037012023 Auxiliary Table Indicator 1 20 410251017 Screw w/Washer (M6 x 12 mm, Rnd. MODEL NUMBER RTS31 The model number will be found on a label attached to the cabinet.

User Manual 4
Page 4
... Front Rail Hook 1 65 089037012063 Screw (M4 x 12 mm, Pan Hd 1 66 410551701 Screw w/Washer (1/4-2 x 1/2 in . PORTABLE TABLE SAW or when ordering parts. PARTS LIST FOR FIGURE A KEY NO. 46 47 48 49 50 51 52 53 54 55 56 57 58 59...2 089110102045 Screw w/Washer (M4 x 16 mm, Soc. RYOBI 10 in. Hd.)........ 4 0134010314 Block Rod 2 089037012029 Sliding Bar 2 0134010910 Locking Pin 2 0181010501 Quick Stop 2 0134010802 Lock Nut 2 9134015330201 Pinch Point Label 1 KEY PART NO. TABLE SAW - MODEL NUMBER RTS31 The model number will be found on a label attached to...
... Front Rail Hook 1 65 089037012063 Screw (M4 x 12 mm, Pan Hd 1 66 410551701 Screw w/Washer (1/4-2 x 1/2 in . PORTABLE TABLE SAW or when ordering parts. PARTS LIST FOR FIGURE A KEY NO. 46 47 48 49 50 51 52 53 54 55 56 57 58 59...2 089110102045 Screw w/Washer (M4 x 16 mm, Soc. RYOBI 10 in. Hd.)........ 4 0134010314 Block Rod 2 089037012029 Sliding Bar 2 0134010910 Locking Pin 2 0181010501 Quick Stop 2 0134010802 Lock Nut 2 9134015330201 Pinch Point Label 1 KEY PART NO. TABLE SAW - MODEL NUMBER RTS31 The model number will be found on a label attached to...

User Manual 4
Page 6
...all correspondence regarding your 10 in ., Pan Hd 1 Cam 1 Rack 1 Bevel Scale Label 1 Indicator 1 Screw w/Washer (M5 x 8 mm, Rnd. PORTABLE TABLE SAW or when ordering parts. Hd.)......... 4 Knob Ring 1 Wrench B 1 Wrench A 1 Wing Nut 1 Bolt (5/16-18 x 1-1/2 in 1 Screw (M4 ... 089037007902 089037012060 089037012904 0101010907 Screw (M5 x 8 mm, Hex Soc. PARTS LIST FOR FIGURE B KEY PART NO. TABLE SAW - MODEL NUMBER RTS31 The model number will be found on a label attached to the cabinet. Key Nos. 9 and 50-51 1 ... 412042002 Cabinet 1 Screw (M8 x 40 mm, Half Rnd. RYOBI 10 in.
...all correspondence regarding your 10 in ., Pan Hd 1 Cam 1 Rack 1 Bevel Scale Label 1 Indicator 1 Screw w/Washer (M5 x 8 mm, Rnd. PORTABLE TABLE SAW or when ordering parts. Hd.)......... 4 Knob Ring 1 Wrench B 1 Wrench A 1 Wing Nut 1 Bolt (5/16-18 x 1-1/2 in 1 Screw (M4 ... 089037007902 089037012060 089037012904 0101010907 Screw (M5 x 8 mm, Hex Soc. PARTS LIST FOR FIGURE B KEY PART NO. TABLE SAW - MODEL NUMBER RTS31 The model number will be found on a label attached to the cabinet. Key Nos. 9 and 50-51 1 ... 412042002 Cabinet 1 Screw (M8 x 40 mm, Half Rnd. RYOBI 10 in.


