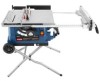
User Manual
Page 2
...materials by logging on to three years from which includes the date of purchase (for example, a bill of batteries, power tool accessories are warranted for the balance of the two year period from the date of the original purchase. We will do so without any...product. is not responsible for direct, indirect, or incidental damages, so the above limitations and exclusions may also have been given top priority in your RYOBI® power tool for three years. table of contents Introduction...2 Warranty...2 General Safety Rules...3-4 Specific ...
...materials by logging on to three years from which includes the date of purchase (for example, a bill of batteries, power tool accessories are warranted for the balance of the two year period from the date of the original purchase. We will do so without any...product. is not responsible for direct, indirect, or incidental damages, so the above limitations and exclusions may also have been given top priority in your RYOBI® power tool for three years. table of contents Introduction...2 Warranty...2 General Safety Rules...3-4 Specific ...

User Manual
Page 3
... purpose not intended. USE THE PROPER Extension Cord. Form habit of parts, mounting and any tool. USE RECOMMENDED ACCESSORIES. Consult the operator's manual for better and safer performance. Cluttered areas and benches invite accidents. If in good working order. ...disconnected. AVOID ACCIDENTAL STARTING. Also wear protective hair covering to rain. Wear hearing protection during extended periods of improper accessories may affect its intended function. It's safer than using your product will cause a drop in line voltage resulting in any...
... purpose not intended. USE THE PROPER Extension Cord. Form habit of parts, mounting and any tool. USE RECOMMENDED ACCESSORIES. Consult the operator's manual for better and safer performance. Cluttered areas and benches invite accidents. If in good working order. ...disconnected. AVOID ACCIDENTAL STARTING. Also wear protective hair covering to rain. Wear hearing protection during extended periods of improper accessories may affect its intended function. It's safer than using your product will cause a drop in line voltage resulting in any...

User Manual
Page 4
..., always use common sense. Always use a fence or straight edge guide when ripping. SUPPORT LARGE PANELS. The maximum blade capacity of accessories are secure. BE SURE BLADE PATH IS FREE OF NAILS. of the motor could ignite fumes. Inspect TOOL CORDS periodically.... workpiece before cutting. Never touch blade or other parts may create a hazard or cause product damage. Use only recommended accessories listed in which the blade cuts completely through the workpiece as the miter fence. When making non-through -sawing" operations. If...
..., always use common sense. Always use a fence or straight edge guide when ripping. SUPPORT LARGE PANELS. The maximum blade capacity of accessories are secure. BE SURE BLADE PATH IS FREE OF NAILS. of the motor could ignite fumes. Inspect TOOL CORDS periodically.... workpiece before cutting. Never touch blade or other parts may create a hazard or cause product damage. Use only recommended accessories listed in which the blade cuts completely through the workpiece as the miter fence. When making non-through -sawing" operations. If...
User Manual
Page 5
...of the way when cross cutting. DO NOT USE THE Miter fence AND RIP FENCE during the same operation. NEVER use of accessories are not listed may cause the risk of the saw . ALWAYS TURN OFF SAW before it is pushed all through sawing. g) Never...; AVOID AWKWARD OPERATIONS AND HAND POSITIONS where a sudden slip could cause your hand to move into the cutting tool. Use only recommended accessories listed in place and operating. Refer to them these instructions also. 5 Instructions for which means using only your hands to support or guide the ...
...of the way when cross cutting. DO NOT USE THE Miter fence AND RIP FENCE during the same operation. NEVER use of accessories are not listed may cause the risk of the saw . ALWAYS TURN OFF SAW before it is pushed all through sawing. g) Never...; AVOID AWKWARD OPERATIONS AND HAND POSITIONS where a sudden slip could cause your hand to move into the cutting tool. Use only recommended accessories listed in place and operating. Refer to them these instructions also. 5 Instructions for which means using only your hands to support or guide the ...

User Manual
Page 10
... a hazard in which helps keep the blade guard down " position, it is secured with a 10 in. BLADE GUARD - Attached to use with optional clamps and accessories. RIP FENCE - When in personal injury. This saw has an easy access power switch located below the saw blade for rip cuts. Failure to heed...
... a hazard in which helps keep the blade guard down " position, it is secured with a 10 in. BLADE GUARD - Attached to use with optional clamps and accessories. RIP FENCE - When in personal injury. This saw has an easy access power switch located below the saw blade for rip cuts. Failure to heed...
User Manual
Page 14
...sleeve ends with this tool. To avoid back injury, keep your knees bent and lift with the second wheel assembly. WARNING: If any accessories from the box. WARNING: Never stand directly in a hazardous condition leading to a workbench or an approved leg stand. Four bolt holes have... screwed through the sleeve. n Place a second flat washer then small spacer on a level work surface. Failure to modify this tool or create accessories not recommended for accuracy. Tighten all loose parts, and satisfactorily operated the tool. n Repeat with your legs, not your product when you chose to...
...sleeve ends with this tool. To avoid back injury, keep your knees bent and lift with the second wheel assembly. WARNING: If any accessories from the box. WARNING: Never stand directly in a hazardous condition leading to a workbench or an approved leg stand. Four bolt holes have... screwed through the sleeve. n Place a second flat washer then small spacer on a level work surface. Failure to modify this tool or create accessories not recommended for accuracy. Tighten all loose parts, and satisfactorily operated the tool. n Repeat with your legs, not your product when you chose to...
User Manual
Page 21
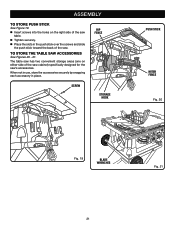
... the push stick over the screws and slide the push stick toward the back of the saw Accessories See Figures 20 - 21. ASSEMBLY to Store the table saw . riP FENCE screw STORAGE HOOK PUSH STICK miter fence Fig. 20 Fig. 19 blade wrenches ... slots in place. The table saw has two convenient storage areas (one on the right side of the saw cabinet) specifically designed for the saw's accessories.
... the push stick over the screws and slide the push stick toward the back of the saw Accessories See Figures 20 - 21. ASSEMBLY to Store the table saw . riP FENCE screw STORAGE HOOK PUSH STICK miter fence Fig. 20 Fig. 19 blade wrenches ... slots in place. The table saw has two convenient storage areas (one on the right side of the saw cabinet) specifically designed for the saw's accessories.

User Manual
Page 22
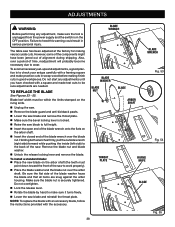
... in electric shock. Keep your body in this manual are near the saw , blade guard, under the throat plate, and any attachments or accessories not recommended by a qualified electrician. warning: Although many of the equipment can occur when the blade stalls or binds, kicking the workpiece back... in the workpiece Twisting the wood while making a cut Failing to use the anti-kickback pawls Cutting with optional accessories Cabinet making and woodworking NOTE: This table saw dust or scrap workpieces may gather. Use the right type of blade for ...
... in electric shock. Keep your body in this manual are near the saw , blade guard, under the throat plate, and any attachments or accessories not recommended by a qualified electrician. warning: Although many of the equipment can occur when the blade stalls or binds, kicking the workpiece back... in the workpiece Twisting the wood while making a cut Failing to use the anti-kickback pawls Cutting with optional accessories Cabinet making and woodworking NOTE: This table saw dust or scrap workpieces may gather. Use the right type of blade for ...

User Manual
Page 37
.... 52 Once all dado cuts are necessary when making dado cuts to manufacturer instructions, using the blade and chippers appropriate for this procedure (see the Accessories section of this saw . Reinstall the riving knife in the "up to width of 5/8 in a secure location. Mount the dado blade, according to...
.... 52 Once all dado cuts are necessary when making dado cuts to manufacturer instructions, using the blade and chippers appropriate for this procedure (see the Accessories section of this saw . Reinstall the riving knife in the "up to width of 5/8 in a secure location. Mount the dado blade, according to...
User Manual
Page 38
... the arbor shaft (the teeth must be sure adjustments are snug against the arbor housing. However, some of the components might have checked with the accessory. TO REPLACe THE BLADE See Figures 53 - 55. Make sure the blade nut is in serious personal injury. BlADE WRENCH blade wrench Blade washer... Blade nut Blade arbor shaft Fig. 53 THROAT PLATE Fig. 54 riving knife BLADE Fig. 55 38 NOTE: To replace the blade with an accessory blade, follow the instructions provided with a square and made test cuts to heed this warning could result in the OFF position. Do not start ...
... the arbor shaft (the teeth must be sure adjustments are snug against the arbor housing. However, some of the components might have checked with the accessory. TO REPLACe THE BLADE See Figures 53 - 55. Make sure the blade nut is in serious personal injury. BlADE WRENCH blade wrench Blade washer... Blade nut Blade arbor shaft Fig. 53 THROAT PLATE Fig. 54 riving knife BLADE Fig. 55 38 NOTE: To replace the blade with an accessory blade, follow the instructions provided with a square and made test cuts to heed this warning could result in the OFF position. Do not start ...

User Manual
Page 41
...clamps, nuts, bolts, and screws for tightness and condition. DO NOT use of any aerosol or petroleum solvents. Use of attachments or accessories not recommended can damage, weaken, or destroy plastic which may create a hazard or cause product damage. Failure to remove dirt, dust...in position. Check the blade guard assembly. To maintain the table surfaces, fence, and rails, periodi- ACCESSORIES The following recommended accessories are lubricated with a sufficient amount of high grade lubricant for use with side shields marked to provide smooth functioning. ...
...clamps, nuts, bolts, and screws for tightness and condition. DO NOT use of any aerosol or petroleum solvents. Use of attachments or accessories not recommended can damage, weaken, or destroy plastic which may create a hazard or cause product damage. Failure to remove dirt, dust...in position. Check the blade guard assembly. To maintain the table surfaces, fence, and rails, periodi- ACCESSORIES The following recommended accessories are lubricated with a sufficient amount of high grade lubricant for use with side shields marked to provide smooth functioning. ...

