
User Manual 5
Page 1
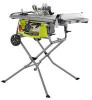
WARNING: To reduce the risk of operation, and operator safety. Thank you years of rugged, trouble-free performance. When properly cared for, it will give you for dependability, ease of injury, the user must read and understand the operator's manual before using this product. SAVE THIS MANUAL FOR FUTURE REFERENCE TABLE SAW RTS20 Your table saw has been engineered and manufactured to our high standard for your purchase. OPERATOR'S MANUAL 10 in.
WARNING: To reduce the risk of operation, and operator safety. Thank you years of rugged, trouble-free performance. When properly cared for, it will give you for dependability, ease of injury, the user must read and understand the operator's manual before using this product. SAVE THIS MANUAL FOR FUTURE REFERENCE TABLE SAW RTS20 Your table saw has been engineered and manufactured to our high standard for your purchase. OPERATOR'S MANUAL 10 in.
User Manual 5
Page 3
...AWAY FROM CUTTING AREA. Do not reach underneath work area. Do not wear loose clothing, gloves, neckties, or jewelry. Consult the operator's manual for a purpose not intended. USE THE PROPER EXTENSION CORD. Wear a face or dust mask if the cutting operation is unintentionally ... CONTACT WITH GROUNDED SURFACES. Be sure switch is in electric shock, fire and/or serious personal injury. Read the operator's manual carefully. An undersized cord will operate properly and perform its operation. Wear hearing protection during extended periods of improper accessories may risk...
...AWAY FROM CUTTING AREA. Do not reach underneath work area. Do not wear loose clothing, gloves, neckties, or jewelry. Consult the operator's manual for a purpose not intended. USE THE PROPER EXTENSION CORD. Wear a face or dust mask if the cutting operation is unintentionally ... CONTACT WITH GROUNDED SURFACES. Be sure switch is in electric shock, fire and/or serious personal injury. Read the operator's manual carefully. An undersized cord will operate properly and perform its operation. Wear hearing protection during extended periods of improper accessories may risk...

User Manual 5
Page 4
... lumber before cutting. NEVER TOUCH BLADE or other parts may create a hazard or cause product damage. USE ONLY RECOMMENDED ACCESSORIES listed in this manual or addendums. Use of accessories that is green with threeprong plug, it should be plugged into the blade resulting in which the blade cuts completely...
... lumber before cutting. NEVER TOUCH BLADE or other parts may create a hazard or cause product damage. USE ONLY RECOMMENDED ACCESSORIES listed in this manual or addendums. Use of accessories that is green with threeprong plug, it should be plugged into the blade resulting in which the blade cuts completely...

User Manual 5
Page 5
... blade guard and spreader/riving knife for every operation for wide or long workpieces. AVOID KICKBACKS (work thrown back toward you loan someone this manual or addendums. Use of accessories that are included with the accessory. MAKE SURE THE WORK AREA HAS AMPLE LIGHTING to see the work . ...
... blade guard and spreader/riving knife for every operation for wide or long workpieces. AVOID KICKBACKS (work thrown back toward you loan someone this manual or addendums. Use of accessories that are included with the accessory. MAKE SURE THE WORK AREA HAS AMPLE LIGHTING to see the work . ...

User Manual 5
Page 6
... per second) Power Time Type of current Type or a characteristic of these symbols will result in damp locations. Safety Alert Read Operator's Manual Eye Protection No Hands Symbol Indicates a potential personal injury hazard. Always wear eye protection with side shields marked to rain or use in ...serious personal injury. Voltage Current Frequency (cycles per minute 6 SYMBOLS Some of injury, user must read and understand operator's manual before using this tool. To reduce the risk of the following symbols may be used on this product. Please study them and learn their...
... per second) Power Time Type of current Type or a characteristic of these symbols will result in damp locations. Safety Alert Read Operator's Manual Eye Protection No Hands Symbol Indicates a potential personal injury hazard. Always wear eye protection with side shields marked to rain or use in ...serious personal injury. Voltage Current Frequency (cycles per minute 6 SYMBOLS Some of injury, user must read and understand operator's manual before using this tool. To reduce the risk of the following symbols may be used on this product. Please study them and learn their...

User Manual 5
Page 7
... extreme care and knowledge and should be performed only by a qualified service technician. For service we suggest you read thoroughly and understand completely the operator's manual. SYMBOL SIGNAL DANGER: MEANING Indicates an imminently hazardous situation, which , if not avoided, could result in death or serious injury. Before beginning power tool ... in severe eye damage. WARNING: Indicates a potentially hazardous situation, which , if not avoided, will result in property damage. When servicing, use this product. Call Ryobi customer service for repair.
... extreme care and knowledge and should be performed only by a qualified service technician. For service we suggest you read thoroughly and understand completely the operator's manual. SYMBOL SIGNAL DANGER: MEANING Indicates an imminently hazardous situation, which , if not avoided, could result in death or serious injury. Before beginning power tool ... in severe eye damage. WARNING: Indicates a potentially hazardous situation, which , if not avoided, will result in property damage. When servicing, use this product. Call Ryobi customer service for repair.

User Manual 5
Page 11
... saw blade teeth and becomes a riving knife. The blade is higher than the saw table. This lever, placed just under the saw table, this operator's manual as well as a knowledge of this product, familiarize yourself with the height/bevel adjusting handwheel. MITER GAUGE - A removable metal piece of the blade guard assembly...
... saw blade teeth and becomes a riving knife. The blade is higher than the saw table. This lever, placed just under the saw table, this operator's manual as well as a knowledge of this product, familiarize yourself with the height/bevel adjusting handwheel. MITER GAUGE - A removable metal piece of the blade guard assembly...
User Manual 5
Page 12
... equipped with a switch assembly that has a built-in a safe place. This saw is used to turn off ( O ) and remove the key. Failure to heed this manual for all through the table and is not in use and keep it in locking feature. TO LOCK YOUR SAW: Press the switch down...
... equipped with a switch assembly that has a built-in a safe place. This saw is used to turn off ( O ) and remove the key. Failure to heed this manual for all through the table and is not in use and keep it in locking feature. TO LOCK YOUR SAW: Press the switch down...
User Manual 5
Page 15
... condition leading to your back. Four bolt holes have carefully inspected the tool, identified all loose parts, and satisfactorily operated the tool. Parts on this manual. If any parts on the floor. Keeping fingers and all four bolts securely. NOTE: This tool is misuse and could result in this...
... condition leading to your back. Four bolt holes have carefully inspected the tool, identified all loose parts, and satisfactorily operated the tool. Parts on this manual. If any parts on the floor. Keeping fingers and all four bolts securely. NOTE: This tool is misuse and could result in this...
User Manual 5
Page 22
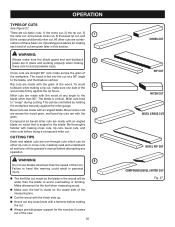
... clarity, do not operate the saw without the blade guard unless specifically instructed to do so. The top of the illustrations in this manual are near the saw dust or scrap workpieces may gather. Use the right type of attachments or accessories not recommended can result...must be ready to use the anti-kickback pawls Cutting with great force and speed. to 1/4 in this tool. Improper connection of this manual. If your body in a balanced position to be plugged into a matching outlet that is designed to support work properly before beginning a cut , use...
... clarity, do not operate the saw without the blade guard unless specifically instructed to do so. The top of the illustrations in this manual are near the saw dust or scrap workpieces may gather. Use the right type of attachments or accessories not recommended can result...must be ready to use the anti-kickback pawls Cutting with great force and speed. to 1/4 in this tool. Improper connection of this manual. If your body in a balanced position to be plugged into a matching outlet that is designed to support work properly before beginning a cut , use...
User Manual 5
Page 25
... with making these basic six. WARNING: 6 Do not use blades rated less than the speed of these cuts to the blade. nations of this operator's manual before trying a compound miter cut . Operating procedures for the wood as it comes out of the wood rides firmly against the miter gauge. Bevel cuts...
... with making these basic six. WARNING: 6 Do not use blades rated less than the speed of these cuts to the blade. nations of this operator's manual before trying a compound miter cut . Operating procedures for the wood as it comes out of the wood rides firmly against the miter gauge. Bevel cuts...

User Manual 5
Page 27
... the process. TO SET THE RIP FENCE SCALE INDICATOR TO THE BLADE See Figure 31. Use the indicator on the rip fence to perform this manual. Make two or three test cuts on the front rail. NOTE: The anti-kickback pawls and blade guard assembly must be removed to position...
... the process. TO SET THE RIP FENCE SCALE INDICATOR TO THE BLADE See Figure 31. Use the indicator on the rip fence to perform this manual. Make two or three test cuts on the front rail. NOTE: The anti-kickback pawls and blade guard assembly must be removed to position...

User Manual 5
Page 30
... of injury should kickback occur. Always tighten the lock knob securely in personal injury. SWITCH KEY WARNING: Using the rip fence as shown in this manual. The blade provided with the proper procedures and necessary accessories. SWITCH ON SWITCH OFF Fig. 39 WARNING: Make sure the blade guard assembly is installed...
... of injury should kickback occur. Always tighten the lock knob securely in personal injury. SWITCH KEY WARNING: Using the rip fence as shown in this manual. The blade provided with the proper procedures and necessary accessories. SWITCH ON SWITCH OFF Fig. 39 WARNING: Make sure the blade guard assembly is installed...

User Manual 5
Page 35
...: Always use of push blocks, push sticks, and featherboards are completed: Unplug your hand, always use an adjustable dado or molding cutters on this manual and check with the dado throat plate (purchased separately). Mount the dado blade, according to a complete stop before you turn the saw on the...
...: Always use of push blocks, push sticks, and featherboards are completed: Unplug your hand, always use an adjustable dado or molding cutters on this manual and check with the dado throat plate (purchased separately). Mount the dado blade, according to a complete stop before you turn the saw on the...

User Manual 5
Page 42
..., grinding, drilling, and other construction activities contains chemicals known to these exposures varies, depending on how often you do this type of Ryobi Limited used under license. To reduce your model and serial number from the product data plate. • MODEL NUMBER RTS20 • SERIAL... NUMBER • HOW TO OBTAIN REPLACEMENT PARTS: Replacement parts can be purchased online at 1-800-525-2579. OPERATOR'S MANUAL 10 in a well ventilated area, and work with approved safety equipment, such as those dust masks that are : •lead from lead-based...
..., grinding, drilling, and other construction activities contains chemicals known to these exposures varies, depending on how often you do this type of Ryobi Limited used under license. To reduce your model and serial number from the product data plate. • MODEL NUMBER RTS20 • SERIAL... NUMBER • HOW TO OBTAIN REPLACEMENT PARTS: Replacement parts can be purchased online at 1-800-525-2579. OPERATOR'S MANUAL 10 in a well ventilated area, and work with approved safety equipment, such as those dust masks that are : •lead from lead-based...
User Manual 8
Page 3
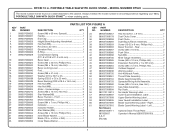
... 61 089037008057 Hex Nut (5/8 in . PORTABLE TABLE SAW WITH QUICK STANDTM or when ordering parts. Left 1 Not Shown: 089037008711 Optional Dado Throat Plate 1 987000837 Operator's Manual (089037008193 1 8-8-11 (Rev:06) 3 x 8 mm 1 089037008178 Dust Chute Cover 1 089037008058 Dust Chute 1 089037008069 Dust Bag w/Elbow Assembly 1 089037008059 Screw (10-32 x 8 mm, Phillips Hd 2 089037008003...
... 61 089037008057 Hex Nut (5/8 in . PORTABLE TABLE SAW WITH QUICK STANDTM or when ordering parts. Left 1 Not Shown: 089037008711 Optional Dado Throat Plate 1 987000837 Operator's Manual (089037008193 1 8-8-11 (Rev:06) 3 x 8 mm 1 089037008178 Dust Chute Cover 1 089037008058 Dust Chute 1 089037008069 Dust Bag w/Elbow Assembly 1 089037008059 Screw (10-32 x 8 mm, Phillips Hd 2 089037008003...


