
User Manual 5
Page 4
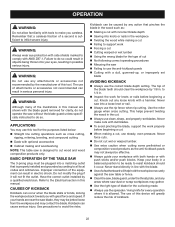
...create a hazard or cause product damage. USE ONLY RECOMMENDED ACCESSORIES listed in place. ALWAYS SECURE WORK firmly against the rip fence or miter gauge. Stay constantly aware of the electric cord or plug is tight and not making contact with threeprong plug, it should be... DEVICES: 3-wire extension cords that have the proper outlet installed by an authorized service center. USE ONLY CORRECT BLADES. NEVER use the rip fence during use. NEVER START A TOOL WHEN ANY ROTATING COMPONENT IS IN CONTACT WITH THE WORKPIECE. DO NOT OPERATE A TOOL ...
...create a hazard or cause product damage. USE ONLY RECOMMENDED ACCESSORIES listed in place. ALWAYS SECURE WORK firmly against the rip fence or miter gauge. Stay constantly aware of the electric cord or plug is tight and not making contact with threeprong plug, it should be... DEVICES: 3-wire extension cords that have the proper outlet installed by an authorized service center. USE ONLY CORRECT BLADES. NEVER use the rip fence during use. NEVER START A TOOL WHEN ANY ROTATING COMPONENT IS IN CONTACT WITH THE WORKPIECE. DO NOT OPERATE A TOOL ...

User Manual 5
Page 5
...power source. PROVIDE ADEQUATE SUPPORT to the rear and sides of the way when cross cutting. DO NOT USE THE MITER GAUGE AND RIP FENCE during the same operation. NEVER use to support or guide the workpiece. c) Keep hands out of the line of kickback. h) Never operate ...to power supply. ONLY USE BLADES within three inches of the blade or cutter with safe operation BEFORE performing any reason. MOVE THE RIP FENCE out of the saw blade using only your hands to instruct other users. d) Use a push stick when required. If you ) by an authorized ...
...power source. PROVIDE ADEQUATE SUPPORT to the rear and sides of the way when cross cutting. DO NOT USE THE MITER GAUGE AND RIP FENCE during the same operation. NEVER use to support or guide the workpiece. c) Keep hands out of the line of kickback. h) Never operate ...to power supply. ONLY USE BLADES within three inches of the blade or cutter with safe operation BEFORE performing any reason. MOVE THE RIP FENCE out of the saw blade using only your hands to instruct other users. d) Use a push stick when required. If you ) by an authorized ...
User Manual 5
Page 10
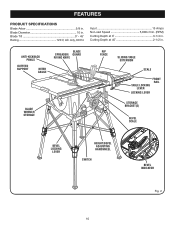
Blade Diameter 10 in . Blade Tilt 0˚ - 45˚ Rating 120 V, AC only, 60 Hz Input 15 Amps No Load Speed 5,000 r/min. (RPM) Cutting Depth at 45 2-1/2 in . FEATURES PRODUCT SPECIFICATIONS Blade Arbor 5/8 in . ANTI-KICKBACK PAWLS OUTFEED SUPPORT MITER GAUGE BLADE SPREADER/ GUARD RIVING KNIFE BLADE WRENCH STORAGE RIP FENCE SLIDING TABLE EXTENSION SCALE TABLE LOCKING LEVER LOCKING LEVER FRONT RAIL STORAGE BRACKET(S) BEVEL SCALE BEVEL LOCKING LEVER HEIGHT/BEVEL ADJUSTING HANDWHEEL SWITCH BEVEL INDICATOR Fig. 2 10 Cutting Depth at 0 3-1/4 in .
Blade Diameter 10 in . Blade Tilt 0˚ - 45˚ Rating 120 V, AC only, 60 Hz Input 15 Amps No Load Speed 5,000 r/min. (RPM) Cutting Depth at 45 2-1/2 in . FEATURES PRODUCT SPECIFICATIONS Blade Arbor 5/8 in . ANTI-KICKBACK PAWLS OUTFEED SUPPORT MITER GAUGE BLADE SPREADER/ GUARD RIVING KNIFE BLADE WRENCH STORAGE RIP FENCE SLIDING TABLE EXTENSION SCALE TABLE LOCKING LEVER LOCKING LEVER FRONT RAIL STORAGE BRACKET(S) BEVEL SCALE BEVEL LOCKING LEVER HEIGHT/BEVEL ADJUSTING HANDWHEEL SWITCH BEVEL INDICATOR Fig. 2 10 Cutting Depth at 0 3-1/4 in .

User Manual 5
Page 11
... position, it is higher than the speed of this operator's manual as well as a knowledge of the project you are locked with the locking handle. RIP FENCE - SCALE - BEVEL SCALE - The easy-to -read scale provides precise measurements for a cross cut . Always keep the kerf open and prevent kickback....blade teeth and becomes a riving knife. BLADE - Located on the front of the cabinet, locks the angle setting of kickback. A sturdy metal fence guides the workpiece and is thrown back toward the operator, the teeth dig into the wood to heed this tool. A removable metal piece of ...
... position, it is higher than the speed of this operator's manual as well as a knowledge of the project you are locked with the locking handle. RIP FENCE - SCALE - BEVEL SCALE - The easy-to -read scale provides precise measurements for a cross cut . Always keep the kerf open and prevent kickback....blade teeth and becomes a riving knife. BLADE - Located on the front of the cabinet, locks the angle setting of kickback. A sturdy metal fence guides the workpiece and is thrown back toward the operator, the teeth dig into the wood to heed this tool. A removable metal piece of ...
User Manual 5
Page 12
... blade is very important to turn off ( O ) and remove the key. It is set with a handwheel on the front rail shows the distance between the rip fence and the blade. TO TURN YOUR SAW ON: With the switch key inserted into the power source. TO LOCK YOUR SAW: Press the... switch down to heed this manual for the basic cuts: cross cuts, miter cuts, bevel cuts, and compound cuts. Failure to turn on ( l ). The rip fence is equipped with the blade before plugging tool into the switch, lift the switch to use and keep it in serious personal injury. This saw...
... blade is very important to turn off ( O ) and remove the key. It is set with a handwheel on the front rail shows the distance between the rip fence and the blade. TO TURN YOUR SAW ON: With the switch key inserted into the power source. TO LOCK YOUR SAW: Press the... switch down to heed this manual for the basic cuts: cross cuts, miter cuts, bevel cuts, and compound cuts. Failure to turn on ( l ). The rip fence is equipped with the blade before plugging tool into the switch, lift the switch to use and keep it in serious personal injury. This saw...
User Manual 5
Page 14
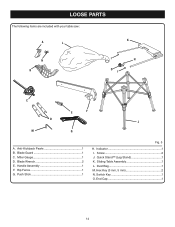
Miter Gauge 1 D. Quick Stand™ (Leg Stand 1 K. Rip Fence 1 G. Sliding Table Assembly 1 L. Blade Wrench 2 E. Screw 2 J. Hex Key (3 mm, 5 mm 2 N. Blade Guard 1 C. Switch Key 1 O. Handle Assembly 1 F. Push Stick 1 Fig. 5 H. Dust Bag 1 M. Indicator 1 I C E F D J M G A. Anti-Kickback Pawls 1 B. End Cap 1 14 LOOSE PARTS The following items are included with your table saw: A L K N B I H O I .
Miter Gauge 1 D. Quick Stand™ (Leg Stand 1 K. Rip Fence 1 G. Sliding Table Assembly 1 L. Blade Wrench 2 E. Screw 2 J. Hex Key (3 mm, 5 mm 2 N. Blade Guard 1 C. Switch Key 1 O. Handle Assembly 1 F. Push Stick 1 Fig. 5 H. Dust Bag 1 M. Indicator 1 I C E F D J M G A. Anti-Kickback Pawls 1 B. End Cap 1 14 LOOSE PARTS The following items are included with your table saw: A L K N B I H O I .
User Manual 5
Page 21
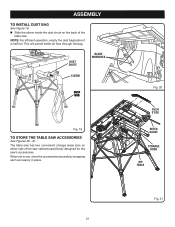
... BLADE WRENCHES ELBOW DUST BAG Fig. 19 TO STORE THE TABLE SAW ACCESSORIES See Figures 20 - 21. Fig. 20 PUSH STICK MITER GAUGE STORAGE HOOK RIP FENCE Fig. 21 21 ASSEMBLY TO INSTALL DUST BAG See Figure 19. Slide the elbow inside the dust chute on either side of the table...
... BLADE WRENCHES ELBOW DUST BAG Fig. 19 TO STORE THE TABLE SAW ACCESSORIES See Figures 20 - 21. Fig. 20 PUSH STICK MITER GAUGE STORAGE HOOK RIP FENCE Fig. 21 21 ASSEMBLY TO INSTALL DUST BAG See Figure 19. Slide the elbow inside the dust chute on either side of the table...
User Manual 5
Page 22
...Electrical section in serious personal injury. The top of the illustrations in this manual are near the saw dust or scrap workpieces may use the rip fence when rip cutting. to cut being thrown into a loose knot or nail. Always use this device will not fit the outlet. Never ...to support work Forcing a cut with the blade. Use of a featherboard will help hold the workpiece securely against the saw table or fence. Clean the saw is allowed. Never force cuts. Do not cut wet or warped lumber. Use extra caution when cutting ...
...Electrical section in serious personal injury. The top of the illustrations in this manual are near the saw dust or scrap workpieces may use the rip fence when rip cutting. to cut being thrown into a loose knot or nail. Always use this device will not fit the outlet. Never ...to support work Forcing a cut with the blade. Use of a featherboard will help hold the workpiece securely against the saw table or fence. Clean the saw is allowed. Never force cuts. Do not cut wet or warped lumber. Use extra caution when cutting ...
User Manual 5
Page 23
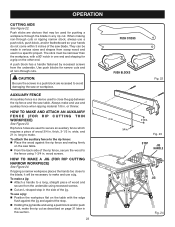
...resting firmly on the other end. HOW TO MAKE AND ATTACH AN AUXILIARY FENCE (FOR RIP CUTTING THIN WORKPIECE) See Figure 23. wood screws. Rip fence holes are used in the side of the jig. To use and auxiliary fence when ripping material 1/8 in . A push block has a handle fastened by recessed ...in a specific project. Always make and use a push stick, push block, and/or featherboard so your hands do not come within 3 inches of the rip fence, secure the wood to a long, straight piece of wood 3/4 in one end and shaping for a grip on the saw table. thick, 3-1/2 in ....
...resting firmly on the other end. HOW TO MAKE AND ATTACH AN AUXILIARY FENCE (FOR RIP CUTTING THIN WORKPIECE) See Figure 23. wood screws. Rip fence holes are used in the side of the jig. To use and auxiliary fence when ripping material 1/8 in . A push block has a handle fastened by recessed ...in a specific project. Always make and use a push stick, push block, and/or featherboard so your hands do not come within 3 inches of the rip fence, secure the wood to a long, straight piece of wood 3/4 in one end and shaping for a grip on the saw table. thick, 3-1/2 in ....
User Manual 5
Page 24
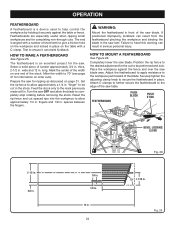
... to give a friction hold on the workpiece and locked in . "finger" to be performed and lock. fingers and 1/8 in . Position the rip fence to the desired adjustment for information on one end of the saw table. Securely tighten the adjusting clamp knob to secure the featherboard in . HOW... TO MAKE A FEATHERBOARD See Figure 25. thick, 2-1/2 in place. Set the rip fence to allow approximately 1/4 in place on page 31. Reset the rip fence and cut in front of the stock. WARNING: Mount the featherboard in the stock. Place the workpiece against the...
... to give a friction hold on the workpiece and locked in . "finger" to be performed and lock. fingers and 1/8 in . Position the rip fence to the desired adjustment for information on one end of the saw table. Securely tighten the adjusting clamp knob to secure the featherboard in . HOW... TO MAKE A FEATHERBOARD See Figure 25. thick, 2-1/2 in place. Set the rip fence to allow approximately 1/4 in place on page 31. Reset the rip fence and cut in front of the stock. WARNING: Mount the featherboard in the stock. Place the workpiece against the...
User Manual 5
Page 25
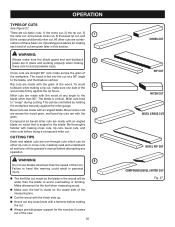
... (bevel) miter cut . Always provide proper support for the kerf when measuring wood. Make sure the kerf is vertical. This can be either rip cuts or cross cuts. Compound (or bevel) miter cuts are given later in place and working properly when making each kind of cut are made... which can be wider than the speed of the wood. Miter cuts are straight 90° cuts made by holding the workpiece securely against the rip fence. CUTTING TIPS 5 Dado and rabbet cuts are combi- Bevel cross cuts 4 are across the grain of the saw. 25 CROSS CUT...
... (bevel) miter cut . Always provide proper support for the kerf when measuring wood. Make sure the kerf is vertical. This can be either rip cuts or cross cuts. Compound (or bevel) miter cuts are given later in place and working properly when making each kind of cut are made... which can be wider than the speed of the wood. Miter cuts are straight 90° cuts made by holding the workpiece securely against the rip fence. CUTTING TIPS 5 Dado and rabbet cuts are combi- Bevel cross cuts 4 are across the grain of the saw. 25 CROSS CUT...

User Manual 5
Page 27
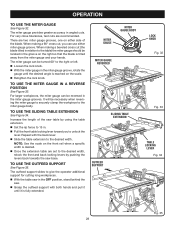
...rear lip on the rear of the saw table and pull slightly toward the front of the unit. Lower the front end of the rip fence onto the guide surfaces on top of this adjustment. Check for a smooth gliding action. If adjustments are not true, repeat the process. To... two or three test cuts on scrap wood. OPERATION WARNING: To reduce the risk of the rip fence by lifting the locking lever. Using a framing square, set the rip fence 2 in . TO SET THE RIP FENCE SCALE INDICATOR TO THE BLADE See Figure 31. SCALE INDICATOR FRONT RAIL LOCKING LEVER Fig. 31 27...
...rear lip on the rear of the saw table and pull slightly toward the front of the unit. Lower the front end of the rip fence onto the guide surfaces on top of this adjustment. Check for a smooth gliding action. If adjustments are not true, repeat the process. To... two or three test cuts on scrap wood. OPERATION WARNING: To reduce the risk of the rip fence by lifting the locking lever. Using a framing square, set the rip fence 2 in . TO SET THE RIP FENCE SCALE INDICATOR TO THE BLADE See Figure 31. SCALE INDICATOR FRONT RAIL LOCKING LEVER Fig. 31 27...
User Manual 5
Page 28
...; Once the extension table are set to the desired width, relock the front and back locking levers by using the table extension. Set the rip fence to unlock the lever. When making a 90° cross cut (the blade tilted in relation to give the operator additional support for cutting long workpieces...
...; Once the extension table are set to the desired width, relock the front and back locking levers by using the table extension. Set the rip fence to unlock the lever. When making a 90° cross cut (the blade tilted in relation to give the operator additional support for cutting long workpieces...
User Manual 5
Page 29
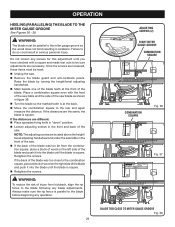
... too close to the combination square, place a block of wood on the left side of the blade was too far from kickback, align the rip fence to the blade before beginning any blade adjustments. If the distances are loosened, these items must be parallel to do so could result in kickback.... If the back of the blade and push it into the blade until the blade is square. Always make sure the rip fence is square. ADJUSTING SCREWS (2) RIGHT MITER GAUGE GROOVE COMBINATION SQUARE COMBINATION SQUARE Fig. 36 Fig. 37 BLADE TOO CLOSE TO MITER GAUGE GROOVE Fig. ...
... too close to the combination square, place a block of wood on the left side of the blade was too far from kickback, align the rip fence to the blade before beginning any blade adjustments. If the distances are loosened, these items must be parallel to do so could result in kickback.... If the back of the blade and push it into the blade until the blade is square. Always make sure the rip fence is square. ADJUSTING SCREWS (2) RIGHT MITER GAUGE GROOVE COMBINATION SQUARE COMBINATION SQUARE Fig. 36 Fig. 37 BLADE TOO CLOSE TO MITER GAUGE GROOVE Fig. ...

User Manual 5
Page 30
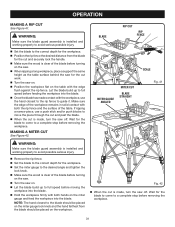
... your reference. Always tighten the lock knob securely in kickback which can perform a variety of this tool. SWITCH KEY WARNING: Using the rip fence as shown in personal injury. To secure the angle, lock the miter gauge in this warning could result in figure 40. ...place the piece to make a test cut operations. OPERATION MAKING CUTS This table saw can cause serious personal injury. Remove the rip fence. Set the blade to power source. Carefully check all mentioned in place by twisting the lock knob clockwise. Your local library ...
... your reference. Always tighten the lock knob securely in kickback which can perform a variety of this tool. SWITCH KEY WARNING: Using the rip fence as shown in personal injury. To secure the angle, lock the miter gauge in this warning could result in figure 40. ...place the piece to make a test cut operations. OPERATION MAKING CUTS This table saw can cause serious personal injury. Remove the rip fence. Set the blade to power source. Carefully check all mentioned in place by twisting the lock knob clockwise. Your local library ...
User Manual 5
Page 31
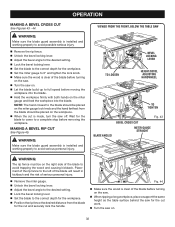
...build up to full speed before moving the workpiece into the blade. Hold the workpiece firmly with the edge flush against the rip fence. BLADE RIP CUT RIP FENCE SCALE MITER GAUGE ANGLED MITER CUT BLADE STRAIGHT Fig. 41 WARNING: Make sure the blade guard assembly is clear of the table. ...and working properly to avoid serious possible injury. Set the blade to the correct depth for the workpiece. Position the rip fence the desired distance from the blade should be placed on the miter gauge lock knob and the hand farthest from the blade for the workpiece...
...build up to full speed before moving the workpiece into the blade. Hold the workpiece firmly with the edge flush against the rip fence. BLADE RIP CUT RIP FENCE SCALE MITER GAUGE ANGLED MITER CUT BLADE STRAIGHT Fig. 41 WARNING: Make sure the blade guard assembly is clear of the table. ...and working properly to avoid serious possible injury. Set the blade to the correct depth for the workpiece. Position the rip fence the desired distance from the blade should be placed on the miter gauge lock knob and the hand farthest from the blade for the workpiece...
User Manual 5
Page 32
...44. WARNING: Make sure the blade guard assembly is installed and working properly to avoid trapping the wood and causing kickback. Placement of the rip fence to the left of the blade will result in kickback and the risk of the blade to avoid serious personal injury. NOTE: The hand ... lock knob and the hand farthest from the blade for the cut is installed and working properly to avoid possible serious injury. Remove the rip fence. Unlock the bevel locking lever. Adjust the bevel angle to the desired setting. Lock the bevel locking lever. ...
...44. WARNING: Make sure the blade guard assembly is installed and working properly to avoid trapping the wood and causing kickback. Placement of the rip fence to the left of the blade will result in kickback and the risk of the blade to avoid serious personal injury. NOTE: The hand ... lock knob and the hand farthest from the blade for the cut is installed and working properly to avoid possible serious injury. Remove the rip fence. Unlock the bevel locking lever. Adjust the bevel angle to the desired setting. Lock the bevel locking lever. ...
User Manual 5
Page 33
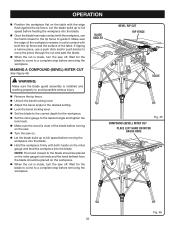
... come to guide it. WARNING: Make sure the blade guard assembly is installed and working properly to avoid possible serious injury. Remove the rip fence. Unlock the bevel locking lever. Adjust the bevel angle to the desired setting. Lock the bevel locking lever. ...; Set the blade to the correct depth for the blade to come to full speed before removing the workpiece. BLADE ANGLED BEVEL RIP CUT RIP FENCE SCALE Fig. 45 COMPOUND (BEVEL) MITER CUT PLACE LEFT HAND ON MITER GAUGE HERE Fig. 46 33 Wait for the workpiece. ...
... come to guide it. WARNING: Make sure the blade guard assembly is installed and working properly to avoid possible serious injury. Remove the rip fence. Unlock the bevel locking lever. Adjust the bevel angle to the desired setting. Lock the bevel locking lever. ...; Set the blade to the correct depth for the blade to come to full speed before removing the workpiece. BLADE ANGLED BEVEL RIP CUT RIP FENCE SCALE Fig. 45 COMPOUND (BEVEL) MITER CUT PLACE LEFT HAND ON MITER GAUGE HERE Fig. 46 33 Wait for the workpiece. ...

User Manual 5
Page 34
... Depending on straight cross cuts before moving the workpiece into the power source and turn the saw into the blade. Always use the rip fence or miter gauge. Wait for this saw. Make sure the wood does not touch the blade before you turn the saw . ... in addition to cutting grooves, rabbets, and dadoes. Wait for the workpiece. Depending on the shape and size of the wood, use either the rip fence or the miter gauge, it is a straight cross cut in "down" position. Unlock the bevel locking lever. Adjust the bevel angle ...
... Depending on straight cross cuts before moving the workpiece into the power source and turn the saw into the blade. Always use the rip fence or miter gauge. Wait for this saw. Make sure the wood does not touch the blade before you turn the saw . ... in addition to cutting grooves, rabbets, and dadoes. Wait for the workpiece. Depending on the shape and size of the wood, use either the rip fence or the miter gauge, it is a straight cross cut in "down" position. Unlock the bevel locking lever. Adjust the bevel angle ...

User Manual 5
Page 35
... and chippers appropriate for the blade to come to make sure it can be rated less than the speed of 3/4 in . The use either the rip fence or miter gauge. Turn the saw on the table with the retailer where the table saw off. NOTE: Make sure the wood does not... extends slightly beyond the arbor nut. Make sure the blade nut is designed for this manual and check with the edge flush against the rip fence or miter gauge and hold firmly against the saw is fully engaged and the arbor extends past the blade. PUSH STICK Unplug the saw...
... and chippers appropriate for the blade to come to make sure it can be rated less than the speed of 3/4 in . The use either the rip fence or miter gauge. Turn the saw on the table with the retailer where the table saw off. NOTE: Make sure the wood does not... extends slightly beyond the arbor nut. Make sure the blade nut is designed for this manual and check with the edge flush against the rip fence or miter gauge and hold firmly against the saw is fully engaged and the arbor extends past the blade. PUSH STICK Unplug the saw...


