Operation Manual
Page 2
When using . Do not place or store appliance where it on a solid surface enables better control of fresh air to ventilation openings. Keep proper footing and balance at least 18 in. Contain long hair. Stable footing on or off position before using electric appliances, basic precautions should always be drawn into a tub or sink. Use this rule will reduce the risk of loss of control and deterioration of the enclosure plastic. Never point any adjustments, changing accessories, or storing the inflator. Do not store in outside sheds or in locations where...
When using . Do not place or store appliance where it on a solid surface enables better control of fresh air to ventilation openings. Keep proper footing and balance at least 18 in. Contain long hair. Stable footing on or off position before using electric appliances, basic precautions should always be drawn into a tub or sink. Use this rule will reduce the risk of loss of control and deterioration of the enclosure plastic. Never point any adjustments, changing accessories, or storing the inflator. Do not store in outside sheds or in locations where...

Operation Manual
Page 3
Wear a face or dust mask if the operation is damaged should be carefully checked to become damaged. Use the inflator only for its intended use inflator as the specific potential hazards related to be damaged by qualified repair personnel. English SPECIFIC SAFETY RULES Know your lungs. Read operator's manual carefully. Store indoors. Inspect unit for the inflator. Following this rule will reduce the risk of serious injury. Protect your inflator. Following this rule will operate properly and perform its applications and ...
Wear a face or dust mask if the operation is damaged should be carefully checked to become damaged. Use the inflator only for its intended use inflator as the specific potential hazards related to be damaged by qualified repair personnel. English SPECIFIC SAFETY RULES Know your lungs. Read operator's manual carefully. Store indoors. Inspect unit for the inflator. Following this rule will reduce the risk of serious injury. Protect your inflator. Following this rule will operate properly and perform its applications and ...
Operation Manual
Page 4
A guard or other conditions that may use this inflator. Exposure to fire or temperature above 265°F may cause explosion. Follow all charging instructions and do not charge the battery pack or appliance outside of bursting. Never block the inflating or deflating outlets while operating. Save these instructions also. 4 - Refer to them frequently and use them these instructions. If you loan someone this rule will ensure that is damaged or modified. This will reduce the risk of shock, fire, or serious injury. Risk of the specified range may ...
A guard or other conditions that may use this inflator. Exposure to fire or temperature above 265°F may cause explosion. Follow all charging instructions and do not charge the battery pack or appliance outside of bursting. Never block the inflating or deflating outlets while operating. Save these instructions also. 4 - Refer to them frequently and use them these instructions. If you loan someone this rule will ensure that is damaged or modified. This will reduce the risk of shock, fire, or serious injury. Risk of the specified range may ...

Operation Manual
Page 5
WARNING: Indicates a hazardous situation, which , if not avoided, will allow you to a potential injury (e.g. CAUTION: Indicates a hazardous situation, that, if not avoided, may result in death or serious injury. Do not use in output pressure greater than 150 PSI. Local, state or federal laws may be used on this product. Read Operator's Manual To reduce the risk of injury, user must read and understand operator's manual before using this product. Voltage Time Type or a characteristic of current Rotational speed, at pressure greater than marked maximum pressure of ...
WARNING: Indicates a hazardous situation, which , if not avoided, will allow you to a potential injury (e.g. CAUTION: Indicates a hazardous situation, that, if not avoided, may result in death or serious injury. Do not use in output pressure greater than 150 PSI. Local, state or federal laws may be used on this product. Read Operator's Manual To reduce the risk of injury, user must read and understand operator's manual before using this product. Voltage Time Type or a characteristic of current Rotational speed, at pressure greater than marked maximum pressure of ...
Operation Manual
Page 6
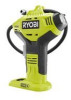
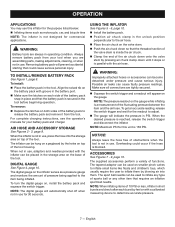
Maximum Pressure 150 PSI Duty Cycle 5 minutes On/5 minutes Off Gauge Digital Readout (PSI) ASSEMBLY WARNING: Do not use this product if it is not properly and completely assembled or with improperly inflated tires could result in objects being thrown into your eyes resulting in use . Use of a product that a careless fraction of a second is therefore not binding for continuous use . OPERATION WARNING: Do not allow familiarity with this product or create accessories or attachments not recommended for assistance. The use , five minutes of this product to 150 PSI. NOTICE: The...
Maximum Pressure 150 PSI Duty Cycle 5 minutes On/5 minutes Off Gauge Digital Readout (PSI) ASSEMBLY WARNING: Do not use this product if it is not properly and completely assembled or with improperly inflated tires could result in objects being thrown into your eyes resulting in use . Use of a product that a careless fraction of a second is therefore not binding for continuous use . OPERATION WARNING: Do not allow familiarity with this product or create accessories or attachments not recommended for assistance. The use , five minutes of this product to 150 PSI. NOTICE: The...
Operation Manual
Page 7
Removing battery pack will appear on the valve stem. Push the air chuck down until it from your battery pack and charger. When the inflator is reached, release the switch trigger and disconnect the inflator. NOTE: The digital gauge will indicate the pressure in the unlock position perpendicular to the air hose. Place the air chuck on the gauge. USING THE INFLATOR See Figures 5 - 6, page 10. Install the battery pack. Position air chuck clamp in PSI. The supplied accessories perform a variety of obstructions when the tool is not designed...
Removing battery pack will appear on the valve stem. Push the air chuck down until it from your battery pack and charger. When the inflator is reached, release the switch trigger and disconnect the inflator. NOTE: The digital gauge will indicate the pressure in the unlock position perpendicular to the air hose. Place the air chuck on the gauge. USING THE INFLATOR See Figures 5 - 6, page 10. Install the battery pack. Position air chuck clamp in PSI. The supplied accessories perform a variety of obstructions when the tool is not designed...

Operation Manual
Page 8
OPERATION SPORT BALL NEEDLE NOTICE: Insert the sport ball needle only until its base is flush with the surface of the air chuck down onto the Presta valve adaptor by their use only identical replacement parts. WARNING: Always wear eye protection with side shields marked to remove dirt, dust, oil, grease, etc. Failure to seal the tire valve. Loosen the Presta valve locking nut. Thread the Presta valve adaptor onto the valve stem with ANSI Z87.1. NOTE: ILLUSTRATIONS START ON PAGE 9 AFTER FRENCH AND SPANISH LANGUAGE SECTIONS. 8 - Do not insert the sport ball needle...
OPERATION SPORT BALL NEEDLE NOTICE: Insert the sport ball needle only until its base is flush with the surface of the air chuck down onto the Presta valve adaptor by their use only identical replacement parts. WARNING: Always wear eye protection with side shields marked to remove dirt, dust, oil, grease, etc. Failure to seal the tire valve. Loosen the Presta valve locking nut. Thread the Presta valve adaptor onto the valve stem with ANSI Z87.1. NOTE: ILLUSTRATIONS START ON PAGE 9 AFTER FRENCH AND SPANISH LANGUAGE SECTIONS. 8 - Do not insert the sport ball needle...
Parts Diagram
Page 1
P.O. RYOBI 18 VOLT PISTOL GRIP INFLATOR MODEL NUMBER P737D REPAIR SHEET ONE WORLD TECHNOLOGIES, INC. Box 1288, Anderson, SC 29625 • Phone 1-800-525-2579 www.ryobitools.com
P.O. RYOBI 18 VOLT PISTOL GRIP INFLATOR MODEL NUMBER P737D REPAIR SHEET ONE WORLD TECHNOLOGIES, INC. Box 1288, Anderson, SC 29625 • Phone 1-800-525-2579 www.ryobitools.com

Parts Diagram
Page 3
... P737D The model number will be found on a label attached to the motor housing. PARTS LIST KEY PART NO. NUMBER DESCRIPTION QTY 1 079077053901 Logo Label 1 2 079077053906 Hose Wrap Label 1 3 079077077901 Data Label 1 4 079042004035 Tapered Adapter 1 5 079042001044 Ball Needle 1 6 079042004036 Presta Valve Adapter 1 Not Shown: 995000679 Operator's Manual (079077053909) 1-2-19 (Rev:02) 3 RYOBI...
... P737D The model number will be found on a label attached to the motor housing. PARTS LIST KEY PART NO. NUMBER DESCRIPTION QTY 1 079077053901 Logo Label 1 2 079077053906 Hose Wrap Label 1 3 079077077901 Data Label 1 4 079042004035 Tapered Adapter 1 5 079042001044 Ball Needle 1 6 079042004036 Presta Valve Adapter 1 Not Shown: 995000679 Operator's Manual (079077053909) 1-2-19 (Rev:02) 3 RYOBI...