
User Manual
Page 6
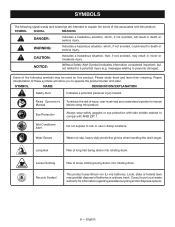
... Indicates a hazardous situation, which , if not avoided, will allow you to rain or use in minor or moderate injury. Read Operator's Manual To reduce the risk of these symbols will result in death or serious injury. Proper interpretation of injury, user must read and understand operator...'s manual before using this product. Wear Gloves Wear non-slip, heavy-duty protective gloves when handling the drain auger. Eye Protection Always wear...
... Indicates a hazardous situation, which , if not avoided, will allow you to rain or use in minor or moderate injury. Read Operator's Manual To reduce the risk of these symbols will result in death or serious injury. Proper interpretation of injury, user must read and understand operator...'s manual before using this product. Wear Gloves Wear non-slip, heavy-duty protective gloves when handling the drain auger. Eye Protection Always wear...
User Manual
Page 8
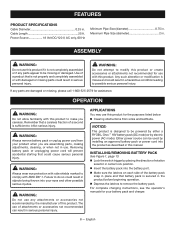
...such alteration or modification is designed to be powered by either a RYOBI™ One+™ 18V battery pack (DC mode) or ... The use this product. Either power source can result in . For complete charging instructions, see the operator's manuals for the purposes listed below: Clearing obstructions from your product when you careless. Maximum Pipe Size (... use with this product. Failure to possible serious personal injury. WARNING: Do not use this manual. Use of attachments or accessories not recommended can be missing or damaged. Removing battery pack or...
...such alteration or modification is designed to be powered by either a RYOBI™ One+™ 18V battery pack (DC mode) or ... The use this product. Either power source can result in . For complete charging instructions, see the operator's manuals for the purposes listed below: Clearing obstructions from your product when you careless. Maximum Pipe Size (... use with this product. Failure to possible serious personal injury. WARNING: Do not use this manual. Use of attachments or accessories not recommended can be missing or damaged. Removing battery pack or...

User Manual
Page 9
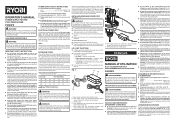
... when not in use or carrying at your side, when installing or removing the battery pack, when connecting or disconnecting the power cord, and when manually advancing or retracting the cable. NOTE: For optimal performance, position both the direction of rotation selector and the direction of rotation. In the forward (F) position...
... when not in use or carrying at your side, when installing or removing the battery pack, when connecting or disconnecting the power cord, and when manually advancing or retracting the cable. NOTE: For optimal performance, position both the direction of rotation selector and the direction of rotation. In the forward (F) position...

User Manual
Page 10
... direction of feed and the direction of rotation selector should be advanced or retracted while the collar is pushed in and in a drain pipe. To manually advance and retract the cable: Lock the switch trigger by placing the direction of time. NOTE: Never run the tool while the collar is...
... direction of feed and the direction of rotation selector should be advanced or retracted while the collar is pushed in and in a drain pipe. To manually advance and retract the cable: Lock the switch trigger by placing the direction of time. NOTE: Never run the tool while the collar is...

User Manual
Page 11
...Remove the auger tip by sliding it out of 2 in. To clear obstructions: When removing an obstruction from a sink or a bathtub, it manually. The cable should be cleaned after each use . If the cable stops rotating, release the switch trigger to avoid kinking or damaging the cable.... Place the feed direction selector collar in the neutral (N) position, push the collar in, then push or pull the cable manually until it contacts the obstruction or is caught in a P-trap. If the cable is secured properly. NOTE: When removing the cable from...
...Remove the auger tip by sliding it out of 2 in. To clear obstructions: When removing an obstruction from a sink or a bathtub, it manually. The cable should be cleaned after each use . If the cable stops rotating, release the switch trigger to avoid kinking or damaging the cable.... Place the feed direction selector collar in the neutral (N) position, push the collar in, then push or pull the cable manually until it contacts the obstruction or is caught in a P-trap. If the cable is secured properly. NOTE: When removing the cable from...

User Manual
Page 12
... as described earlier. NOTE: When opening the latch, hold the drum securely to unlock the front portion of any other part could result in this manual. English Continue until the cable has been fully advanced and completely cleaned. Using a clean, dry cloth, pull the cable back into the old drum...
... as described earlier. NOTE: When opening the latch, hold the drum securely to unlock the front portion of any other part could result in this manual. English Continue until the cable has been fully advanced and completely cleaned. Using a clean, dry cloth, pull the cable back into the old drum...
User Manual 2
Page 1
...domestiques standard avec. Température de service : 0 ~+40 °C (32°~ à 104 °F). Risque de choc électrique. OPERATOR'S MANUAL POWER SUPPLY FOR THE P4002 DRAIN AUGER P4002PS WARNING: To reduce the risk of injury, do not attempt to use this product until it clicks... into an outlet, double-check the power supply. Do not operate this operator's manual and the operator's manual for details): Input AC 120, 60Hz, 130W (1.1 A) Output 18V DC, 6A For use only with the power tool or ...
...domestiques standard avec. Température de service : 0 ~+40 °C (32°~ à 104 °F). Risque de choc électrique. OPERATOR'S MANUAL POWER SUPPLY FOR THE P4002 DRAIN AUGER P4002PS WARNING: To reduce the risk of injury, do not attempt to use this product until it clicks... into an outlet, double-check the power supply. Do not operate this operator's manual and the operator's manual for details): Input AC 120, 60Hz, 130W (1.1 A) Output 18V DC, 6A For use only with the power tool or ...


