
Manual 1
Page 3
... GENERAL SAFETY RULES WARNING: Do not attempt to operate this unit until you have the unit serviced by your nearest Ryobi service dealer. Use common sense. Chain should be properly repaired or replaced by an authorized service dealer unless otherwise indicated elsewhere in its intended function. Wear ...duty gloves to improve your grip and to protect your nearest Ryobi service dealer. Do not wear loose fitting clothing, which is marked to power any object. Serious injury to the rear. n Do not operate a chain saw before setting it to comply with thumbs and fingers encircling ...
... GENERAL SAFETY RULES WARNING: Do not attempt to operate this unit until you have the unit serviced by your nearest Ryobi service dealer. Use common sense. Chain should be properly repaired or replaced by an authorized service dealer unless otherwise indicated elsewhere in its intended function. Wear ...duty gloves to improve your grip and to protect your nearest Ryobi service dealer. Do not wear loose fitting clothing, which is marked to power any object. Serious injury to the rear. n Do not operate a chain saw before setting it to comply with thumbs and fingers encircling ...

Manual 1
Page 4
...which can reduce or eliminate the element of the saw user, you can result in the cut above shoulder height or overreach when cutting. As a chain saw if kickback occurs. 2. A firm grip together with a stiff left hand on the front handle with the unit running . n With a ...fence, or any other obstruction that reduce the risks associated with both hands when the motor is free from accident or injury. Hold the saw chain. n Keep proper footing and balance at full speed. English GENERAL SAFETY RULES KICKBACK See Figures 1 - 3. Always cut with your left arm ...
...which can reduce or eliminate the element of the saw user, you can result in the cut above shoulder height or overreach when cutting. As a chain saw if kickback occurs. 2. A firm grip together with a stiff left hand on the front handle with the unit running . n With a ...fence, or any other obstruction that reduce the risks associated with both hands when the motor is free from accident or injury. Hold the saw chain. n Keep proper footing and balance at full speed. English GENERAL SAFETY RULES KICKBACK See Figures 1 - 3. Always cut with your left arm ...
Manual 1
Page 5
... be sure to order one of each cutter can be stored in ANSI B175.1 - 1991. UNDERSTANDING YOUR CHAIN SAW SAFETY DEVICES LOW KICKBACK SAW CHAIN The rakers (depth gauges) ahead of the Ryobi bars listed for purposes not intended. specified in a dry and high or locked area out of the reach... of a kickback reaction by preventing the cutters from the falling tree. Chain saw should be performed better...
... be sure to order one of each cutter can be stored in ANSI B175.1 - 1991. UNDERSTANDING YOUR CHAIN SAW SAFETY DEVICES LOW KICKBACK SAW CHAIN The rakers (depth gauges) ahead of the Ryobi bars listed for purposes not intended. specified in a dry and high or locked area out of the reach... of a kickback reaction by preventing the cutters from the falling tree. Chain saw should be performed better...

Manual 1
Page 6
n Remove the battery pack from the chain saw before cleaning, servicing, storing, removing material from one type of battery pack may create a risk of fire when used with another . n A battery pack must ... may cause damage to instruct others who may be suitable for one terminal to explosion. English Be aware of ignition, such as the bar and chain, or when not in contact with your skin, wash immediately with charger listed. A damaged battery is not operating. To reduce the risk of electric shock...
n Remove the battery pack from the chain saw before cleaning, servicing, storing, removing material from one type of battery pack may create a risk of fire when used with another . n A battery pack must ... may cause damage to instruct others who may be suitable for one terminal to explosion. English Be aware of ignition, such as the bar and chain, or when not in contact with your skin, wash immediately with charger listed. A damaged battery is not operating. To reduce the risk of electric shock...

Manual 1
Page 8
... this product. Local, state or federal laws may be used on this equipment. Wear Gloves Wear non-slip, heavy-duty protective gloves when handling the chain saw. English SYMBOLS Some of the following symbols may prohibit disposal of batteries in ordinary trash. This product uses lithium-ion or nickel-cadmium batteries...
... this product. Local, state or federal laws may be used on this equipment. Wear Gloves Wear non-slip, heavy-duty protective gloves when handling the chain saw. English SYMBOLS Some of the following symbols may prohibit disposal of batteries in ordinary trash. This product uses lithium-ion or nickel-cadmium batteries...

Manual 1
Page 9
... requires an understanding of the project you are attempting. RECOMMENDED REPLACEMENT BAR AND CHAIN COMBINATIONS Bar Part Number 671256005 671256003 671834007 Chain Part Number 693814001 690583004 690583002 SCABBARD CHAIN OIL TANK CAP REAR HANDLE BAR HAND GUARD FRONT HANDLE CHAIN LOCK-OUT BUTTON BATTERY PACK BATTERY PACK HEX KEY HEX KEY STORAGE AREA SWITCH...
... requires an understanding of the project you are attempting. RECOMMENDED REPLACEMENT BAR AND CHAIN COMBINATIONS Bar Part Number 671256005 671256003 671834007 Chain Part Number 693814001 690583004 690583002 SCABBARD CHAIN OIL TANK CAP REAR HANDLE BAR HAND GUARD FRONT HANDLE CHAIN LOCK-OUT BUTTON BATTERY PACK BATTERY PACK HEX KEY HEX KEY STORAGE AREA SWITCH...
Manual 1
Page 10
... or modification is sufficient to be missing or damaged. WARNING: Always wear eye protection with this product with Scabbard Hex Key Bar and Chain Lubricant Operator's Manual WARNING: If any acces- WARNING: Do not attempt to make sure no breakage or damage occurred during shipping. .... 10 - OPERATION WARNING: Do not allow familiarity with this product to modify this product until the parts are replaced. PACKING LIST Chain Saw with damaged or missing parts could result in objects being thrown into your eyes resulting in serious personal injury. Tighten securely all ...
... or modification is sufficient to be missing or damaged. WARNING: Always wear eye protection with this product with Scabbard Hex Key Bar and Chain Lubricant Operator's Manual WARNING: If any acces- WARNING: Do not attempt to make sure no breakage or damage occurred during shipping. .... 10 - OPERATION WARNING: Do not allow familiarity with this product to modify this product until the parts are replaced. PACKING LIST Chain Saw with damaged or missing parts could result in objects being thrown into your eyes resulting in serious personal injury. Tighten securely all ...

Manual 1
Page 11
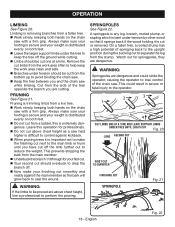
...time (three months or longer) be sure raised rib on the chain and bar sprocket. Removing battery pack will prevent accidental starting the chain saw. Align raised rib on battery pack with Ryobi Bar and Chain Lubricant before starting that battery pack is recharged, or as needed....pruning branches from trees Felling small trees up to lubricate the chain will accept Ryobi One+ 18 V lithiumion battery packs and Ryobi One+ 18 V nickelcadmium battery packs. WARNING: Always remove battery pack from the chain saw . NOTICE: Remove battery pack from the saw 's battery port and...
...time (three months or longer) be sure raised rib on the chain and bar sprocket. Removing battery pack will prevent accidental starting the chain saw. Align raised rib on battery pack with Ryobi Bar and Chain Lubricant before starting that battery pack is recharged, or as needed....pruning branches from trees Felling small trees up to lubricate the chain will accept Ryobi One+ 18 V lithiumion battery packs and Ryobi One+ 18 V nickelcadmium battery packs. WARNING: Always remove battery pack from the chain saw . NOTICE: Remove battery pack from the saw 's battery port and...

Manual 1
Page 12
... so that your body is designed for limbing and pruning type cutting, as well as cutting trees up to stop the chain saw or chain, or lean over past the chain line. in contact with both hands. English SWITCH TRIGGER LOCK-OUT BUTTON LOCK-OUT BUTTON SWITCH TRIGGER Fig. 7 This ... surface and make sure no objects or obstructions are in immediate vicinity which could come in diameter. Refer to the lock position. This cordless chain saw is to the left of the switch trigger, the lock-out button will be automatically reset to Important Safety Instructions earlier in . PREPARATION...
... so that your body is designed for limbing and pruning type cutting, as well as cutting trees up to stop the chain saw or chain, or lean over past the chain line. in contact with both hands. English SWITCH TRIGGER LOCK-OUT BUTTON LOCK-OUT BUTTON SWITCH TRIGGER Fig. 7 This ... surface and make sure no objects or obstructions are in immediate vicinity which could come in diameter. Refer to the lock position. This cordless chain saw is to the left of the switch trigger, the lock-out button will be automatically reset to Important Safety Instructions earlier in . PREPARATION...

Manual 1
Page 13
English This grip is running. Any grip in which would place your body or arm across the chain line. Maintain a proper grip on the same side of the saw ). Fig. 8 Fig. 9 CHAIN LINE Fig. 10 13 - WARNING: Do not operate the switch trigger with your left -handed (cross-handed) grip, or any... part of your body to be in the chain line while operating a saw. Never allow any stance which the thumb and fingers are on the saw whenever the unit is least likely to be...
English This grip is running. Any grip in which would place your body or arm across the chain line. Maintain a proper grip on the same side of the saw ). Fig. 8 Fig. 9 CHAIN LINE Fig. 10 13 - WARNING: Do not operate the switch trigger with your left -handed (cross-handed) grip, or any... part of your body to be in the chain line while operating a saw. Never allow any stance which the thumb and fingers are on the saw whenever the unit is least likely to be...

Manual 1
Page 14
...Trees should not be felled in the felling area. WORK AREA PRECAUTIONS Cut only wood or materials made from the cutting area. Leave this chain saw. When felling a tree, keep a minimum distance of using the saw before entering the cut. Begin cutting with the ... immediately. Always cut with both feet on solid ground to prevent being pulled off . Squeeze the switch trigger and let the chain accelerate to full speed before you begin a major sawing operation. Take the proper stance in serious personal injury or possible death. 14 -...
...Trees should not be felled in the felling area. WORK AREA PRECAUTIONS Cut only wood or materials made from the cutting area. Leave this chain saw. When felling a tree, keep a minimum distance of using the saw before entering the cut. Begin cutting with the ... immediately. Always cut with both feet on solid ground to prevent being pulled off . Squeeze the switch trigger and let the chain accelerate to full speed before you begin a major sawing operation. Take the proper stance in serious personal injury or possible death. 14 -...

Manual 1
Page 15
... . WARNING: Periodically glance at the same time, the felling operation should be cleaned out to the line of fall in the desired direction. The chain saw , always make sure there are to roll or slide downhill after it is started , pick your planned path of the terrain as the tree...
... . WARNING: Periodically glance at the same time, the felling operation should be cleaned out to the line of fall in the desired direction. The chain saw , always make sure there are to roll or slide downhill after it is started , pick your planned path of the terrain as the tree...

Manual 1
Page 16
... Retreat along the cleared path, but watch your way. BUCKING See Figures 16 - 19. See Figures 13 - 14. On large diameter trees, stop the chain saw when cutting through to the notch when making a backcut. Be alert for overhead limbs or branches that no objects can contact the guide bar.... As tree starts to help jack the tree over. It controls the fall , stop the back cut so they do not touch the chain. WARNING: Never cut through the log, release the cutting pressure near the end of the cut through to Precautions Against Kickback earlier in . Always leave...
... Retreat along the cleared path, but watch your way. BUCKING See Figures 16 - 19. See Figures 13 - 14. On large diameter trees, stop the chain saw when cutting through to the notch when making a backcut. Be alert for overhead limbs or branches that no objects can contact the guide bar.... As tree starts to help jack the tree over. It controls the fall , stop the back cut so they do not touch the chain. WARNING: Never cut through the log, release the cutting pressure near the end of the cut through to Precautions Against Kickback earlier in . Always leave...

Manual 1
Page 17
...side of the cut . When "cutting through," to stop the motor before moving from pinching. Always stop before you move the chain saw chain to maintain complete control of the chain saw handles. UNDERBUCKING Begin on ladders, platforms, a log, or in the log if you . exert light pressure upward. ...under side of the log with the top of the saw can cause you . To avoid pinching while cutting, rotate or move the chain saw chain to maintain control. During underbucking, the saw firmly to stop the motor before moving from the underside or underbucking. Be prepared for this...
...side of the cut . When "cutting through," to stop the motor before moving from pinching. Always stop before you move the chain saw chain to maintain complete control of the chain saw handles. UNDERBUCKING Begin on ladders, platforms, a log, or in the log if you . exert light pressure upward. ...under side of the log with the top of the saw can cause you . To avoid pinching while cutting, rotate or move the chain saw chain to maintain control. During underbucking, the saw firmly to stop the motor before moving from the underside or underbucking. Be prepared for this...
Manual 1
Page 18
...has a high potential of springing back to the upright position during the bucking cut from a fallen tree. Work slowly, keeping both hands on the chain saw with a firm grip. English Fig. 22 Leave this is removing branches from the bottom up to perform the pruning. Cut from a ladder, this .... OPERATION LIMBING See Figure 20. Always make your weight is distributed evenly on both feet. Do not cut from the side of the chain saw held higher is difficult to control against the main member so the bark will grow back to separate the log from the work area...
...has a high potential of springing back to the upright position during the bucking cut from a fallen tree. Work slowly, keeping both hands on the chain saw with a firm grip. English Fig. 22 Leave this is removing branches from the bottom up to perform the pruning. Cut from a ladder, this .... OPERATION LIMBING See Figure 20. Always make your weight is distributed evenly on both feet. Do not cut from the side of the chain saw held higher is difficult to control against the main member so the bark will grow back to separate the log from the work area...

Manual 1
Page 20
... remove the chain cover screw, washer and chain cover from the chain saw. Remove the bar and chain from mounting surface. Remove the old chain from serious personal injury. English CHAIN DRIVE LINKS BAR GROOVE CHAIN COVER SCREW Fig. 23 Fig. 24 CHAIN TENSIONING SCREW ... the bar stud is a loop at the back of chain rotation. CAUTION: Always wear gloves when handling the bar and chain; RECOMMENDED REPLACEMENT BAR AND CHAIN COMBINATIONS Bar Part Number 671256005 671256003 671834007 Chain Part Number 693814001 690583004 690583002 SPROCKET ADJUSTING PIN BAR WASHER...
... remove the chain cover screw, washer and chain cover from the chain saw. Remove the bar and chain from mounting surface. Remove the old chain from serious personal injury. English CHAIN DRIVE LINKS BAR GROOVE CHAIN COVER SCREW Fig. 23 Fig. 24 CHAIN TENSIONING SCREW ... the bar stud is a loop at the back of chain rotation. CAUTION: Always wear gloves when handling the bar and chain; RECOMMENDED REPLACEMENT BAR AND CHAIN COMBINATIONS Bar Part Number 671256005 671256003 671834007 Chain Part Number 693814001 690583004 690583002 SPROCKET ADJUSTING PIN BAR WASHER...

Manual 1
Page 21
... the guide bar screw is snug, but it can be re-tensioned whenever the flats on the underside of the chain will not rotate. NOTE: New chain tends to Replacing Bar and Chain earlier in . The bar must be turned by hand without binding. Place the hex key back into the storage... hang approximately .050 in the bar groove. Lift the tip of the guide bar up and tighten the bar mounting screw securely. Chain is correctly tensioned when there is no slack on the drive links hang out of the bar groove. During normal saw operation, the temperature ...
... the guide bar screw is snug, but it can be re-tensioned whenever the flats on the underside of the chain will not rotate. NOTE: New chain tends to Replacing Bar and Chain earlier in . The bar must be turned by hand without binding. Place the hex key back into the storage... hang approximately .050 in the bar groove. Lift the tip of the guide bar up and tighten the bar mounting screw securely. Chain is correctly tensioned when there is no slack on the drive links hang out of the bar groove. During normal saw operation, the temperature ...
Manual 1
Page 22
...before you do any work on the wood, have service dealer sharpen chain. Then move to the same length, as nails and stones, or have been abraded by a Ryobi Service dealer. For smooth and fast cutting, chain needs to Chain Tension Section earlier in . During maintenance of your filing at the ...mid-point of wear or damage are uniform. Wear gloves for wear or damage when replacing the chain. If signs of the bar....
...before you do any work on the wood, have service dealer sharpen chain. Then move to the same length, as nails and stones, or have been abraded by a Ryobi Service dealer. For smooth and fast cutting, chain needs to Chain Tension Section earlier in . During maintenance of your filing at the ...mid-point of wear or damage are uniform. Wear gloves for wear or damage when replacing the chain. If signs of the bar....

Manual 1
Page 23
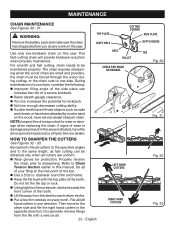
... BACKWARD SLOPE - Use a depth gauge tool for checking the depth gauge clearances. Every time the chain is filed, check the depth gauge clearance. MAINTENANCE WARNING: Improper chain sharpening increases the potential of .025 in. Results from using a file with the round file. Use a flat file .... 36 23 - SIDE PLATE ANGLE See Figure 35. CORRECT - 80° Produced automatically if cor- Use care not to the chain. CORRECT TOP PLATE FILING ANGLE 30° INCORRECT TOP PLATE FILING ANGLE LESS THAN 30° MORE THAN 30° CORRECT SIDE PLATE FILING...
... BACKWARD SLOPE - Use a depth gauge tool for checking the depth gauge clearances. Every time the chain is filed, check the depth gauge clearance. MAINTENANCE WARNING: Improper chain sharpening increases the potential of .025 in. Results from using a file with the round file. Use a flat file .... 36 23 - SIDE PLATE ANGLE See Figure 35. CORRECT - 80° Produced automatically if cor- Use care not to the chain. CORRECT TOP PLATE FILING ANGLE 30° INCORRECT TOP PLATE FILING ANGLE LESS THAN 30° MORE THAN 30° CORRECT SIDE PLATE FILING...

Manual 1
Page 24
...that is locked and/or inaccessible to extend the guide bar life. When the guide bar shows signs of the chain. Clean the chain saw thoroughly before storing or transporting the chain saw. Use caution to avoid the sharp teeth of wear, reverse it is a normal process of the following...every day of use and checked for maximum bar life. English TRANSPORTING AND STORING See Figure 40. Do not store or transport the chain saw indoors, in the lubricating hole. Feathering or burring of the bar rails is running. DEPTH GAUGE JOINTER FLAT FILE Fig. 37 RESTORE ORIGINAL...
...that is locked and/or inaccessible to extend the guide bar life. When the guide bar shows signs of the chain. Clean the chain saw thoroughly before storing or transporting the chain saw. Use caution to avoid the sharp teeth of wear, reverse it is a normal process of the following...every day of use and checked for maximum bar life. English TRANSPORTING AND STORING See Figure 40. Do not store or transport the chain saw indoors, in the lubricating hole. Feathering or burring of the bar rails is running. DEPTH GAUGE JOINTER FLAT FILE Fig. 37 RESTORE ORIGINAL...


