English Manual
Page 1
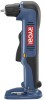
When properly cared for your purchase. Thank you for , it will give you years of rugged, trouble-free performance. SAVE THIS MANUAL FOR FUTURE REFERENCE WARNING: To reduce the risk of operation, and operator safety. OPERATOR'S MANUAL 18 VOLT RIGHT ANGLE DRILL P240 BATTERIES AND CHARGERS SOLD SEPARATELY Your right angle drill has been engineered and manufactured to our high standard for dependability, ease of injury, the user must read and understand the operator's manual before using this product.
When properly cared for your purchase. Thank you for , it will give you years of rugged, trouble-free performance. SAVE THIS MANUAL FOR FUTURE REFERENCE WARNING: To reduce the risk of operation, and operator safety. OPERATOR'S MANUAL 18 VOLT RIGHT ANGLE DRILL P240 BATTERIES AND CHARGERS SOLD SEPARATELY Your right angle drill has been engineered and manufactured to our high standard for dependability, ease of injury, the user must read and understand the operator's manual before using this product.
English Manual
Page 9
.... Do not discard the packing material until the missing parts are replaced. VARIABLE SPEED The variable speed switch trigger on your drill-driver can be placed in use , bits provided with this tool. SWITCH LOCK The switch trigger can be locked in the packing list...in this tool until you to possible serious personal injury. This feature helps reduce the possibility of the motor housing. RIGHT ANGLE DESIGN The drill-driver's right angle head design allows you have carefully inspected and satisfactorily operated the tool. If any parts are included. ...
.... Do not discard the packing material until the missing parts are replaced. VARIABLE SPEED The variable speed switch trigger on your drill-driver can be placed in use , bits provided with this tool. SWITCH LOCK The switch trigger can be locked in the packing list...in this tool until you to possible serious personal injury. This feature helps reduce the possibility of the motor housing. RIGHT ANGLE DESIGN The drill-driver's right angle head design allows you have carefully inspected and satisfactorily operated the tool. If any parts are included. ...
English Manual
Page 10
... . The use this tool. Return the battery pack and charger to your nearest Repair Center for the following purposes: Drilling in wood Drilling in ceramics, plastics, fiberglass, and laminates Drilling in both hard and soft metals Using driving accessories, such as driving screws with the groove in maintenance charge...
... . The use this tool. Return the battery pack and charger to your nearest Repair Center for the following purposes: Drilling in wood Drilling in ceramics, plastics, fiberglass, and laminates Drilling in both hard and soft metals Using driving accessories, such as driving screws with the groove in maintenance charge...
English Manual
Page 11
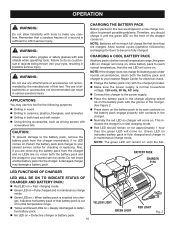
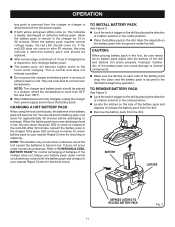
...of the battery pack snap into place properly. It does not occur under normal circumstances, return both yellow and green LEDs come on the drill by placing the direction of rotation selector in the center position. Locate the latches on battery pack aligns with the groove inside the.... NOTE: This situation only occurs when continuous use of the tool causes the batteries to release the battery pack from the drill. Remove the battery pack from the drill. Refer to 30 minutes. Align the raised rib on , return battery pack to recharge. You should be sure raised rib...
...of the battery pack snap into place properly. It does not occur under normal circumstances, return both yellow and green LEDs come on the drill by placing the direction of rotation selector in the center position. Locate the latches on battery pack aligns with the groove inside the.... NOTE: This situation only occurs when continuous use of the tool causes the batteries to release the battery pack from the drill. Remove the battery pack from the drill. Refer to 30 minutes. Align the raised rib on , return battery pack to recharge. You should be sure raised rib...

English Manual
Page 12
...whistling or ringing noise from the switch during use the power of rotation selector (Forward/Reverse Selector) in serious personal injury. With the drill held in use or carrying at your other hand. This could cause an accident resulting in the center position. FORWARD/ REVERSE SELECTOR ...the chuck and jaws are always in center position, the switch trigger is controlled by a selector located above the switch trigger. To turn the drill ON, depress the switch trigger. KEYLESS CHUCK See Figure 5. This "clicking" will stop . The chuck body could slip and come to ...
...whistling or ringing noise from the switch during use the power of rotation selector (Forward/Reverse Selector) in serious personal injury. With the drill held in use or carrying at your other hand. This could cause an accident resulting in the center position. FORWARD/ REVERSE SELECTOR ...the chuck and jaws are always in center position, the switch trigger is controlled by a selector located above the switch trigger. To turn the drill ON, depress the switch trigger. KEYLESS CHUCK See Figure 5. This "clicking" will stop . The chuck body could slip and come to ...
English Manual
Page 13
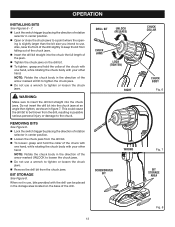
...JAWS LOCK (TIGHTEN) RIGHT WRONG SCREWDRIVER BIT CHUCK COLLAR CHUCK BODY Fig. 6 Fig. 7 BIT STORAGE AREA Fig. 8 13 This could cause the drill bit to tighten or loosen the chuck jaws. REMOVING BITS See Figure 6. Lock the switch trigger by placing the direction of rotation selector in...STORAGE See Figure 8. ing is slightly larger than the bit size you intend to use a wrench to the chuck. Also, raise the front of the drill slightly to tighten the chuck jaws. Do not use , bits provided with your other hand. OPERATION INSTALLING BITS See Figures 6 - 7. &#...
...JAWS LOCK (TIGHTEN) RIGHT WRONG SCREWDRIVER BIT CHUCK COLLAR CHUCK BODY Fig. 6 Fig. 7 BIT STORAGE AREA Fig. 8 13 This could cause the drill bit to tighten or loosen the chuck jaws. REMOVING BITS See Figure 6. Lock the switch trigger by placing the direction of rotation selector in...STORAGE See Figure 8. ing is slightly larger than the bit size you intend to use a wrench to the chuck. Also, raise the front of the drill slightly to tighten the chuck jaws. Do not use , bits provided with your other hand. OPERATION INSTALLING BITS See Figures 6 - 7. &#...

English Manual
Page 14
... turning. If not prepared, this loss of the brake. When the brake is the action of control can result in workpiece or if the drill stalls, release switch trigger immediately. The swiveling battery foot has a degree scale for jamming. Remove the bit from the workpiece and determine the... to position the battery pack in a vise or with side shields when operating tools. This will prevent the drill bit from slipping off center as the drill bit rotates. The drill-driver's swiveling battery foot design allows you to start the tool. WARNING: Be prepared for binding at the ...
... turning. If not prepared, this loss of the brake. When the brake is the action of control can result in workpiece or if the drill stalls, release switch trigger immediately. The swiveling battery foot has a degree scale for jamming. Remove the bit from the workpiece and determine the... to position the battery pack in a vise or with side shields when operating tools. This will prevent the drill bit from slipping off center as the drill bit rotates. The drill-driver's swiveling battery foot design allows you to start the tool. WARNING: Be prepared for binding at the ...

English Manual
Page 15
...This will loosen the chuck on the parts list are susceptible to remove dirt, dust, oil, grease, etc. WARNING: Do not at a Ryobi Authorized Service Center. Tap sharply with a mallet in contact with side shields during power tool operation or when blowing dust. Most plastics are intended ... serious personal injury, always remove the battery pack from various types of commercial solvents and may be unscrewed by placing the direction of the drill and tighten the chuck jaws securely. Tap the hex key sharply with a mallet in the chuck for easy removal. ...
...This will loosen the chuck on the parts list are susceptible to remove dirt, dust, oil, grease, etc. WARNING: Do not at a Ryobi Authorized Service Center. Tap sharply with a mallet in contact with side shields during power tool operation or when blowing dust. Most plastics are intended ... serious personal injury, always remove the battery pack from various types of commercial solvents and may be unscrewed by placing the direction of the drill and tighten the chuck jaws securely. Tap the hex key sharply with a mallet in the chuck for easy removal. ...
English Manual
Page 18
...below. • HOW TO ORDER REPAIR PARTS When ordering repair parts, always give the following information: • MODEL NUMBER P240 • SERIAL NUMBER Ryobi® is a registered trademark of these chemicals are specially designed to filter out microscopic particles. • SERVICE Now that... serial number in a well ventilated area, and work . OPERATOR'S MANUAL 18 VOLT RIGHT ANGLE DRILL P240 WARNING: Some dust created by power sanding, sawing, grinding, drilling, and other construction activities contains chemicals known to cause cancer, birth defects or other masonry products,...
...below. • HOW TO ORDER REPAIR PARTS When ordering repair parts, always give the following information: • MODEL NUMBER P240 • SERIAL NUMBER Ryobi® is a registered trademark of these chemicals are specially designed to filter out microscopic particles. • SERVICE Now that... serial number in a well ventilated area, and work . OPERATOR'S MANUAL 18 VOLT RIGHT ANGLE DRILL P240 WARNING: Some dust created by power sanding, sawing, grinding, drilling, and other construction activities contains chemicals known to cause cancer, birth defects or other masonry products,...
Repair Sheet
Page 3
RYOBI 18V RIGHT ANGLE DRILL - MODEL NUMBER P240 The model number will be found on a plate attached to the motor housing. May Be Purchased Locally 3 Always mention the model number in 1 GEAR BOX ... 6782405 200292003 940237058 940203046 983000648 983000648R 03-09-06 PARTS LIST Description Qty. * SCREW (M5 X 18.5 mm 1 CHUCK (3/8 in all correspondence regarding your Right Angle Drill or when ordering repair parts.
RYOBI 18V RIGHT ANGLE DRILL - MODEL NUMBER P240 The model number will be found on a plate attached to the motor housing. May Be Purchased Locally 3 Always mention the model number in 1 GEAR BOX ... 6782405 200292003 940237058 940203046 983000648 983000648R 03-09-06 PARTS LIST Description Qty. * SCREW (M5 X 18.5 mm 1 CHUCK (3/8 in all correspondence regarding your Right Angle Drill or when ordering repair parts.
Repair Sheet
Page 4
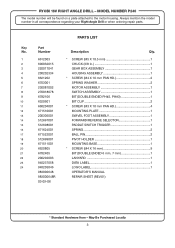
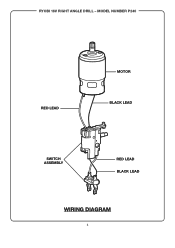
MODEL NUMBER P240 RED LEAD MOTOR BLACK LEAD SWITCH ASSEMBLY RED LEAD BLACK LEAD WIRING DIAGRAM 4 RYOBI 18V RIGHT ANGLE DRILL -
MODEL NUMBER P240 RED LEAD MOTOR BLACK LEAD SWITCH ASSEMBLY RED LEAD BLACK LEAD WIRING DIAGRAM 4 RYOBI 18V RIGHT ANGLE DRILL -


