BS903_979_trillingual.pdf
Page 2
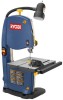
... days. We will repair any faulty workmanship, and either request service under normal usage and does not cover any RYOBI® power tool which includes the date of purchase (for example, a bill of the original purchase. ADDITIONAL ... Specific Safety Rules...4 Symbols...5-6 Electrical...7 Features...8 Assembly...9-11 Operation...11-13 Adjustments...13-14 Maintenance...15 Troubleshooting...16 Figure numbers (illlustrations)...17-23 Parts Ordering / Service...Back page INTRODUCTION ...
... days. We will repair any faulty workmanship, and either request service under normal usage and does not cover any RYOBI® power tool which includes the date of purchase (for example, a bill of the original purchase. ADDITIONAL ... Specific Safety Rules...4 Symbols...5-6 Electrical...7 Features...8 Assembly...9-11 Operation...11-13 Adjustments...13-14 Maintenance...15 Troubleshooting...16 Figure numbers (illlustrations)...17-23 Parts Ordering / Service...Back page INTRODUCTION ...
BS903_979_trillingual.pdf
Page 3
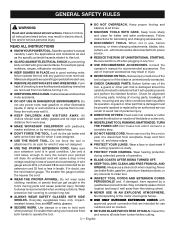
.... All visitors should wear safety glasses and be carefully checked to operate the tool. DO NOT ABUSE CORD. The use . REMOVE ADJUSTING KEYS AND WRENCHES. If in any solvents to disconnect from tool before each use of the blade or cutter only. NEVER LEAVE TOOL RUNNING... tool is tipped or if the blade is damaged must be properly repaired or replaced by an authorized service center to see that keys and adjusting wrenches are operating properly before turning it was designed. USE THE RIGHT TOOL. Wear a face or dust mask if the cutting ...
.... All visitors should wear safety glasses and be carefully checked to operate the tool. DO NOT ABUSE CORD. The use . REMOVE ADJUSTING KEYS AND WRENCHES. If in any solvents to disconnect from tool before each use of the blade or cutter only. NEVER LEAVE TOOL RUNNING... tool is tipped or if the blade is damaged must be properly repaired or replaced by an authorized service center to see that keys and adjusting wrenches are operating properly before turning it was designed. USE THE RIGHT TOOL. Wear a face or dust mask if the cutting ...

BS903_979_trillingual.pdf
Page 4
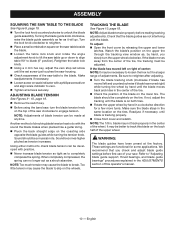
...61550; The blade guides have good balance. ALLOW THE MOTOR TO COME UP TO FULL SPEED before disconnecting it must be sure all adjustments are doing and use . BEFORE CHANGING THE SETUP, REMOVING COVERS, GUARDS OR BLADES, unplug the saw and remove the switch key....exposures varies, depending on the saw table. To avoid accidental blade contact, minimize blade breakage, and provide maximum blade support, always adjust the blade guide assembly to avoid risk. SAVE THESE INSTRUCTIONS. Do not reach underneath work using your fingers go under the influence...
...61550; The blade guides have good balance. ALLOW THE MOTOR TO COME UP TO FULL SPEED before disconnecting it must be sure all adjustments are doing and use . BEFORE CHANGING THE SETUP, REMOVING COVERS, GUARDS OR BLADES, unplug the saw and remove the switch key....exposures varies, depending on the saw table. To avoid accidental blade contact, minimize blade breakage, and provide maximum blade support, always adjust the blade guide assembly to avoid risk. SAVE THESE INSTRUCTIONS. Do not reach underneath work using your fingers go under the influence...
BS903_979_trillingual.pdf
Page 8
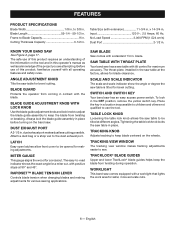
...a knowledge of this product requires an understanding of the information on the wheels. Tracking View Window The tracking view window makes tracking adjustments easier to the dust exhaust port. Table Size (with extension 11-3/4 in contact with the blade. dust exhaust port makes dustless...for a crosscut. Table Lock Knob Loosening the table lock knob allows the saw has an easy access power switch. blade. Tracking Knob Adjusts tracking to use of this product, familiarize yourself with a standard 1/4 in a location inaccessible to children and others not qualified to ...
...a knowledge of this product requires an understanding of the information on the wheels. Tracking View Window The tracking view window makes tracking adjustments easier to the dust exhaust port. Table Size (with extension 11-3/4 in contact with the blade. dust exhaust port makes dustless...for a crosscut. Table Lock Knob Loosening the table lock knob allows the saw has an easy access power switch. blade. Tracking Knob Adjusts tracking to use of this product, familiarize yourself with a standard 1/4 in a location inaccessible to children and others not qualified to ...
BS903_979_trillingual.pdf
Page 10
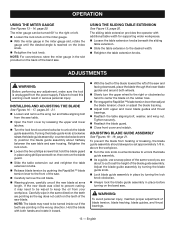
... functional for a larger range of center: Note: It may be completely on the wheels. Note: Too much tension may cause the blade to "Adjusting blade guide support, thrust bearings, and blade guide bearings" procedures explained in a clockwise direction for a few more turns. It may not track properly... the back half of your saw , turn the upper wheel clockwise. If the blade moves away from the center of the wheel. blade may be adjusted. ADJUSTING BLADE TENSION See Figures 9 - 10, page 19. Remove the switch key. Before using the band saw . Make sure the...
... functional for a larger range of center: Note: It may be completely on the wheels. Note: Too much tension may cause the blade to "Adjusting blade guide support, thrust bearings, and blade guide bearings" procedures explained in a clockwise direction for a few more turns. It may not track properly... the back half of your saw , turn the upper wheel clockwise. If the blade moves away from the center of the wheel. blade may be adjusted. ADJUSTING BLADE TENSION See Figures 9 - 10, page 19. Remove the switch key. Before using the band saw . Make sure the...
BS903_979_trillingual.pdf
Page 11
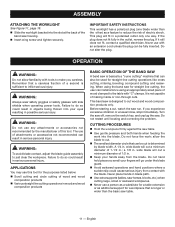
... used for straight-line cutting operations like cross cutting, mitering, beveling, compound cutting, and resawing. Do not alter the plug. WARNING: To avoid blade contact, adjust the blade guide assembly to make you experience excessive vibration or unusual noise, stop immediately. APPLICATIONS You may use this tool. When using an appropriately...
... used for straight-line cutting operations like cross cutting, mitering, beveling, compound cutting, and resawing. Do not alter the plug. WARNING: To avoid blade contact, adjust the blade guide assembly to make you experience excessive vibration or unusual noise, stop immediately. APPLICATIONS You may use this tool. When using an appropriately...
BS903_979_trillingual.pdf
Page 12
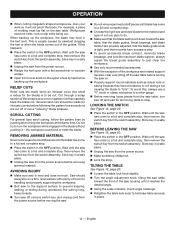
...the saw table, turn saw off the saw table before leaving the saw on. Properly support round materials such as sections are properly adjusted, that the blade guide knob is to be made when an intricate curve (too small a radius for the blade) is tight, and that... rods or tubing because they have excessive play. To avoid accidental blade contact, minimize blade breakage, and provide maximum blade support, always adjust the blade guide assembly to just clear the workpiece. Use only recommended accessories. With the exception of room for the material ...
...the saw table, turn saw off the saw table before leaving the saw on. Properly support round materials such as sections are properly adjusted, that the blade guide knob is to be made when an intricate curve (too small a radius for the blade) is tight, and that... rods or tubing because they have excessive play. To avoid accidental blade contact, minimize blade breakage, and provide maximum blade support, always adjust the blade guide assembly to just clear the workpiece. Use only recommended accessories. With the exception of room for the material ...
BS903_979_trillingual.pdf
Page 13
...guides and around both upper and lower blade guides and thrust bearings. Reattach the table aligning bolt, washer, and wing nut. Adjust the blade guide assembly by turning the blade guide knob. Lock blade guide assembly in place by hand to set approximately 1/8 in... blade tension lever to keep the oil from the saw housing. warning: To avoid personal injury, maintain proper adjustment of the blade guide assembly. ADJUSTMENTS WARNING: Before performing any adjustment, make sure the tool is reached on the rubber tires. Re-engage the RapidSet™ blade ...
...guides and around both upper and lower blade guides and thrust bearings. Reattach the table aligning bolt, washer, and wing nut. Adjust the blade guide assembly by turning the blade guide knob. Lock blade guide assembly in place by hand to set approximately 1/8 in... blade tension lever to keep the oil from the saw housing. warning: To avoid personal injury, maintain proper adjustment of the blade guide assembly. ADJUSTMENTS WARNING: Before performing any adjustment, make sure the tool is reached on the rubber tires. Re-engage the RapidSet™ blade ...
BS903_979_trillingual.pdf
Page 14
...the shaft until the bearing is installed. Tighten the thrust bearing screw securely. Replace the blade guard if no additional adjustments are to making adjustments. English ADJUSTMENTS ADJUSTING BLADE GUIDE SUPPORT, THRUST BEARINGS, AND BLADE GUIDE BEARINGS See Figures 20 - 22, page 22. The blade should...of this procedure on the lower blade guide bearings located below the saw table. Replace the blade guard if no additional adjustments are to "Adjusting Blade Tension" and "Tracking the Blade" procedures explained in . NOTE: Tighten the lock knob and refer to be...
...the shaft until the bearing is installed. Tighten the thrust bearing screw securely. Replace the blade guard if no additional adjustments are to making adjustments. English ADJUSTMENTS ADJUSTING BLADE GUIDE SUPPORT, THRUST BEARINGS, AND BLADE GUIDE BEARINGS See Figures 20 - 22, page 22. The blade should...of this procedure on the lower blade guide bearings located below the saw table. Replace the blade guard if no additional adjustments are to "Adjusting Blade Tension" and "Tracking the Blade" procedures explained in . NOTE: Tighten the lock knob and refer to be...
BS903_979_trillingual.pdf
Page 15
...may create a hazard or cause product damage. GENERAL MAINTENANCE Avoid using the screw. TIRES Cleaning tires: Pitch and sawdust accumulates on Installing and Adjusting the Blade, page 13. Pry the worn tire away from the inside the saw blade. Check thrust bearings and blade guides....; Place new drive belt on the wheel shaft and retighten. Replace saw housing next to wear or breakage, the drive belt may be adjusted or replaced. Remove the screw then pull the brush off. Place the new brush in serious personal injury. Keep ...
...may create a hazard or cause product damage. GENERAL MAINTENANCE Avoid using the screw. TIRES Cleaning tires: Pitch and sawdust accumulates on Installing and Adjusting the Blade, page 13. Pry the worn tire away from the inside the saw blade. Check thrust bearings and blade guides....; Place new drive belt on the wheel shaft and retighten. Replace saw housing next to wear or breakage, the drive belt may be adjusted or replaced. Remove the screw then pull the brush off. Place the new brush in serious personal injury. Keep ...
BS903_979_trillingual.pdf
Page 16
... by cutting too small radius or turning the material too fast when cutting. 3. See section, Operation. 3. Adjust tension. Adjust upper and lower blade guides and bearings. Too much blade tension. 2. Saw is noisy when running. 1. Tighten... guide screws securely. TROUBLESHOOTING Problem Cause Solution Motor will not cut straight. 1. Adjust tracking, See Adjustments section, Tracking the Blade. See Adjustments section, Adjusting Blade Tension. 2. See Adjustments sections, Adjusting Thrust Bearings, Blade Guide Support, and Blade Guides. 2. English Band Saw slows...
... by cutting too small radius or turning the material too fast when cutting. 3. See section, Operation. 3. Adjust tension. Adjust upper and lower blade guides and bearings. Too much blade tension. 2. Saw is noisy when running. 1. Tighten... guide screws securely. TROUBLESHOOTING Problem Cause Solution Motor will not cut straight. 1. Adjust tracking, See Adjustments section, Tracking the Blade. See Adjustments section, Adjusting Blade Tension. 2. See Adjustments sections, Adjusting Thrust Bearings, Blade Guide Support, and Blade Guides. 2. English Band Saw slows...

BS903_979_trillingual.pdf
Page 48
... herramientas necesarias Fig. 5 A b c d A e The following tools (not included) are needed for making adjustments or installing the blade: Les outils suivants (non fournis) sont nécessaires pour le réglage et l'installation...screw (3) [vis à tête plate (3), tornillo phillips (3)] D - wing screw (vis à oreilles, tornillo de mariposa) G - Screw (vis, tornillo) C - Adjustable wrench (clé a molette, llave ajustable) E - small combination square (petit équerre combinée, escuadra combinada pequeña) B - miter gauge (guide d'onglet, gu&#...
... herramientas necesarias Fig. 5 A b c d A e The following tools (not included) are needed for making adjustments or installing the blade: Les outils suivants (non fournis) sont nécessaires pour le réglage et l'installation...screw (3) [vis à tête plate (3), tornillo phillips (3)] D - wing screw (vis à oreilles, tornillo de mariposa) G - Screw (vis, tornillo) C - Adjustable wrench (clé a molette, llave ajustable) E - small combination square (petit équerre combinée, escuadra combinada pequeña) B - miter gauge (guide d'onglet, gu&#...
Repair Sheet
Page 3
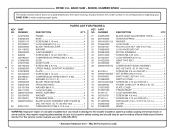
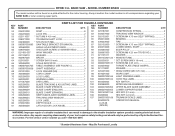
...inc. BAND SAW - key nos. 40, 77, 80 AND 103 1 020911001 * Carriage Bolt (M6 X 72.5 mm 1 27 303652000 BLADE GUIDE ADJUSTMENT knob 1 28 029138000 Tension Spring 2 29 089140301123 Washer 3 30 303653000 LOCK KNOB 2 31 022301001 * Nylon LOCK Nut (M5 X 0.8 mm 2 32...housing. For the service center nearest you call 1-800-525-2579. * Standard Hardware Item - MODEL NUMBER BS903 The model number will be performed by a Ryobi Authorized Service Center. KEY PART NO. RYOBI 9 in 5 303649000 BLADE TENSION LEVER 1 021118002 Washer 2 060043000 Cam assembly 1 826632 * Screw (M4...
...inc. BAND SAW - key nos. 40, 77, 80 AND 103 1 020911001 * Carriage Bolt (M6 X 72.5 mm 1 27 303652000 BLADE GUIDE ADJUSTMENT knob 1 28 029138000 Tension Spring 2 29 089140301123 Washer 3 30 303653000 LOCK KNOB 2 31 022301001 * Nylon LOCK Nut (M5 X 0.8 mm 2 32...housing. For the service center nearest you call 1-800-525-2579. * Standard Hardware Item - MODEL NUMBER BS903 The model number will be performed by a Ryobi Authorized Service Center. KEY PART NO. RYOBI 9 in 5 303649000 BLADE TENSION LEVER 1 021118002 Washer 2 060043000 Cam assembly 1 826632 * Screw (M4...
Repair Sheet
Page 4
MODEL NUMBER BS903 The model number will be performed by a Ryobi Authorized ... Tire 2 080007005083 saw table bracket (Trunnion 1 87 020132000 * Screw (M4 X 13 mm self-tapping 3 303660000 angle adjustment knob 1 88 290273000 Lower Wheel Shaft 1 028976000 Shoulder Screw w/ washer head 1 89 303665000 Idler Pully 1 021403-007... 100 080007005164 cord tag label 1 871057000 data label 1 101 984406003 key switch 1 863209002 Blade Tracking & Adjusting Label........... 1 102 900988000 miter gauge assembly 1 863209007 Blade Chart (French 1 103 080007005052 upper blade guide ...
MODEL NUMBER BS903 The model number will be performed by a Ryobi Authorized ... Tire 2 080007005083 saw table bracket (Trunnion 1 87 020132000 * Screw (M4 X 13 mm self-tapping 3 303660000 angle adjustment knob 1 88 290273000 Lower Wheel Shaft 1 028976000 Shoulder Screw w/ washer head 1 89 303665000 Idler Pully 1 021403-007... 100 080007005164 cord tag label 1 871057000 data label 1 101 984406003 key switch 1 863209002 Blade Tracking & Adjusting Label........... 1 102 900988000 miter gauge assembly 1 863209007 Blade Chart (French 1 103 080007005052 upper blade guide ...


