
Warranty (English)
Page 1
...• Commercial use www.rocketfishproducts.com 1 Make sure that you . Products and parts replaced under this warranty become the property of Rocketfish brand products and packaged with the product. How to the address listed on the web site. This warranty does not cover refurbished product.... The Warranty Period lasts for one year (365 days), beginning on the receipt you notify Rocketfish during the Warranty Period. This product must be defective by this warranty statement. If you received with this warranty that provides...
...• Commercial use www.rocketfishproducts.com 1 Make sure that you . Products and parts replaced under this warranty become the property of Rocketfish brand products and packaged with the product. How to the address listed on the web site. This warranty does not cover refurbished product.... The Warranty Period lasts for one year (365 days), beginning on the receipt you notify Rocketfish during the Warranty Period. This product must be defective by this warranty statement. If you received with this warranty that provides...
Warranty (English)
Page 2
... the factory applied serial number has been altered or removed REPAIR REPLACEMENT AS PROVIDED UNDER THIS WARRANTY IS YOUR EXCLUSIVE REMEDY. ROCKETFISH SHALL NOT BE LIABLE FOR ANY INCIDENTAL OR CONSEQUENTIAL DAMAGES FOR THE BREACH OF ANY EXPRESS OR IMPLIED WARRANTY ON THIS PRODUCT..., Richfield, Minnesota, U.S.A. 55423-3645 © 2008 Best Buy Enterprise Services, Inc. Contact Rocketfish: For customer service please call 1-800-620-2790 www.rocketfishproducts.com Distributed by Rocketfish to an incorrect voltage supply • Attempted repair by anyone other products and brand names are...
... the factory applied serial number has been altered or removed REPAIR REPLACEMENT AS PROVIDED UNDER THIS WARRANTY IS YOUR EXCLUSIVE REMEDY. ROCKETFISH SHALL NOT BE LIABLE FOR ANY INCIDENTAL OR CONSEQUENTIAL DAMAGES FOR THE BREACH OF ANY EXPRESS OR IMPLIED WARRANTY ON THIS PRODUCT..., Richfield, Minnesota, U.S.A. 55423-3645 © 2008 Best Buy Enterprise Services, Inc. Contact Rocketfish: For customer service please call 1-800-620-2790 www.rocketfishproducts.com Distributed by Rocketfish to an incorrect voltage supply • Attempted repair by anyone other products and brand names are...

User Manual (English)
Page 1
2.4 GHz Digital Wireless Stereo Headphones RF-WHP212 User Guide
2.4 GHz Digital Wireless Stereo Headphones RF-WHP212 User Guide

User Manual (English)
Page 3
You can use . 3 RF-WHP212 Rocketfish RF-WHP212 2.4 GHz Digital Wireless Stereo Headphones Contents Introduction 3 Safety information 4 Features 6 Setting up to recharge the headphones when they are not in 2.4 GHz wireless headphone design, ... Troubleshooting 17 Specifications 18 Legal notices 18 One-year limited warranty 21 Introduction Congratulations on your music or movie without the limitations of high-quality Rocketfish 2.4 GHz Digital Wireless Stereo Headphones. This system represents the state of the art in use the docking station to 60 feet (20 m).
You can use . 3 RF-WHP212 Rocketfish RF-WHP212 2.4 GHz Digital Wireless Stereo Headphones Contents Introduction 3 Safety information 4 Features 6 Setting up to recharge the headphones when they are not in 2.4 GHz wireless headphone design, ... Troubleshooting 17 Specifications 18 Legal notices 18 One-year limited warranty 21 Introduction Congratulations on your music or movie without the limitations of high-quality Rocketfish 2.4 GHz Digital Wireless Stereo Headphones. This system represents the state of the art in use the docking station to 60 feet (20 m).

User Manual (English)
Page 4
... plug has two blades with your television or other audio components, like your CD/DVD player, home theater system, or even audio output from your Rocketfish Digital Wireless Stereo Headphones. There are no user-serviceable parts inside. The wide blade or the third is provided for quick reference. If the provided...
... plug has two blades with your television or other audio components, like your CD/DVD player, home theater system, or even audio output from your Rocketfish Digital Wireless Stereo Headphones. There are no user-serviceable parts inside. The wide blade or the third is provided for quick reference. If the provided...

User Manual (English)
Page 5
... or moisture, does not operate normally, or has been dropped. • To reduce the risk of time. • Refer all servicing to qualified service personnel. RF-WHP212 • Protect the power cord from the system. • Only use attachments or accessories specified by the manufacturer. • Unplug this system during lightning storms...
... or moisture, does not operate normally, or has been dropped. • To reduce the risk of time. • Refer all servicing to qualified service personnel. RF-WHP212 • Protect the power cord from the system. • Only use attachments or accessories specified by the manufacturer. • Unplug this system during lightning storms...

User Manual (English)
Page 6
Features • High-Performance Audio - The box should contain: Headphones Docking station AC adapter AAA Rechargeable batteries (2) RCA audio cable (1) 3.5 mm-to Use - Digital sound with convenient base docking station. Easy setup, rechargeable batteries with adjustable volume control. • Strong Wireless Signal - 60 ft. (20 m) wireless range (maximum, line-of the box for your digital wireless stereo headphones. Package contents Examine the contents of -sight). • Easy to -RCA adapter cable User Guide Quick Start Guide 6
Features • High-Performance Audio - The box should contain: Headphones Docking station AC adapter AAA Rechargeable batteries (2) RCA audio cable (1) 3.5 mm-to Use - Digital sound with convenient base docking station. Easy setup, rechargeable batteries with adjustable volume control. • Strong Wireless Signal - 60 ft. (20 m) wireless range (maximum, line-of the box for your digital wireless stereo headphones. Package contents Examine the contents of -sight). • Easy to -RCA adapter cable User Guide Quick Start Guide 6

User Manual (English)
Page 7
... and docking station are paired. • Blue - Slide in the direction of the arrow to open the battery compartment. 5 Headphone POWER switch (on . Headphones back RF-WHP212 8 Item Description 1 Left earpiece. 2 Battery compartment lid. 3 Power/Pairing indicator (red/blue): • Blue - lights steadily if the headphone and docking station are pairing. •...
... and docking station are paired. • Blue - Slide in the direction of the arrow to open the battery compartment. 5 Headphone POWER switch (on . Headphones back RF-WHP212 8 Item Description 1 Left earpiece. 2 Battery compartment lid. 3 Power/Pairing indicator (red/blue): • Blue - lights steadily if the headphone and docking station are pairing. •...

User Manual (English)
Page 8
Docking station top Item Description 1 CHARGING indicator: • Turns red when the headphones are charging. • Turns green when the headphones are charged. • Turns off when the headphones are removed from the docking station. 2 PAIRING indicator (blue): • Lights steadily if the headphones and docking station are paired. • Blinks rapidly if the headphones and docking station are pairing. • Blinks slowly if the headphones and docking station are not paired. 3 Charging pins. 4 Headphone cradle. 8
Docking station top Item Description 1 CHARGING indicator: • Turns red when the headphones are charging. • Turns green when the headphones are charged. • Turns off when the headphones are removed from the docking station. 2 PAIRING indicator (blue): • Lights steadily if the headphones and docking station are paired. • Blinks rapidly if the headphones and docking station are pairing. • Blinks slowly if the headphones and docking station are not paired. 3 Charging pins. 4 Headphone cradle. 8

User Manual (English)
Page 9
.... Setting up your system Installing or replacing headphone batteries The headphones are installed correctly. 9 Both batteries are housed in the left earpiece. Docking station back RF-WHP212 5V 500mA Item Description 1 Docking station On/Off switch. 2 INPUT jacks (L and R).
.... Setting up your system Installing or replacing headphone batteries The headphones are installed correctly. 9 Both batteries are housed in the left earpiece. Docking station back RF-WHP212 5V 500mA Item Description 1 Docking station On/Off switch. 2 INPUT jacks (L and R).

User Manual (English)
Page 10
symbols on the batteries with the battery compartment facing up, then slide the battery compartment latch to align the + and - To install batteries in the headphones: 1 Hold the left earpiece in one hand with the symbols in the battery compartment. 10 Make sure to the right. 2 Remove the battery compartment lid. 3 Insert both AAA batteries into the battery compartment.
symbols on the batteries with the battery compartment facing up, then slide the battery compartment latch to align the + and - To install batteries in the headphones: 1 Hold the left earpiece in one hand with the symbols in the battery compartment. 10 Make sure to the right. 2 Remove the battery compartment lid. 3 Insert both AAA batteries into the battery compartment.

User Manual (English)
Page 11
Connecting the headphones Caution: To prevent damage to your system, make sure that all components are turned off before making the connections. 11 RF-WHP212 4 Close the battery compartment by engaging the pins in the battery compartment cover with the grooves in the top of the earpiece, then shutting the battery compartment until it clicks into place.
Connecting the headphones Caution: To prevent damage to your system, make sure that all components are turned off before making the connections. 11 RF-WHP212 4 Close the battery compartment by engaging the pins in the battery compartment cover with the grooves in the top of the earpiece, then shutting the battery compartment until it clicks into place.
User Manual (English)
Page 12
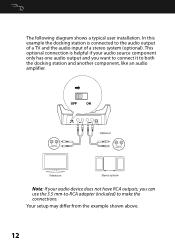
In this example the docking station is helpful if your audio source component only has one audio output and you want to connect it to both the docking station and another component, like an audio amplifier. 5V 5 00 mA Optional IN Television Stereo system Note: If your audio device does not have RCA outputs, you can use the 3.5 mm-to-RCA adapter (included) to the audio output of a TV and the audio input of a stereo system (optional). Your setup may differ from the example shown above. 12 The following diagram shows a typical user installation. This optional connection is connected...
In this example the docking station is helpful if your audio source component only has one audio output and you want to connect it to both the docking station and another component, like an audio amplifier. 5V 5 00 mA Optional IN Television Stereo system Note: If your audio device does not have RCA outputs, you can use the 3.5 mm-to-RCA adapter (included) to the audio output of a TV and the audio input of a stereo system (optional). Your setup may differ from the example shown above. 12 The following diagram shows a typical user installation. This optional connection is connected...

User Manual (English)
Page 13
... charging contacts and the docking station charging pins make sure that the AC power outlet matches the AC adapter's 100-240V before making the connection. RF-WHP212 Connecting the AC adapter to the docking station Cautions: To avoid risk of fire and to prevent damage, only use the AC adapter supplied with...
... charging contacts and the docking station charging pins make sure that the AC power outlet matches the AC adapter's 100-240V before making the connection. RF-WHP212 Connecting the AC adapter to the docking station Cautions: To avoid risk of fire and to prevent damage, only use the AC adapter supplied with...
User Manual (English)
Page 14
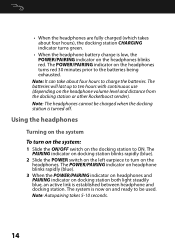
Note: The headphones cannot be used. The PAIRING indicator on docking station blinks rapidly (blue). 2 Slide the POWER switch on the left earpiece to turn on the system: 1 Slide the ON/OFF switch on and ready to be charged when the docking station is now on the docking station to ON. The POWER/PAIRING indicator on the headphones. The system is turned off. Note: Autopairing takes 5-10 seconds. 14 Using the headphones Turning on the system To turn on the headphones turns red 30 minutes prior to the batteries being exhausted. • When the headphones are fully charged (...
Note: The headphones cannot be used. The PAIRING indicator on docking station blinks rapidly (blue). 2 Slide the POWER switch on the left earpiece to turn on the system: 1 Slide the ON/OFF switch on and ready to be charged when the docking station is now on the docking station to ON. The POWER/PAIRING indicator on the headphones. The system is turned off. Note: Autopairing takes 5-10 seconds. 14 Using the headphones Turning on the system To turn on the headphones turns red 30 minutes prior to the batteries being exhausted. • When the headphones are fully charged (...

User Manual (English)
Page 15
... the headphones and the docking station. Make sure that your digital wireless stereo headphones To listen through the headphones: 1 Turn on the headphones blinks red. RF-WHP212 Notes: If the charge on the headphone batteries is low, the POWER/PAIRING indicator on the headphones and docking station.
... the headphones and the docking station. Make sure that your digital wireless stereo headphones To listen through the headphones: 1 Turn on the headphones blinks red. RF-WHP212 Notes: If the charge on the headphone batteries is low, the POWER/PAIRING indicator on the headphones and docking station.

User Manual (English)
Page 16
3 Put your headphones on your system Use a soft cloth dampened with a clean cloth. Adjust the fit until you may need to turn off the headphones. 2 Slide the ON/OFF switch on the docking station to OFF to your hearing. Notes: If the system is connected to your audio source and begin playback. Turning off the system To turn off the system: 1 Slide the POWER switch located on the headphones' left earpiece toward the arrow to turn up the volume on the audio source. 5 Adjust the headphone volume to a TV, you feel comfortable. 4 Turn on as long as they may permanently damage your ...
3 Put your headphones on your system Use a soft cloth dampened with a clean cloth. Adjust the fit until you may need to turn off the headphones. 2 Slide the ON/OFF switch on the docking station to OFF to your hearing. Notes: If the system is connected to your audio source and begin playback. Turning off the system To turn off the system: 1 Slide the POWER switch located on the headphones' left earpiece toward the arrow to turn up the volume on the audio source. 5 Adjust the headphone volume to a TV, you feel comfortable. 4 Turn on as long as they may permanently damage your ...

User Manual (English)
Page 17
RF-WHP212 Troubleshooting Check this distance. • Make sure that all of the cables are connected correctly. • It is possible that other obstructions will not turn ...
RF-WHP212 Troubleshooting Check this distance. • Make sure that all of the cables are connected correctly. • It is possible that other obstructions will not turn ...

User Manual (English)
Page 18
This equipment generates, uses and can radiate radio frequency energy and , if not installed and used in a particular installation. However, there is no guarantee that interference will not occur in accordance with the limits for support. Contact the manufacturer of the FCC Rules. Operation is subject to the following two conditions: (1) This device may not cause harmful interference, and (2) this device must accept any interference received, including interference that may cause undesired operation. These limits are blinking on one or both devices, see "Using the ...
This equipment generates, uses and can radiate radio frequency energy and , if not installed and used in a particular installation. However, there is no guarantee that interference will not occur in accordance with the limits for support. Contact the manufacturer of the FCC Rules. Operation is subject to the following two conditions: (1) This device may not cause harmful interference, and (2) this device must accept any interference received, including interference that may cause undesired operation. These limits are blinking on one or both devices, see "Using the ...

User Manual (English)
Page 19
... Note: This symbol is connected. • Consult the dealer or an experienced radio/TV technician for the treatment of old electrical and electronic equipment. 19 RF-WHP212 harmful interference to radio or television reception, which the receiver is only valid in the European Union. Information for Users on a circuit different from that...
... Note: This symbol is connected. • Consult the dealer or an experienced radio/TV technician for the treatment of old electrical and electronic equipment. 19 RF-WHP212 harmful interference to radio or television reception, which the receiver is only valid in the European Union. Information for Users on a circuit different from that...
