User Manual (English)
Page 3
Rocketfish RF-TWIST Wireless Twister Laser Mouse Contents Introduction 4 Features 4 Setting up the mouse 6 Using the mouse 9 Troubleshooting 26 Maintaining 27 Legal notices 30 Warranty 33 Français 39 Español 83 RF-TWIST 3
Rocketfish RF-TWIST Wireless Twister Laser Mouse Contents Introduction 4 Features 4 Setting up the mouse 6 Using the mouse 9 Troubleshooting 26 Maintaining 27 Legal notices 30 Warranty 33 Français 39 Español 83 RF-TWIST 3

User Manual (English)
Page 4
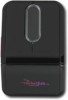
The Twister's revolutionary design and user-programmable mouse buttons let you easily navigate your purchase of a Rocketfish Wireless Twister Laser Mouse. Introduction Congratulations on your favorite programs. Features • Wireless laser mouse with Precision Laser Stream™ technology • Four programmable buttons • Slim USB receiver (stored in mouse chassis) • Unique "twistable" design • Scroll...
The Twister's revolutionary design and user-programmable mouse buttons let you easily navigate your purchase of a Rocketfish Wireless Twister Laser Mouse. Introduction Congratulations on your favorite programs. Features • Wireless laser mouse with Precision Laser Stream™ technology • Four programmable buttons • Slim USB receiver (stored in mouse chassis) • Unique "twistable" design • Scroll...

User Manual (English)
Page 5
Controls Item 1 2 3 4 5 6 Name Left mouse button Side button Right mouse button Scroll flat panel Battery indicator LED USB receiver housing panel RF-TWIST 5
Controls Item 1 2 3 4 5 6 Name Left mouse button Side button Right mouse button Scroll flat panel Battery indicator LED USB receiver housing panel RF-TWIST 5

User Manual (English)
Page 6
Make sure that the batteries are inserted correctly. 3 Slide the battery door closed. 6 LED Status LED Color Description Twister LED Green Red USB receiver LED Green Red Mouse is on, battery level normal Low battery (flashing) Battery level normal Low battery (flashing) Setting up the mouse Installing the batteries To install the batteries: 1 Press and slide open the battery door. 2 Insert two AAA batteries.
Make sure that the batteries are inserted correctly. 3 Slide the battery door closed. 6 LED Status LED Color Description Twister LED Green Red USB receiver LED Green Red Mouse is on, battery level normal Low battery (flashing) Battery level normal Low battery (flashing) Setting up the mouse Installing the batteries To install the batteries: 1 Press and slide open the battery door. 2 Insert two AAA batteries.
User Manual (English)
Page 7
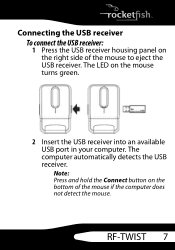
The LED on the bottom of the mouse to eject the USB receiver. Note: Press and hold the Connect button on the mouse turns green. 2 Insert the USB receiver into an available USB port in your computer. RF-TWIST 7 Connecting the USB receiver To connect the USB receiver: 1 Press the USB receiver housing panel on the right side of the mouse if the computer does not detect the mouse. The computer automatically detects the USB receiver.
The LED on the bottom of the mouse to eject the USB receiver. Note: Press and hold the Connect button on the mouse turns green. 2 Insert the USB receiver into an available USB port in your computer. RF-TWIST 7 Connecting the USB receiver To connect the USB receiver: 1 Press the USB receiver housing panel on the right side of the mouse if the computer does not detect the mouse. The computer automatically detects the USB receiver.

User Manual (English)
Page 8
Installing the software Customize the mouse buttons and settings with Mouse Suite software. To install the software: 1 Insert the software CD into the optical drive, then follow all on-screen instructions. 2 Restart the computer. 8
Installing the software Customize the mouse buttons and settings with Mouse Suite software. To install the software: 1 Insert the software CD into the optical drive, then follow all on-screen instructions. 2 Restart the computer. 8

User Manual (English)
Page 9
The mouse is ready to customize mouse buttons and functions. Using the mouse Operating the mouse To use . Customizing the mouse Use the Mouse Suite software to use your mouse: 1 Twist the back of the mouse clockwise 180 degrees. 2 Place the mouse on a flat surface. RF-TWIST 9
The mouse is ready to customize mouse buttons and functions. Using the mouse Operating the mouse To use . Customizing the mouse Use the Mouse Suite software to use your mouse: 1 Twist the back of the mouse clockwise 180 degrees. 2 Place the mouse on a flat surface. RF-TWIST 9

User Manual (English)
Page 10
The Rocketfish Mouse menu opens. -ORRight-click the Mouse Suite icon, then click Adjust Mouse Properties. The Rocketfish Mouse menu opens. -ORClick Start, Settings, Control Panel, then double-click Rocketfish Mouse. The Rocketfish Mouse menu opens. 10 To open Mouse Suite: • Double-click the Mouse Suite icon in the system tray.
The Rocketfish Mouse menu opens. -ORRight-click the Mouse Suite icon, then click Adjust Mouse Properties. The Rocketfish Mouse menu opens. -ORClick Start, Settings, Control Panel, then double-click Rocketfish Mouse. The Rocketfish Mouse menu opens. 10 To open Mouse Suite: • Double-click the Mouse Suite icon in the system tray.
User Manual (English)
Page 11
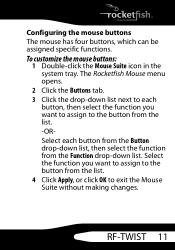
... from the Function drop-down list. RF-TWIST 11 The Rocketfish Mouse menu opens. 2 Click the Buttons tab. 3 Click the drop-down list next to exit the Mouse Suite without making changes. To customize the mouse buttons: 1 Double-click the Mouse Suite icon in the system tray. Configuring the mouse buttons The mouse has four buttons, which can be...
... from the Function drop-down list. RF-TWIST 11 The Rocketfish Mouse menu opens. 2 Click the Buttons tab. 3 Click the drop-down list next to exit the Mouse Suite without making changes. To customize the mouse buttons: 1 Double-click the Mouse Suite icon in the system tray. Configuring the mouse buttons The mouse has four buttons, which can be...

User Manual (English)
Page 12
...Default Setting Left button Right button Scroll flat panel Side button Primary Mouse Button Context Menu Quick/ Auto Scroll Page Up The following functions can be assigned to the mouse buttons: Function Description Mouse Button Context Menu Page Down Page Up Next Window Close Window Maximize... Window Minimize Window Quick/Auto Scroll Primary mouse button for selection and dragging. Closes the active window. ...
...Default Setting Left button Right button Scroll flat panel Side button Primary Mouse Button Context Menu Quick/ Auto Scroll Page Up The following functions can be assigned to the mouse buttons: Function Description Mouse Button Context Menu Page Down Page Up Next Window Close Window Maximize... Window Minimize Window Quick/Auto Scroll Primary mouse button for selection and dragging. Closes the active window. ...

User Manual (English)
Page 14
...nine of the most commonly performed functions. See "Using HyperGrid" on the Rocketfish Mouse menu to restore the default mouse button settings. See "Using Magnifier" on page 11. 14 See "To customize the mouse buttons:" on page 16. Double-click Performs a double-click. See "...Hyperlink" on page 15. Using HyperGrid HyperGrid opens a menu providing easy access to one of the primary mouse button. Drag Lock Enables and disables the drag lock feature of the mouse buttons. Function Description Printers Opens the Printers folder. Magnifier Enables the Magnifier.
...nine of the most commonly performed functions. See "Using HyperGrid" on the Rocketfish Mouse menu to restore the default mouse button settings. See "Using Magnifier" on page 11. 14 See "To customize the mouse buttons:" on page 16. Double-click Performs a double-click. See "...Hyperlink" on page 15. Using HyperGrid HyperGrid opens a menu providing easy access to one of the primary mouse button. Drag Lock Enables and disables the drag lock feature of the mouse buttons. Function Description Printers Opens the Printers folder. Magnifier Enables the Magnifier.
User Manual (English)
Page 15
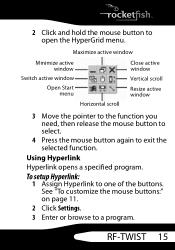
To setup Hyperlink: 1 Assign Hyperlink to a program. See "To customize the mouse buttons:" on page 11. 2 Click Settings. 3 Enter or browse to one of the buttons. RF-TWIST 15 Maximize active window Minimize active window Switch active window Open Start menu Horizontal scroll Close active window Vertical scroll Resize active window 3 Move the ...
To setup Hyperlink: 1 Assign Hyperlink to a program. See "To customize the mouse buttons:" on page 11. 2 Click Settings. 3 Enter or browse to one of the buttons. RF-TWIST 15 Maximize active window Minimize active window Switch active window Open Start menu Horizontal scroll Close active window Vertical scroll Resize active window 3 Move the ...

User Manual (English)
Page 16
The specified program opens. The Rocketfish Mouse menu opens. 2 Click the Magnifier checkbox to select the option. 3 Assign Magnifier to zoom in the system tray. To setup Magnifier: 1 Double-click the Mouse Suite icon in on any area of the buttons. Using Magnifier The Magnifier lets you to one of the computer display. See "To customize the mouse buttons:" on the Rocketfish Mouse menu. 6 Click the mouse button. 4 Type a description, then click OK. 5 Click Apply on page 11. 4 Click Apply. 16
The specified program opens. The Rocketfish Mouse menu opens. 2 Click the Magnifier checkbox to select the option. 3 Assign Magnifier to zoom in the system tray. To setup Magnifier: 1 Double-click the Mouse Suite icon in on any area of the buttons. Using Magnifier The Magnifier lets you to one of the computer display. See "To customize the mouse buttons:" on the Rocketfish Mouse menu. 6 Click the mouse button. 4 Type a description, then click OK. 5 Click Apply on page 11. 4 Click Apply. 16
User Manual (English)
Page 17
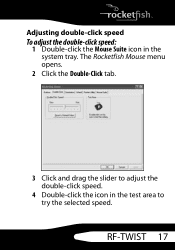
Adjusting double-click speed To adjust the double-click speed: 1 Double-click the Mouse Suite icon in the test area to adjust the double-click speed. 4 Double-click the icon in the system tray. RF-TWIST 17 The Rocketfish Mouse menu opens. 2 Click the Double-Click tab. 3 Click and drag the slider to try the selected speed.
Adjusting double-click speed To adjust the double-click speed: 1 Double-click the Mouse Suite icon in the test area to adjust the double-click speed. 4 Double-click the icon in the system tray. RF-TWIST 17 The Rocketfish Mouse menu opens. 2 Click the Double-Click tab. 3 Click and drag the slider to try the selected speed.

User Manual (English)
Page 18
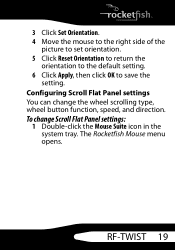
The Rocketfish Mouse menu opens. 2 Click the Orientation tab. 18 Adjusting mouse orientation To change the orientation of the mouse: 1 Double-click the Mouse Suite icon in the system tray. 5 Click Reset to Default Value to return the double-click speed to the original setting. 6 Click Apply, then click OK to save the setting.
The Rocketfish Mouse menu opens. 2 Click the Orientation tab. 18 Adjusting mouse orientation To change the orientation of the mouse: 1 Double-click the Mouse Suite icon in the system tray. 5 Click Reset to Default Value to return the double-click speed to the original setting. 6 Click Apply, then click OK to save the setting.
User Manual (English)
Page 19
RF-TWIST 19 The Rocketfish Mouse menu opens. Configuring Scroll Flat Panel settings You can change Scroll Flat Panel settings: 1 Double-click the Mouse Suite icon in the system tray. To change the wheel scrolling type, wheel button function, speed, and direction. 3 Click Set Orientation. 4 Move the mouse to the right side of the picture to set orientation. 5 Click Reset Orientation to return the orientation to the default setting. 6 Click Apply, then click OK to save the setting.
RF-TWIST 19 The Rocketfish Mouse menu opens. Configuring Scroll Flat Panel settings You can change Scroll Flat Panel settings: 1 Double-click the Mouse Suite icon in the system tray. To change the wheel scrolling type, wheel button function, speed, and direction. 3 Click Set Orientation. 4 Move the mouse to the right side of the picture to set orientation. 5 Click Reset Orientation to return the orientation to the default setting. 6 Click Apply, then click OK to save the setting.
User Manual (English)
Page 21
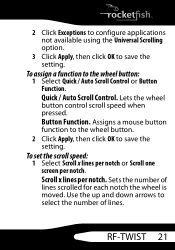
...Function. Sets the number of lines. To assign a function to the wheel button: 1 Select Quick / Auto Scroll Control or Button Function. Assigns a mouse button function to the wheel button. 2 Click Apply, then click OK to save the setting. To set the scroll speed: 1 Select Scroll x ...Scroll one screen per notch. Use the up and down arrows to select the number of lines scrolled for each notch the wheel is moved. RF-TWIST 21 2 Click Exceptions to configure applications not available using the Universal Scrolling option. 3 Click Apply, then click OK to save the setting. ...
...Function. Sets the number of lines. To assign a function to the wheel button: 1 Select Quick / Auto Scroll Control or Button Function. Assigns a mouse button function to the wheel button. 2 Click Apply, then click OK to save the setting. To set the scroll speed: 1 Select Scroll x ...Scroll one screen per notch. Use the up and down arrows to select the number of lines scrolled for each notch the wheel is moved. RF-TWIST 21 2 Click Exceptions to configure applications not available using the Universal Scrolling option. 3 Click Apply, then click OK to save the setting. ...

User Manual (English)
Page 22
The Rocketfish Mouse menu opens. 22 Scrolls an entire page for each notch the wheel is moved. 2 Click Apply, then click OK to the mouse. Scroll one screen per notch. To configure the pointer utilities: 1 Double-click the Mouse Suite icon in the system tray. Configuring pointer utilities Three pointer utilities are available to add additional functionality to save the setting.
The Rocketfish Mouse menu opens. 22 Scrolls an entire page for each notch the wheel is moved. 2 Click Apply, then click OK to the mouse. Scroll one screen per notch. To configure the pointer utilities: 1 Double-click the Mouse Suite icon in the system tray. Configuring pointer utilities Three pointer utilities are available to add additional functionality to save the setting.

User Manual (English)
Page 24
3 Select the utility or utilities to apply to the pointer. 4 Click Apply, then click OK to save the setting. The Rocketfish Mouse menu opens. 2 Click the Mouse Suite tab. 24 Configuring Mouse Suite settings Adjust the appearance of the system tray icon or uninstall the Mouse Suite software. To configure the Mouse Suite settings: 1 Double-click the Mouse Suite icon in the system tray.
3 Select the utility or utilities to apply to the pointer. 4 Click Apply, then click OK to save the setting. The Rocketfish Mouse menu opens. 2 Click the Mouse Suite tab. 24 Configuring Mouse Suite settings Adjust the appearance of the system tray icon or uninstall the Mouse Suite software. To configure the Mouse Suite settings: 1 Double-click the Mouse Suite icon in the system tray.
User Manual (English)
Page 25
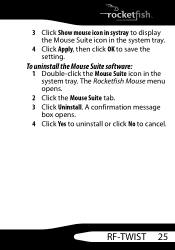
A confirmation message box opens. 4 Click Yes to uninstall or click No to save the setting. RF-TWIST 25 3 Click Show mouse icon in systray to display the Mouse Suite icon in the system tray. To uninstall the Mouse Suite software: 1 Double-click the Mouse Suite icon in the system tray. 4 Click Apply, then click OK to cancel. The Rocketfish Mouse menu opens. 2 Click the Mouse Suite tab. 3 Click Uninstall.
A confirmation message box opens. 4 Click Yes to uninstall or click No to save the setting. RF-TWIST 25 3 Click Show mouse icon in systray to display the Mouse Suite icon in the system tray. To uninstall the Mouse Suite software: 1 Double-click the Mouse Suite icon in the system tray. 4 Click Apply, then click OK to cancel. The Rocketfish Mouse menu opens. 2 Click the Mouse Suite tab. 3 Click Uninstall.
