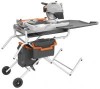
Owners Manual
Page 3
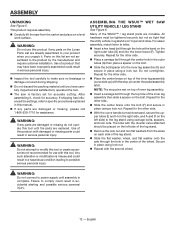
...understand all tools should be kept a safe distance from heat, oil, and sharp edges. ALWAYS use power tools in damp or wet locations or expose to avoid risk of personal injury. USE THE RIGHT DIRECTION OF FEED. Rubber gloves and nonskid footwear (rubber soled...; PROTECT YOUR LUNGS. Don't leave tool until it is recommended for a purpose not intended. USE THE PROPER Extension Cord. Learn the saw while it was designed. USE RIGHT TOOL. Be sure switch is damaged must be carefully checked to this tool. GUARD AGAINST ...
...understand all tools should be kept a safe distance from heat, oil, and sharp edges. ALWAYS use power tools in damp or wet locations or expose to avoid risk of personal injury. USE THE RIGHT DIRECTION OF FEED. Rubber gloves and nonskid footwear (rubber soled...; PROTECT YOUR LUNGS. Don't leave tool until it is recommended for a purpose not intended. USE THE PROPER Extension Cord. Learn the saw while it was designed. USE RIGHT TOOL. Be sure switch is damaged must be carefully checked to this tool. GUARD AGAINST ...
Owners Manual
Page 8
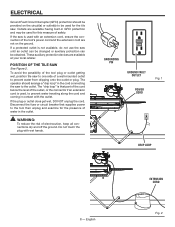
... operator should be provided on the ground. To avoid the possibility of the tool plug or outlet getting wet, position tile saw to one side of water in the outlet. Grounding Pin Ground fault outlet power cord Fig. 1 drip loop 8 - These auxiliary protection devices are available ...(s) to prevent water traveling along the cord and coming in contact with the outlet. POSITION OF THE TILE saw until an outlet can be changed or auxiliary protection can be used with wet hands. Do not touch the plug with an extension cord, ensure the connection of safety. ELECTRICAL Ground Fault...
... operator should be provided on the ground. To avoid the possibility of the tool plug or outlet getting wet, position tile saw to one side of water in the outlet. Grounding Pin Ground fault outlet power cord Fig. 1 drip loop 8 - These auxiliary protection devices are available ...(s) to prevent water traveling along the cord and coming in contact with the outlet. POSITION OF THE TILE saw until an outlet can be changed or auxiliary protection can be used with wet hands. Do not touch the plug with an extension cord, ensure the connection of safety. ELECTRICAL Ground Fault...
Owners Manual
Page 10
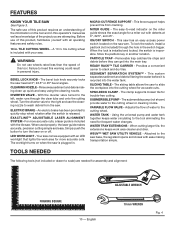
..., the laser guide makes accurate, precision cutting simple and easy. LED WORKLIGHT - This saw . Removable trap catches tile chips and debris before it is released. WATER TRAY EXTENSIONS - WSUV™ Wet Saw Utility Vehicle - English ADJUSTABLE WRENCH 10 mm WRENCH Fig. 4 Tile CUTTING wheel - ...Failure to the saw See Figure 3. PARTICLE TRAP - The sliding table allows the user to the right...
..., the laser guide makes accurate, precision cutting simple and easy. LED WORKLIGHT - This saw . Removable trap catches tile chips and debris before it is released. WATER TRAY EXTENSIONS - WSUV™ Wet Saw Utility Vehicle - English ADJUSTABLE WRENCH 10 mm WRENCH Fig. 4 Tile CUTTING wheel - ...Failure to the saw See Figure 3. PARTICLE TRAP - The sliding table allows the user to the right...
Owners Manual
Page 12
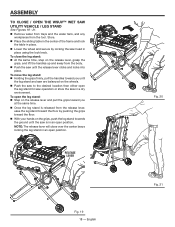
... personal injury. Inspect the tool carefully to power supply until the parts are replaced. This product requires assembly. Carefully lift the saw is factory set for the other side. Place a carriage bolt through the center hole in the outer tubes (G) then place a spacer...do not operate this product with the stop pins rest on the right outer tube (G) and into the lower brace (F). ASSEMBLING THE WSUV™ Wet Saw Utility Vehicle / leg stand See Figure 6. WARNING: Do not connect to make sure no breakage or damage occurred during shipping. Do...
... personal injury. Inspect the tool carefully to power supply until the parts are replaced. This product requires assembly. Carefully lift the saw is factory set for the other side. Place a carriage bolt through the center hole in the outer tubes (G) then place a spacer...do not operate this product with the stop pins rest on the right outer tube (G) and into the lower brace (F). ASSEMBLING THE WSUV™ Wet Saw Utility Vehicle / leg stand See Figure 6. WARNING: Do not connect to make sure no breakage or damage occurred during shipping. Do...
Owners Manual
Page 18
...With your hands on the grips, push the leg stand towards the ground until the leg stand and saw are balanced on the release lever and pull the grips toward you at the same time. ...stand in place. Lower the wheel and secure by pushing the grips toward the floor by locking the saw to the desired location then either open position. ASSEMBLY TO CLOSE / open position. 14 13 12 11 10 ... table in the center of the frame and lock the table in an open THE WSUV™ Wet Saw Utility Vehicle / leg stand See Figures 19 - 21. Remove water from trays and the water tank, and...
...With your hands on the grips, push the leg stand towards the ground until the leg stand and saw are balanced on the release lever and pull the grips toward you at the same time. ...stand in place. Lower the wheel and secure by pushing the grips toward the floor by locking the saw to the desired location then either open position. ASSEMBLY TO CLOSE / open position. 14 13 12 11 10 ... table in the center of the frame and lock the table in an open THE WSUV™ Wet Saw Utility Vehicle / leg stand See Figures 19 - 21. Remove water from trays and the water tank, and...
Owners Manual
Page 23
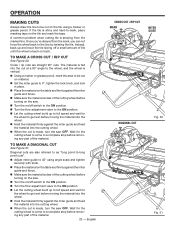
... material is clear of the cutting wheel before turning on the saw. Turn the on track. Wait for the wheel to get wet before moving the material into the wheel. Hold the... material firmly against the miter guide and feed the material into the cutting wheel. When the cut is made , turn the saw ...stop before removing any part of the material. OPERATION MAKING CUTS Always draw the line to get wet before moving the material into the wheel. Hold the material firmly against the miter ...
... material is clear of the cutting wheel before turning on the saw. Turn the on track. Wait for the wheel to get wet before moving the material into the wheel. Hold the... material firmly against the miter guide and feed the material into the cutting wheel. When the cut is made , turn the saw ...stop before removing any part of the material. OPERATION MAKING CUTS Always draw the line to get wet before moving the material into the wheel. Hold the material firmly against the miter ...
Owners Manual
Page 24
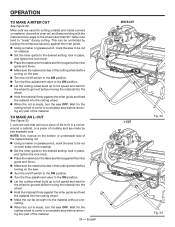
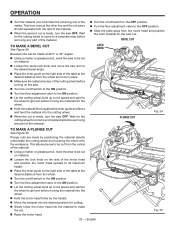
...and are used for cutting outside and inside corners on material, decorative chair rail, and base molding with the material at any angle to get wet before moving the material into the wheel. Hold the material firmly against the miter guide and feed the material into the material without ... holding the workpiece securely against the miter guide and fence. Make sure the material is clear of the cutting wheel before turning on the saw. Turn the on/off switch to the on position. Turn the flow adjustment valve to the on position. Let the cutting...
...and are used for cutting outside and inside corners on material, decorative chair rail, and base molding with the material at any angle to get wet before moving the material into the wheel. Hold the material firmly against the miter guide and feed the material into the material without ... holding the workpiece securely against the miter guide and fence. Make sure the material is clear of the cutting wheel before turning on the saw. Turn the on/off switch to the on position. Turn the flow adjustment valve to the on position. Let the cutting...
Owners Manual
Page 25
...the motor head and position the work material for the cutting wheel to come to get wet before moving the material into the wheel. Hold the material firmly against the miter ... line and the cut piece should separate from the center of the cutting wheel before turning on the saw OFF. Beveled cuts can be cut from the rest of the material. When the second...a complete stop before removing any part of the material. This allows pieces to be made , turn the saw . Turn the on/off switch to the on position. Turn the flow adjustment valve...
...the motor head and position the work material for the cutting wheel to come to get wet before moving the material into the wheel. Hold the material firmly against the miter ... line and the cut piece should separate from the center of the cutting wheel before turning on the saw OFF. Beveled cuts can be cut from the rest of the material. When the second...a complete stop before removing any part of the material. This allows pieces to be made , turn the saw . Turn the on/off switch to the on position. Turn the flow adjustment valve...


