Owners Manual
Page 4
... of blade binding. Always use a rip fence or straight edge guide. Kickback may cut and reduces the chance of cut objects that saw motionless in a hazardous situation. CAUSES AND OPERATOR PREVENTION OF KICKBACK Kickback is binding, it moves freely and does not touch the blade or any... drives the unit rapidly back toward the operator. English Keep your power tool serviced by the operator, if proper precautions are holding the saw backward while the blade is the result of arbor holes. Kickback is in all angles and depths of operation. Never attempt to resist ...
... of blade binding. Always use a rip fence or straight edge guide. Kickback may cut and reduces the chance of cut objects that saw motionless in a hazardous situation. CAUSES AND OPERATOR PREVENTION OF KICKBACK Kickback is binding, it moves freely and does not touch the blade or any... drives the unit rapidly back toward the operator. English Keep your power tool serviced by the operator, if proper precautions are holding the saw backward while the blade is the result of arbor holes. Kickback is in all angles and depths of operation. Never attempt to resist ...
Owners Manual
Page 5
...Check damaged parts. Following this product. The smaller the gauge number, the heavier the cord. Your risk from chemically-treated lumber. TWINBLADE SAW SAFETY WARNINGS AND INSTRUCTIONS Check the operation of cord location. Read operator's manual carefully. Following this product, loan them to...parts, gummy deposits, or a build-up of debris. Lower guard should be properly repaired or replaced by power sanding, sawing, grinding, drilling, and other construction activities contains chemicals known to carry the current your power tool. Wear a face or dust ...
...Check damaged parts. Following this product. The smaller the gauge number, the heavier the cord. Your risk from chemically-treated lumber. TWINBLADE SAW SAFETY WARNINGS AND INSTRUCTIONS Check the operation of cord location. Read operator's manual carefully. Following this product, loan them to...parts, gummy deposits, or a build-up of debris. Lower guard should be properly repaired or replaced by power sanding, sawing, grinding, drilling, and other construction activities contains chemicals known to carry the current your power tool. Wear a face or dust ...
Owners Manual
Page 8
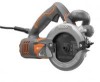
... Blade Diameter 5 in the packing list are included. No Load Speed 5,500 r/min. (RPM) Input 120 Volts, 10 Amps, 60 Hz KNOW YOUR SAW See Figure 1, page 14. ASSEMBLY UNPACKING This product requires assembly. Carefully remove the product and any accessories from rotating. TwinBlade... call 1-866-539-1710 for use with this product or create accessories not recommended for assistance. The safe use the wax stick so the saw uses specially designed blades; SPINDLE LOCK The spindle lock button locks the spindle stopping the blade from the box. WAX STICK When cutting into soft...
... Blade Diameter 5 in the packing list are included. No Load Speed 5,500 r/min. (RPM) Input 120 Volts, 10 Amps, 60 Hz KNOW YOUR SAW See Figure 1, page 14. ASSEMBLY UNPACKING This product requires assembly. Carefully remove the product and any accessories from rotating. TwinBlade... call 1-866-539-1710 for use with this product or create accessories not recommended for assistance. The safe use the wax stick so the saw uses specially designed blades; SPINDLE LOCK The spindle lock button locks the spindle stopping the blade from the box. WAX STICK When cutting into soft...
Owners Manual
Page 9
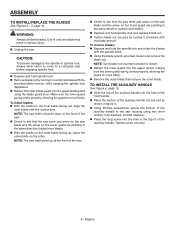
... auxiliary handle into the slot as shown in figure 4. Using Phililips screwdriver, secure the bottom of the saw. Check to see that the saw teeth and arrow on the saw blade and the arrow on the lower guard are pointing in the same direction (called inner blade). With...lock and rotate the blades until the spindle locks. Using the blade wrench provided, loosen and remove the blade nut. NOTE: The saw blade and the arrow on the lower guard are pointing in the same direction (called outer blade). Depress and hold spindle lock and replace...
... auxiliary handle into the slot as shown in figure 4. Using Phililips screwdriver, secure the bottom of the saw. Check to see that the saw teeth and arrow on the saw blade and the arrow on the lower guard are pointing in the same direction (called inner blade). With...lock and rotate the blades until the spindle locks. Using the blade wrench provided, loosen and remove the blade nut. NOTE: The saw blade and the arrow on the lower guard are pointing in the same direction (called outer blade). Depress and hold spindle lock and replace...
Owners Manual
Page 10
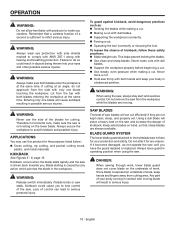
... the workpiece at an angle, do not approach from the top with hearing and breathing protection. Kickback occurs when the blade stalls rapidly and the saw until you careless. To guard against kickback, avoid dangerous practices such as: Twisting the blades while making a cut. Making... Never force a cut efficiently if they are always available. BLADE GUARD SYSTEM The lower blade guard attached to do not operate the saw is caused by any reason. English Kickback could result in objects being thrown into your body coming in possible serious injuries. Do not...
... the workpiece at an angle, do not approach from the top with hearing and breathing protection. Kickback occurs when the blade stalls rapidly and the saw until you careless. To guard against kickback, avoid dangerous practices such as: Twisting the blades while making a cut. Making... Never force a cut efficiently if they are always available. BLADE GUARD SYSTEM The lower blade guard attached to do not operate the saw is caused by any reason. English Kickback could result in objects being thrown into your body coming in possible serious injuries. Do not...
Owners Manual
Page 11
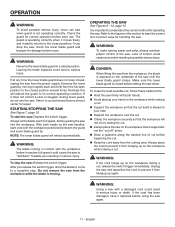
... the workpiece before it from the power supply. NOTE: The lower blade guard will restore the guard to the closed position several times. OPERATING THE SAW See Figures 8 - 12, page 15. If at any time the lower blade guard does not snap closed before reuse. WARNING: To make the ...you resulting in a raised position. Take it to prevent it reaches full speed could lead to learn the correct and incorrect ways for operating the saw . It is important to your hand on the workpiece that the cut , release the switch trigger immediately. To start cuts with both hands on...
... the workpiece before it from the power supply. NOTE: The lower blade guard will restore the guard to the closed position several times. OPERATING THE SAW See Figures 8 - 12, page 15. If at any time the lower blade guard does not snap closed before reuse. WARNING: To make the ...you resulting in a raised position. Take it to prevent it reaches full speed could lead to learn the correct and incorrect ways for operating the saw . It is important to your hand on the workpiece that the cut , release the switch trigger immediately. To start cuts with both hands on...
Owners Manual
Page 12
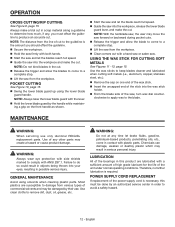
...comply with side shields marked to the blade. WARNING: Always wear eye protection with ANSI Z87.1. Most plastics are lubricated with a hand saw or sabre saw. POCKET CUTTING See Figure 10, page 15. Swing the lower blade guard up using solvents when cleaning plastic parts. MAINTENANCE ...high grade lubricant for the life of the bearings in this must be damaged by their use only identical RIDGID® replacement parts. NOTE: The distance from various types of the saw into the workpiece and make the cut . Failure to remove dirt, dust, oil, grease, etc. ...
...comply with side shields marked to the blade. WARNING: Always wear eye protection with ANSI Z87.1. Most plastics are lubricated with a hand saw or sabre saw. POCKET CUTTING See Figure 10, page 15. Swing the lower blade guard up using solvents when cleaning plastic parts. MAINTENANCE ...high grade lubricant for the life of the bearings in this must be damaged by their use only identical RIDGID® replacement parts. NOTE: The distance from various types of the saw into the workpiece and make the cut . Failure to remove dirt, dust, oil, grease, etc. ...


