User Guide
Page 3
...13 Connection: DVD/VCR + TV + Satellite Receiver.......... 15 Connection: DVD/VCR + TV + Basic Cable Box + Audio Receiver 17 Install Batteries in the Remote 19 Point the Remote in the Right Direction 19 Turn on the TV and DVD/VCR 19 Complete the Interactive Setup 19 Setting the Clock 20 Setting the... to Expect 21 Turn on the DVD recorder to Watch TV 21 Discs for Recording 21 Next Steps 22 Explanation of the Remote Control Buttons 23 Using the Remote's Features 24 Understanding the INPUT button 24 The Channel Banner 24 DVD Recording 25 DISCS THAT YOU CAN USE FOR RECORDING ............
...13 Connection: DVD/VCR + TV + Satellite Receiver.......... 15 Connection: DVD/VCR + TV + Basic Cable Box + Audio Receiver 17 Install Batteries in the Remote 19 Point the Remote in the Right Direction 19 Turn on the TV and DVD/VCR 19 Complete the Interactive Setup 19 Setting the Clock 20 Setting the... to Expect 21 Turn on the DVD recorder to Watch TV 21 Discs for Recording 21 Next Steps 22 Explanation of the Remote Control Buttons 23 Using the Remote's Features 24 Understanding the INPUT button 24 The Channel Banner 24 DVD Recording 25 DISCS THAT YOU CAN USE FOR RECORDING ............

User Guide
Page 5
Unpack the Box Your DVD/VCR came with the following items: DVD/VCR recorder Remote control and batteries RF Coaxial cable 1 set of audio video cables Graphics contained within this book show each cable separately (audio left, audio right, and video). Graphics contained within this publication are for representation only. 3 Chapter 1: Connections and Setup Connection Pictures Audio/video cables are usually bundled together. For better visibility, the connection pictures in this publication are for representation only.
Unpack the Box Your DVD/VCR came with the following items: DVD/VCR recorder Remote control and batteries RF Coaxial cable 1 set of audio video cables Graphics contained within this book show each cable separately (audio left, audio right, and video). Graphics contained within this publication are for representation only. 3 Chapter 1: Connections and Setup Connection Pictures Audio/video cables are usually bundled together. For better visibility, the connection pictures in this publication are for representation only.
User Guide
Page 12
... Tune the DVD recorder to the channel you want to its Input 1 channel or Vid 1 channel. Use the buttons on the TV (or the TV's remote control*) to tune the TV to the channel you want to watch a program on the TV to channel 8 to page 22. 10 Graphics contained within...
... Tune the DVD recorder to the channel you want to its Input 1 channel or Vid 1 channel. Use the buttons on the TV (or the TV's remote control*) to tune the TV to the channel you want to watch a program on the TV to channel 8 to page 22. 10 Graphics contained within...

User Guide
Page 13
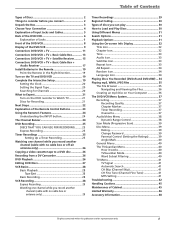
... to the TV You need to connect cables from the DVD recorder's OUTPUT jacks to the TV's INPUT jacks in order to see on the remote to page 5. For more explanation, go to toggle between progressive scan and interlace. 3. It is important to make this publication are usually color-coded red...
... to the TV You need to connect cables from the DVD recorder's OUTPUT jacks to the TV's INPUT jacks in order to see on the remote to page 5. For more explanation, go to toggle between progressive scan and interlace. 3. It is important to make this publication are usually color-coded red...

User Guide
Page 15
... the DVD recorder, you can achieve even greater picture quality (DVD playback only) by connecting the DVD recorder to the RF OUT jack on the remote to page 5.
... the DVD recorder, you can achieve even greater picture quality (DVD playback only) by connecting the DVD recorder to the RF OUT jack on the remote to page 5.

User Guide
Page 16
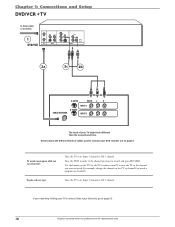
.... Tune the DVD recorder to the INPUT 1 channel (press the SOURCE button on : To watch TV (satellite programming) with the DVD Recorder turned on the remote). Tune the satellite receiver to the channel you want to watch. Tune the TV to its Input 1 channel or Vid 1 channel. Details about the different...
.... Tune the DVD recorder to the INPUT 1 channel (press the SOURCE button on : To watch TV (satellite programming) with the DVD Recorder turned on the remote). Tune the satellite receiver to the channel you want to watch. Tune the TV to its Input 1 channel or Vid 1 channel. Details about the different...
User Guide
Page 17
... jack on the back of your TV is important to the TV using the COMPONENT VIDEO OUT jacks, and press the PSCAN button on the remote to the Video Input jack on different satellite receivers and televisions, the steps provided are usually color-coded red, white, and yellow. Notes: If your...
... jack on the back of your TV is important to the TV using the COMPONENT VIDEO OUT jacks, and press the PSCAN button on the remote to the Video Input jack on different satellite receivers and televisions, the steps provided are usually color-coded red, white, and yellow. Notes: If your...

User Guide
Page 20
Plug the power cord into an AC outlet. Go to toggle between progressive scan and interlace. 4. Chapter 1: Connections and Setup Notes: If your TV is capable of progressive scan, connect the DVD recorder to the TV using the COMPONENT VIDEO OUT jacks, and press the PSCAN button on the remote to page 19 18 Graphics contained within this publication are for representation only.
Plug the power cord into an AC outlet. Go to toggle between progressive scan and interlace. 4. Chapter 1: Connections and Setup Notes: If your TV is capable of progressive scan, connect the DVD recorder to the TV using the COMPONENT VIDEO OUT jacks, and press the PSCAN button on the remote to page 19 18 Graphics contained within this publication are for representation only.
User Guide
Page 21
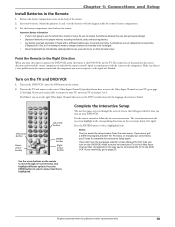
...buttons move , get a different program provider for representation only. 19 Important Battery Information • If you're not going to use the remote for help , go to the Video Input Channel that will appear the first time you 'll need help ). If you used coaxial...in the correct direction and toward the correct component in the proper manner, according to be recharged. • Discard leaky batteries immediately. The remote has to federal, state, and local regulations. • Any battery may leak electrolyte if mixed with a different battery type, if inserted incorrectly...
...buttons move , get a different program provider for representation only. 19 Important Battery Information • If you're not going to use the remote for help , go to the Video Input Channel that will appear the first time you 'll need help ). If you used coaxial...in the correct direction and toward the correct component in the proper manner, according to be recharged. • Discard leaky batteries immediately. The remote has to federal, state, and local regulations. • Any battery may leak electrolyte if mixed with a different battery type, if inserted incorrectly...
User Guide
Page 24
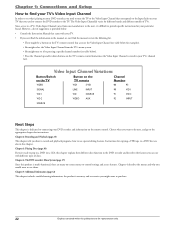
... Consult the Instruction Manual that came with different types of TVs. Video Input Channel Variations Button/Switch on the TV Button on the TV remote Channel Number VIDEO VID1 S-VID 00 93 SIGNAL LINE INPUT 90 VID 1 VID 1 VID SOURCE 91 VID 2 VID 2 VIDEO AUX ...Chapter 5: Additional Information (page 42) This chapter includes troubleshooting information, the product's warranty, and accessories you might be a button on the TV's remote control that you can't find the information in the manual, or can't find the manual, review the following list. • There...
... Consult the Instruction Manual that came with different types of TVs. Video Input Channel Variations Button/Switch on the TV Button on the TV remote Channel Number VIDEO VID1 S-VID 00 93 SIGNAL LINE INPUT 90 VID 1 VID 1 VID SOURCE 91 VID 2 VID 2 VIDEO AUX ...Chapter 5: Additional Information (page 42) This chapter includes troubleshooting information, the product's warranty, and accessories you might be a button on the TV's remote control that you can't find the information in the manual, or can't find the manual, review the following list. • There...

User Guide
Page 25
Many buttons will perform different functions depending upon the type of disc and menu functions of the Remote Control Buttons (in the channels list. left arrow moves the highlight left , right) Use the arrow buttons to highlight options that follow describe how each .... UP Goes to the next channel in slow motion. DOWN When watching TV, goes to the previous channel in alphabetical order) You can use this remote to operate the DVD/VCR, and to access the features available. COUNTER RESET Resets the tape counter to quickly access the Timer Recordings list or...
Many buttons will perform different functions depending upon the type of disc and menu functions of the Remote Control Buttons (in the channels list. left arrow moves the highlight left , right) Use the arrow buttons to highlight options that follow describe how each .... UP Goes to the next channel in slow motion. DOWN When watching TV, goes to the previous channel in alphabetical order) You can use this remote to operate the DVD/VCR, and to access the features available. COUNTER RESET Resets the tape counter to quickly access the Timer Recordings list or...

User Guide
Page 26
... sent by using the S-VIDEO IN jack on the front of the disc. The Channel Banner While watching TV, press DISPLAY on the remote control to see the program it is the SOURCE button. BOOKMARK Creates a bookmark for representation only. PAUSE/STEP Pauses tape playback or recording...pre-recorded disc when it works with DVD discs and CD-Rs with this button. Using the Remote's Features Understanding the SOURCE button Another important button is automatically detected. AUDIO Puts the remote in the disc. DVD MENU Brings up the disc edit menu. MUTE Mutes the sound. Also...
... sent by using the S-VIDEO IN jack on the front of the disc. The Channel Banner While watching TV, press DISPLAY on the remote control to see the program it is the SOURCE button. BOOKMARK Creates a bookmark for representation only. PAUSE/STEP Pauses tape playback or recording...pre-recorded disc when it works with DVD discs and CD-Rs with this button. Using the Remote's Features Understanding the SOURCE button Another important button is automatically detected. AUDIO Puts the remote in the disc. DVD MENU Brings up the disc edit menu. MUTE Mutes the sound. Also...
User Guide
Page 27
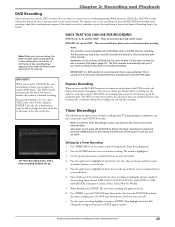
...;nalize a disc later, press TITLE, then select Finalize and press ENTER. The DVD recorder will need to the maximum limit. Do NOT turn on the remote. The Timer Recording menu, with DVD-RAM, CD-R, or CD-RW discs for the amount of the recording may need to remember to press the... DVD/VCR into the DVD recorder's disc tray, there are returned to TV viewing. Express Recording When you press the RECORD button on the remote or on the remote control to the correct time and date. Note: In order for the timer recording, including the minutes, length of the DVD recorder, the...
...;nalize a disc later, press TITLE, then select Finalize and press ENTER. The DVD recorder will need to the maximum limit. Do NOT turn on the remote. The Timer Recording menu, with DVD-RAM, CD-R, or CD-RW discs for the amount of the recording may need to remember to press the... DVD/VCR into the DVD recorder's disc tray, there are returned to TV viewing. Express Recording When you press the RECORD button on the remote or on the remote control to the correct time and date. Note: In order for the timer recording, including the minutes, length of the DVD recorder, the...
User Guide
Page 28
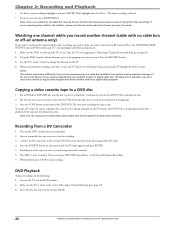
...appropriate Video Input Channel (if you need to make sure it's cued up or rewound to the ANTENNA/CABLE OUTPUT jack on . Use the TV's remote control to record. Notes: This feature might work differently if you receive programming via a satellite receiver or digital cable box, this publication are for the... to disc, you want to page 22). 3. Press the COPY button on the TV. 4. Press REC to the recorder's DV IN jack on the remote until the DV input appears and press ENTER. 5. Insert the disc you record another satellite or digital cable program. Find the part of the unit...
...appropriate Video Input Channel (if you need to make sure it's cued up or rewound to the ANTENNA/CABLE OUTPUT jack on . Use the TV's remote control to record. Notes: This feature might work differently if you receive programming via a satellite receiver or digital cable box, this publication are for the... to disc, you want to page 22). 3. Press the COPY button on the TV. 4. Press REC to the recorder's DV IN jack on the remote until the DV input appears and press ENTER. 5. Insert the disc you record another satellite or digital cable program. Find the part of the unit...

User Guide
Page 29
... DVD±RW disc you recorded using the DVD recorder. Choose to erase one title or all titles. • A-B Erase Erases the A-B points on the remote. In order for a DVD±R disc to be edited. While playing the disc, press the TITLE button on a DVD±RW disc (or a DVD±...
... DVD±RW disc you recorded using the DVD recorder. Choose to erase one title or all titles. • A-B Erase Erases the A-B points on the remote. In order for a DVD±R disc to be edited. While playing the disc, press the TITLE button on a DVD±RW disc (or a DVD±...

User Guide
Page 30
...to begin recording. 3. To resume recording, press the RECORD button on a tape if the safety tab has been removed. You cannot record on the remote control. The quickest way to start recording is a tape in the DVD/VCR with adhesive tape. Note: The DVD/VCR supports Macrovision and won't ... you want to halt recording. Press the STOP button to pause the recording for representation only. If you just want to make changes, use the remote to record programming. To move one frame. • Press the TRK+/- Chapter 2: Recording and Playback VCR Basics The VCR part of your DVD/...
...to begin recording. 3. To resume recording, press the RECORD button on a tape if the safety tab has been removed. You cannot record on the remote control. The quickest way to start recording is a tape in the DVD/VCR with adhesive tape. Note: The DVD/VCR supports Macrovision and won't ... you want to halt recording. Press the STOP button to pause the recording for representation only. If you just want to make changes, use the remote to record programming. To move one frame. • Press the TRK+/- Chapter 2: Recording and Playback VCR Basics The VCR part of your DVD/...

User Guide
Page 31
... and select Cancel in the Express Recording screen. Tune the TV to the appropriate Video Input Channel (if you press the RECORD button on the remote or on . Put a tape with your DVD/VCR operates your TV, use the channel up Timer Recordings. For the duration, each time you... to the maximum limit. The DVD recorder will record for instructions to set up and down buttons to go to be connected): 1. If the remote that came with its Video Input Channel and watch another satellite or digital cable program. Graphics contained within this feature isn't available-you 've connected...
... and select Cancel in the Express Recording screen. Tune the TV to the appropriate Video Input Channel (if you press the RECORD button on the remote or on . Put a tape with your DVD/VCR operates your TV, use the channel up Timer Recordings. For the duration, each time you... to the maximum limit. The DVD recorder will record for instructions to set up and down buttons to go to be connected): 1. If the remote that came with its Video Input Channel and watch another satellite or digital cable program. Graphics contained within this feature isn't available-you 've connected...

User Guide
Page 32
... press the STOP button twice. ) How to Load and Play Discs Turn on the TV and your DVD recorder (press ON•OFF on the remote or press the STANDBY/ ON button on the DVD recorder). 1. Place a disc gently into the tray with this publication are compatible with the disc's label...
... press the STOP button twice. ) How to Load and Play Discs Turn on the TV and your DVD recorder (press ON•OFF on the remote or press the STANDBY/ ON button on the DVD recorder). 1. Place a disc gently into the tray with this publication are compatible with the disc's label...
User Guide
Page 33
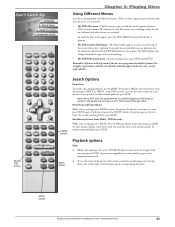
... fastest scan speed. For example, if you choose subtitles, the subtitles will only appear if the disc was created with the DISPLAY button on the remote. or SKIP R., your DVD recorder scans the disc faster until you 're playing a disc, press STOP and SETUP. Each time you get a little faster until...
... fastest scan speed. For example, if you choose subtitles, the subtitles will only appear if the disc was created with the DISPLAY button on the remote. or SKIP R., your DVD recorder scans the disc faster until you 're playing a disc, press STOP and SETUP. Each time you get a little faster until...

User Guide
Page 34
... won 't work if the disc isn't formatted with different camera angles). While a disc is illustrated with the right arrow button on the remote to enter the title/track number. The movie starts playing at the beginning of chapter there are added according to scroll through the different icons...the disc (for the disc you entered. Title Chapter Time Audio Subtitles Repeat A-B Repeat Random Language Title Icon (on DVDs or a Track on the remote control. Notes: You can also use digital technology, a title can only access the Info Display when you 're playing a VCD or an Audio ...
... won 't work if the disc isn't formatted with different camera angles). While a disc is illustrated with the right arrow button on the remote to enter the title/track number. The movie starts playing at the beginning of chapter there are added according to scroll through the different icons...the disc (for the disc you entered. Title Chapter Time Audio Subtitles Repeat A-B Repeat Random Language Title Icon (on DVDs or a Track on the remote control. Notes: You can also use digital technology, a title can only access the Info Display when you 're playing a VCD or an Audio ...
