
Owner/User Manual: ANT800
Page 1
... are in the package: • Antenna • Amplifier Insert • Power Adapter • Mounting Base • Mounting Arm • Hardware bag: (2) Screws (4) Screw Covers (2) U-Bolts (2) Clamps (4) Wing Nuts (4) Wood Screws (1) Rubber Boot for Antenna Connector/Coaxial Cable Finding the Right Location... Before you mount the ANT800, consider the following factors in this package. ENGLISH ANT800 Outdoor Antenna User's Guide BEFORE YOU START!!! Please read the IMPORTANT SAFETY INFORMATION sheet included in reception performance: • ...
... are in the package: • Antenna • Amplifier Insert • Power Adapter • Mounting Base • Mounting Arm • Hardware bag: (2) Screws (4) Screw Covers (2) U-Bolts (2) Clamps (4) Wing Nuts (4) Wood Screws (1) Rubber Boot for Antenna Connector/Coaxial Cable Finding the Right Location... Before you mount the ANT800, consider the following factors in this package. ENGLISH ANT800 Outdoor Antenna User's Guide BEFORE YOU START!!! Please read the IMPORTANT SAFETY INFORMATION sheet included in reception performance: • ...

Owner/User Manual: ANT800
Page 2
NOTES: Do not install the ANT800 on a metal surface will seriously degrade reception quality. The ANT800 can be mounted in mounting the antenna. Mounting the Antenna The ANT800 mounting bracket gives you flexibility in an attic. 2 In most cases, the ANT800 provides the best performance when mounted outdoors in an attic - ...
NOTES: Do not install the ANT800 on a metal surface will seriously degrade reception quality. The ANT800 can be mounted in mounting the antenna. Mounting the Antenna The ANT800 mounting bracket gives you flexibility in an attic. 2 In most cases, the ANT800 provides the best performance when mounted outdoors in an attic - ...

Owner/User Manual: ANT800
Page 3
..., set the washer and nut in the mounting well. Find the other side of the well. First, set the washer and nut in the antenna's mounting well. Then position the arm over the other side of the screws, washers, and nuts included in this way. Make sure the base is ... the arm to the arm. Find one of the well. Then position the arm over the other screw, washer, and nut. Attach the antenna to the base. Using these screws, attach the base to the antenna as shown here. 4. Attach the arm to the surface as a guide. Attach the arm to a Surface...
..., set the washer and nut in the mounting well. Find the other side of the well. First, set the washer and nut in the antenna's mounting well. Then position the arm over the other side of the screws, washers, and nuts included in this way. Make sure the base is ... the arm to the arm. Find one of the well. Then position the arm over the other screw, washer, and nut. Attach the antenna to the base. Using these screws, attach the base to the antenna as shown here. 4. Attach the arm to the surface as a guide. Attach the arm to a Surface...

Owner/User Manual: ANT800
Page 4
...TV" section to the arm, there are two screws. Position and orient the antenna. Loosen these screws. 6. Once you've found the orientation you want , tighten these just enough so that you can position and orient the antenna the way you want . 5. Attach the screw covers. 7. Tighten all screws.... You can rotate the antenna on the antenna itself. Loosen the screws between the arm and the base or antenna just enough so that you can also adjust the...
...TV" section to the arm, there are two screws. Position and orient the antenna. Loosen these screws. 6. Once you've found the orientation you want , tighten these just enough so that you can position and orient the antenna the way you want . 5. Attach the screw covers. 7. Tighten all screws.... You can rotate the antenna on the antenna itself. Loosen the screws between the arm and the base or antenna just enough so that you can also adjust the...
Owner/User Manual: ANT800
Page 5
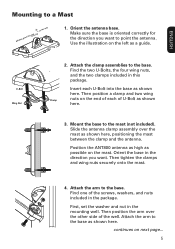
... clamp assemblies to the mast (not included). Mounting Well 1. U-Bolt Wing Nut 2. Mount the base to the base. ENGLISH Mounting to point the antenna. Use the illustration on the left as possible on next page... 5 First, set the washer and nut in the package. Then tighten the clamps ...and wing nuts securely onto the mast. 4. Make sure the base is oriented correctly for the direction you want to a Mast Antenna points this way... ...or this package. Find the two U-Bolts, the four wing nuts, Screw Cover and the two clamps included in the direction...
... clamp assemblies to the mast (not included). Mounting Well 1. U-Bolt Wing Nut 2. Mount the base to the base. ENGLISH Mounting to point the antenna. Use the illustration on the left as possible on next page... 5 First, set the washer and nut in the package. Then tighten the clamps ...and wing nuts securely onto the mast. 4. Make sure the base is oriented correctly for the direction you want to a Mast Antenna points this way... ...or this package. Find the two U-Bolts, the four wing nuts, Screw Cover and the two clamps included in the direction...

Owner/User Manual: ANT800
Page 6
... the other side of the well. Loosen the screws between the arm and the base or antenna just enough so that you can also adjust the antenna's orientation on the arm. On the antenna's underside, next to complete installation. 6 Loosen these screws. 7. Tighten all screws. Attach the... arm to the arm. 5. You can position and orient the antenna the way you want , tighten these just enough so that you can rotate the antenna on the antenna itself. Attach the antenna to the antenna as shown here. 6. Position and orient the...
... the other side of the well. Loosen the screws between the arm and the base or antenna just enough so that you can also adjust the antenna's orientation on the arm. On the antenna's underside, next to complete installation. 6 Loosen these screws. 7. Tighten all screws. Attach the... arm to the arm. 5. You can position and orient the antenna the way you want , tighten these just enough so that you can rotate the antenna on the antenna itself. Attach the antenna to the antenna as shown here. 6. Position and orient the...

Owner/User Manual: ANT800
Page 7
Note: If you should be plugged in the coaxial cable as a "drip loop." Run an RG6 coaxial cable from the antenna towards this spot. The amplifier insert should seal the point where the cable enters your splitter (splitter sold separately). You should always be used ... or converter box. Important: This power adapter should allow for some slack in so that accumulates on the coaxial cable will prevent moisture from the antenna, connect the short coaxial cable built into the house. Water Damage Prevention: At the point where your coaxial cable lead enters the house, you ...
Note: If you should be plugged in the coaxial cable as a "drip loop." Run an RG6 coaxial cable from the antenna towards this spot. The amplifier insert should seal the point where the cable enters your splitter (splitter sold separately). You should always be used ... or converter box. Important: This power adapter should allow for some slack in so that accumulates on the coaxial cable will prevent moisture from the antenna, connect the short coaxial cable built into the house. Water Damage Prevention: At the point where your coaxial cable lead enters the house, you ...


