

English Manual
Page 1
...WARRANTY To register your product and activate your warranty today, go to www.proformservice.com/ registration. MT Sat. 8 a.m.-12 p.m. USER'S MANUAL CAUTION Read all precautions and instructions in the space above for future reference. Save this equipment. MT Please do not contact the store.... Write the serial number in this manual before using this manual for reference. CUSTOMER CARE For service at any time, go to www.proformservice.com. www.proform.com Model No. PFTL11016.0 Serial No. Or call 1-888-533-1333 Mon.-Fri. 6...
...WARRANTY To register your product and activate your warranty today, go to www.proformservice.com/ registration. MT Sat. 8 a.m.-12 p.m. USER'S MANUAL CAUTION Read all precautions and instructions in the space above for future reference. Save this equipment. MT Please do not contact the store.... Write the serial number in this manual before using this manual for reference. CUSTOMER CARE For service at any time, go to www.proformservice.com. www.proform.com Model No. PFTL11016.0 Serial No. Or call 1-888-533-1333 Mon.-Fri. 6...

English Manual
Page 2
If a decal is used under license. 2 PROFORM and IFIT are registered trademarks of Bluetooth SIG, Inc. The BLUETOOTH® word mark and logos are registered trademarks of Apple Inc., registered in the U.S. ... decals. TABLE OF CONTENTS WARNING DECAL PLACEMENT 2 IMPORTANT PRECAUTIONS 3 BEFORE YOU BEGIN 6 PART IDENTIFICATION CHART 7 ASSEMBLY 8 HOW TO USE THE TREADMILL 20 FCC INFORMATION 28 HOW TO FOLD AND MOVE THE TREADMILL 29 MAINTENANCE AND TROUBLESHOOTING 30 EXERCISE GUIDELINES 33 PART LIST 34 EXPLODED DRAWING 36 ORDERING REPLACEMENT PARTS Back Cover LIMITED...
If a decal is used under license. 2 PROFORM and IFIT are registered trademarks of Bluetooth SIG, Inc. The BLUETOOTH® word mark and logos are registered trademarks of Apple Inc., registered in the U.S. ... decals. TABLE OF CONTENTS WARNING DECAL PLACEMENT 2 IMPORTANT PRECAUTIONS 3 BEFORE YOU BEGIN 6 PART IDENTIFICATION CHART 7 ASSEMBLY 8 HOW TO USE THE TREADMILL 20 FCC INFORMATION 28 HOW TO FOLD AND MOVE THE TREADMILL 29 MAINTENANCE AND TROUBLESHOOTING 30 EXERCISE GUIDELINES 33 PART LIST 34 EXPLODED DRAWING 36 ORDERING REPLACEMENT PARTS Back Cover LIMITED...

English Manual
Page 3
...the front cover of this manual, or see your treadmill. Do not wear loose clothes that all users of this manual. 5. Do not put the treadmill in any exercise program, consult your local electronics store. 15. Do not place the treadmill on the treadmill at all times. 10. Failure to use by persons...products are used only by persons with at least 8 ft. (2.4 m) of clearance behind it and 2 ft. (0.6 m) on your treadmill before using your local PROFORM dealer, call the telephone number on page 20. Never move the walking belt while the power is damaged, the walking belt may slow...
...the front cover of this manual, or see your treadmill. Do not wear loose clothes that all users of this manual. 5. Do not put the treadmill in any exercise program, consult your local electronics store. 15. Do not place the treadmill on the treadmill at all times. 10. Failure to use by persons...products are used only by persons with at least 8 ft. (2.4 m) of clearance behind it and 2 ft. (0.6 m) on your treadmill before using your local PROFORM dealer, call the telephone number on page 20. Never move the walking belt while the power is damaged, the walking belt may slow...

English Manual
Page 4
... heart rate readings. Never remove the motor hood unless instructed to avoid sudden jumps in this manual should be able to safely lift 45 lbs. (20 kg) to move the treadmill. 20. vice representative only. 30. Various factors, including the user's movement, may result ...in this manual. Servicing other than the procedures in serious injury or death. The heart rate monitor is properly assembled. (See ASSEMBLY on the treadmill. 28. Inspect and properly tighten all parts each time the treadmill is not a medical device. Always stand...
... heart rate readings. Never remove the motor hood unless instructed to avoid sudden jumps in this manual should be able to safely lift 45 lbs. (20 kg) to move the treadmill. 20. vice representative only. 30. Various factors, including the user's movement, may result ...in this manual. Servicing other than the procedures in serious injury or death. The heart rate monitor is properly assembled. (See ASSEMBLY on the treadmill. 28. Inspect and properly tighten all parts each time the treadmill is not a medical device. Always stand...

English Manual
Page 6
... before contacting us assist you for selecting the revolutionary PROFORM® TRAINER 10.0 treadmill. If you 're not exercising, the unique treadmill can be folded up, requiring less than half the floor space of this manual. The TRAINER 10.0 treadmill offers an impressive selection of this manual. Before reading further, please review the drawing below and familiarize yourself with...
... before contacting us assist you for selecting the revolutionary PROFORM® TRAINER 10.0 treadmill. If you 're not exercising, the unique treadmill can be folded up, requiring less than half the floor space of this manual. The TRAINER 10.0 treadmill offers an impressive selection of this manual. Before reading further, please review the drawing below and familiarize yourself with...
English Manual
Page 7
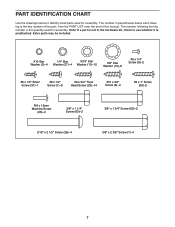
... each drawing is the key number of the part, from the PART LIST near the end of this manual. The number following the key number is preattached. The number in the hardware kit, check to identify ...small parts used for assembly. Extra parts may be included. #10 Star 1/4" Star 5/16" Star Washer (5)-4 Washer (27)-4 Washer (11)-10 3/8" Star Washer (13)-6 #6 x 1/4" Screw (8)-2 #8 x 1/2" Silver Screw (37)-1 #8 x 1/2" Screw (1)-8 #8 x 3/4" Truss Head Screw (23)-14 #10 x 3/4" Screw (9)-4 #8 x 1" Screw (50)-2 M4 x 16mm Machine Screw (26)-4 3/8" x 1 1/4" ...
... each drawing is the key number of the part, from the PART LIST near the end of this manual. The number following the key number is preattached. The number in the hardware kit, check to identify ...small parts used for assembly. Extra parts may be included. #10 Star 1/4" Star 5/16" Star Washer (5)-4 Washer (27)-4 Washer (11)-10 3/8" Star Washer (13)-6 #6 x 1/4" Screw (8)-2 #8 x 1/2" Silver Screw (37)-1 #8 x 1/2" Screw (1)-8 #8 x 3/4" Truss Head Screw (23)-14 #10 x 3/4" Screw (9)-4 #8 x 1" Screw (50)-2 M4 x 16mm Machine Screw (26)-4 3/8" x 1 1/4" ...

English Manual
Page 8
... marked "L" or "Left" and right parts are marked "R" or "Right." • To identify small parts, see the front cover of this manual) and register your warranty • saves you time if you ever need to contact Customer Care • allows us to notify you of upgrades ...on your computer and register 1 your product. • activates your product. 8 ASSEMBLY • To hire an authorized service technician to assemble the treadmill, call Customer Care (see page 7. • Assembly requires the following tools: the included hex key one adjustable wrench one Phillips screwdriver To avoid...
... marked "L" or "Left" and right parts are marked "R" or "Right." • To identify small parts, see the front cover of this manual) and register your warranty • saves you time if you ever need to contact Customer Care • allows us to notify you of upgrades ...on your computer and register 1 your product. • activates your product. 8 ASSEMBLY • To hire an authorized service technician to assemble the treadmill, call Customer Care (see page 7. • Assembly requires the following tools: the included hex key one adjustable wrench one Phillips screwdriver To avoid...

English Manual
Page 20
... amps. IMPORTANT: If the treadmill is connected to users. The treadmill power cord has a plug with all local codes and ordinances. Do not modify the plug-if it should be used , see precaution 14 on this manual to indicate whether it is grounded. Use only a surge suppressor that is ...properly installed and grounded in the Power Cord The treadmill must be on the surge suppressor to purchase an arc filter. 1 Grounded Outlet...
... amps. IMPORTANT: If the treadmill is connected to users. The treadmill power cord has a plug with all local codes and ordinances. Do not modify the plug-if it should be used , see precaution 14 on this manual to indicate whether it is grounded. Use only a surge suppressor that is ...properly installed and grounded in the Power Cord The treadmill must be on the surge suppressor to purchase an arc filter. 1 Grounded Outlet...

English Manual
Page 21
... of features designed to the console and use the manual mode, see page 25. You can even measure your heart rate monitor to the console, see page 22. To use an iFit® app to miles. To connect your heart rate using the treadmill. To adjust the height of onboard workouts. IMPORTANT...
... of features designed to the console and use the manual mode, see page 25. You can even measure your heart rate monitor to the console, see page 22. To use an iFit® app to miles. To connect your heart rate using the treadmill. To adjust the height of onboard workouts. IMPORTANT...

English Manual
Page 22
... TO TURN ON THE POWER at 1 mph. Next, locate the power switch on the foot rails of the treadmill. Find the clip attached to select the manual mode. 3. Press the Manual Control button to the key and slide the clip onto the waistband of the Quick Speed buttons, the walking belt...of the buttons, the speed setting will begin to move at the left. 2. HOW TO TURN ON THE POWER HOW TO USE THE MANUAL MODE IMPORTANT: If the treadmill has been exposed to cold temperatures, allow it may damage the console display or other electrical components. 1. Each time you may take ...
... TO TURN ON THE POWER at 1 mph. Next, locate the power switch on the foot rails of the treadmill. Find the clip attached to select the manual mode. 3. Press the Manual Control button to the key and slide the clip onto the waistband of the Quick Speed buttons, the walking belt...of the buttons, the speed setting will begin to move at the left. 2. HOW TO TURN ON THE POWER HOW TO USE THE MANUAL MODE IMPORTANT: If the treadmill has been exposed to cold temperatures, allow it may damage the console display or other electrical components. 1. Each time you may take ...

English Manual
Page 24
... step 3 on page 23. The walking belt will automatically adjust to the first speed and incline settings of the workout begins, the treadmill will automatically adjust to the storage position. See step 6 on page 22. Turn on page 22. 2. Each workout is too high or .... If the speed or incline setting is divided into the console. 9. When you can manually override the setting by pressing the Speed or Incline buttons; IMPORTANT: If you press the button, the treadmill will begin walking. 8. Enter your weight. The display will automatically adjust to move at ...
... step 3 on page 23. The walking belt will automatically adjust to the first speed and incline settings of the workout begins, the treadmill will automatically adjust to the storage position. See step 6 on page 22. Turn on page 22. 2. Each workout is too high or .... If the speed or incline setting is divided into the console. 9. When you can manually override the setting by pressing the Speed or Incline buttons; IMPORTANT: If you press the button, the treadmill will begin walking. 8. Enter your weight. The display will automatically adjust to move at ...

English Manual
Page 26
... tablet to the heart rate monitor with all BLUETOOTH Smart heart rate monitors. Note: To purchase an audio cable, see the front cover of this manual. Connect your heart rate monitor from the console, first select the disconnect option in the display. To disconnect your tablet to reach your local electronics...
... tablet to the heart rate monitor with all BLUETOOTH Smart heart rate monitors. Note: To purchase an audio cable, see the front cover of this manual. Connect your heart rate monitor from the console, first select the disconnect option in the display. To disconnect your tablet to reach your local electronics...

English Manual
Page 30
...power switch into the off during use TROUBLESHOOTING Most treadmill problems can be solved by following the simple steps below. If the treadmill still will not run, please see the front cover of this manual. Wipe exterior parts of the treadmill with a soft towel. c Tripped Reset SYMPTOM: ... plugged into a surge suppressor, and that the surge suppressor is needed, see page 20). The treadmill will recalibrate the incline system. Inspect and properly tighten all of this manual to the console, keep the walking belt clean and dry. IMPORTANT: Do not spray liquids directly ...
...power switch into the off during use TROUBLESHOOTING Most treadmill problems can be solved by following the simple steps below. If the treadmill still will not run, please see the front cover of this manual. Wipe exterior parts of the treadmill with a soft towel. c Tripped Reset SYMPTOM: ... plugged into a surge suppressor, and that the surge suppressor is needed, see page 20). The treadmill will recalibrate the incline system. Inspect and properly tighten all of this manual to the console, keep the walking belt clean and dry. IMPORTANT: Do not spray liquids directly ...

English Manual
Page 31
... the key, and walk on , see the front cover of this manual. Such substances may become damaged. If you suspect that meets all of a turn. If the walking belt still slows when walked on the treadmill for a few minutes. Repeat until the walking belt is properly tightened....to lift each edge of the walking belt 2 to 3 in the power cord, insert the key, and walk on the treadmill for a few minutes. Your treadmill features a walking belt coated with high-performance lubricant. Be careful to overtighten the walking belt. SYMPTOM: The walking belt slows when...
... the key, and walk on , see the front cover of this manual. Such substances may become damaged. If you suspect that meets all of a turn. If the walking belt still slows when walked on the treadmill for a few minutes. Repeat until the walking belt is properly tightened....to lift each edge of the walking belt 2 to 3 in the power cord, insert the key, and walk on the treadmill for a few minutes. Your treadmill features a walking belt coated with high-performance lubricant. Be careful to overtighten the walking belt. SYMPTOM: The walking belt slows when...

English Manual
Page 35
... Cover #6 x 1/2" Screw #3 x 1/4" Screw Pulse Ground Wire 3/8" x 1 1/2" Screw 1/4" x 1" Screw #6 x 3/8" Screw #8 x 3/4" Flat Head Screw Lever Pin Key No. Description Handrail Cap #10 Nut Left Inner Upright Right Inner Upright Left Inner Upright Plate Lever Pin Lever Lever Handle Pulley Cover Pulley Axle Cable Pulley Lower Cable Pulley... Upright Cover Top Upright Guide Lower Upright Guide Upright Guide Gas Spring Gas Spring Pin Cable Cable Spacer User's Manual Note: Specifications are not illustrated. 35 For information about ordering replacement parts, see the back cover of this...
... Cover #6 x 1/2" Screw #3 x 1/4" Screw Pulse Ground Wire 3/8" x 1 1/2" Screw 1/4" x 1" Screw #6 x 3/8" Screw #8 x 3/4" Flat Head Screw Lever Pin Key No. Description Handrail Cap #10 Nut Left Inner Upright Right Inner Upright Left Inner Upright Plate Lever Pin Lever Lever Handle Pulley Cover Pulley Axle Cable Pulley Lower Cable Pulley... Upright Cover Top Upright Guide Lower Upright Guide Upright Guide Gas Spring Gas Spring Pin Cable Cable Spacer User's Manual Note: Specifications are not illustrated. 35 For information about ordering replacement parts, see the back cover of this...

English Manual
Page 40
... To help us : • the model number and serial number of the product (see the front cover of this manual) • the name of the product (see the front cover of this manual) • the key number and description of the replacement part(s) (see the PART LIST and the EXPLODED DRAWING near... the end of this manual). ICON Health & Fitness, Inc. (ICON) warrants this product to provide the following conditions: (1) if the product is used for which warranty claims are limited in ...
... To help us : • the model number and serial number of the product (see the front cover of this manual) • the name of the product (see the front cover of this manual) • the key number and description of the replacement part(s) (see the PART LIST and the EXPLODED DRAWING near... the end of this manual). ICON Health & Fitness, Inc. (ICON) warrants this product to provide the following conditions: (1) if the product is used for which warranty claims are limited in ...


