

Uk Manual
Page 2
... WARNING DECAL PLACEMENT 2 IMPORTANT PRECAUTIONS 3 BEFORE YOU BEGIN 5 PART IDENTIFICATION CHART 6 ASSEMBLY 7 OPERATION AND ADJUSTMENT 13 HOW TO FOLD AND MOVE THE TREADMILL 21 TROUBLESHOOTING 22 EXERCISE GUIDELINES 25 PART LIST 26 EXPLODED DRAWING 28 ORDERING REPLACEMENT PARTS Back Cover RECYCLING INFORMATION Back Cover WARNING DECAL PLACEMENT This ... the location shown. If a decal is a registered trademark of ICON IP, Inc. 2 Note: The decals may not be shown at actual size. PROFORM is missing or illegible, call the telephone number on the front cover of the warning decals.
... WARNING DECAL PLACEMENT 2 IMPORTANT PRECAUTIONS 3 BEFORE YOU BEGIN 5 PART IDENTIFICATION CHART 6 ASSEMBLY 7 OPERATION AND ADJUSTMENT 13 HOW TO FOLD AND MOVE THE TREADMILL 21 TROUBLESHOOTING 22 EXERCISE GUIDELINES 25 PART LIST 26 EXPLODED DRAWING 28 ORDERING REPLACEMENT PARTS Back Cover RECYCLING INFORMATION Back Cover WARNING DECAL PLACEMENT This ... the location shown. If a decal is a registered trademark of ICON IP, Inc. 2 Note: The decals may not be shown at actual size. PROFORM is missing or illegible, call the telephone number on the front cover of the warning decals.

Uk Manual
Page 3
...cord is intended only as described in small increments to ensure that blocks air openings. Always hold the handrails while using the treadmill. Never use the treadmill in this manual and all users of this manual. 4. The heart rate monitor is needed, use of burns, fire,... a mat under age 12 and pets away from moisture and dust. Never allow more than 5 ft. (1.5 m). 14. Do not operate the treadmill where aerosol products are recommended for home use . 3 Before beginning any commercial, rental, or institutional setting. 5. This is no responsibility for persons ...
...cord is intended only as described in small increments to ensure that blocks air openings. Always hold the handrails while using the treadmill. Never use the treadmill in this manual and all users of this manual. 4. The heart rate monitor is needed, use of burns, fire,... a mat under age 12 and pets away from moisture and dust. Never allow more than 5 ft. (1.5 m). 14. Do not operate the treadmill where aerosol products are recommended for home use . 3 Before beginning any commercial, rental, or institutional setting. 5. This is no responsibility for persons ...

Uk Manual
Page 4
...Never insert any object into any opening on page 21.) You must be performed by placing objects under the treadmill. 24. Always unplug the power cord immediately after use, before performing the maintenance and adjustment procedures described in the storage position. 23. vice ...representative only. 27. SAVE THESE INSTRUCTIONS 4 When folding or moving the treadmill, make sure that the storage latch is properly assembled....
...Never insert any object into any opening on page 21.) You must be performed by placing objects under the treadmill. 24. Always unplug the power cord immediately after use, before performing the maintenance and adjustment procedures described in the storage position. 23. vice ...representative only. 27. SAVE THESE INSTRUCTIONS 4 When folding or moving the treadmill, make sure that the storage latch is properly assembled....

Uk Manual
Page 5
BEFORE YOU BEGIN Thank you use the treadmill. The PERFORMANCE 750 treadmill provides an impressive selection of this manual. Length: 6 ft. (183 cm) Width: 2 ft. 10 in the drawing below. For your workouts at home more effective ... front cover of this manual carefully before contacting us assist you, note the product model number and serial number before you for selecting the new PROFORM® PERFORMANCE 750 treadmill.
BEFORE YOU BEGIN Thank you use the treadmill. The PERFORMANCE 750 treadmill provides an impressive selection of this manual. Length: 6 ft. (183 cm) Width: 2 ft. 10 in the drawing below. For your workouts at home more effective ... front cover of this manual carefully before contacting us assist you, note the product model number and serial number before you for selecting the new PROFORM® PERFORMANCE 750 treadmill.

Uk Manual
Page 7
... a cleared area and remove the packing materials. Go to www.iconsupport.eu on the exterior of the treadmill. Make sure that the power cord is normal. If there is an oily substance on the treadmill, wipe it off with a soft cloth and a mild, non-abrasive cleaner. •• Left parts are marked...
... a cleared area and remove the packing materials. Go to www.iconsupport.eu on the exterior of the treadmill. Make sure that the power cord is normal. If there is an oily substance on the treadmill, wipe it off with a soft cloth and a mild, non-abrasive cleaner. •• Left parts are marked...

Uk Manual
Page 12
Orient the Storage Latch (56) so that all parts are properly tightened before you use the treadmill. Attach the upper end of the Storage Latch (56) to the Latch Crossbar (70)...). 12 Raise the Frame (55) to adjust the walking belt (see HOW TO LOWER THE TREADMILL FOR USE on the treadmill decals, remove the plastic. Make sure that the large barrel and the latch knob are sheets ... 45mm Bolt (5) and an M8 Nut (99). To protect the oor or carpet, place a mat under the treadmill. Note: Extra parts may be included. If there are in a secure place; Keep the included hex key in the ...
Orient the Storage Latch (56) so that all parts are properly tightened before you use the treadmill. Attach the upper end of the Storage Latch (56) to the Latch Crossbar (70)...). 12 Raise the Frame (55) to adjust the walking belt (see HOW TO LOWER THE TREADMILL FOR USE on the treadmill decals, remove the plastic. Make sure that the large barrel and the latch knob are sheets ... 45mm Bolt (5) and an M8 Nut (99). To protect the oor or carpet, place a mat under the treadmill. Note: Extra parts may be included. If there are in a secure place; Keep the included hex key in the ...

Uk Manual
Page 13
... it must be replaced with a manufacturer-recommended power cord. Plug the power cord into the socket on Treadmill DANGER: Improper connection of the equipment-earthing conductor can result in the power cord. 1. Socket on the treadmill. This product’'s power cord has an equipment-earthing conductor and an earthing plug. Plug the...
... it must be replaced with a manufacturer-recommended power cord. Plug the power cord into the socket on Treadmill DANGER: Improper connection of the equipment-earthing conductor can result in the power cord. 1. Socket on the treadmill. This product’'s power cord has an equipment-earthing conductor and an earthing plug. Plug the...

Uk Manual
Page 14
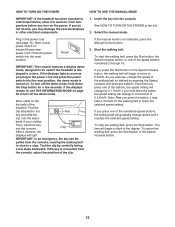
... the telephone number on page 20. To use an onboard workout, see page 15. Note: The console can change the speed and incline of the treadmill with the touch of features designed to your favorite workout music or audio books with your workout results, race against other iFit users, and access...page 24). 14 With the iFit mode, you use an iFit workout, see page 20. The console also features an iFit mode that enables the treadmill to communicate with the console’'s stereo sound system while you can display speed and distance in this manual. To turn on the console, remove...
... the telephone number on page 20. To use an onboard workout, see page 15. Note: The console can change the speed and incline of the treadmill with the touch of features designed to your favorite workout music or audio books with your workout results, race against other iFit users, and access...page 24). 14 With the iFit mode, you use an iFit workout, see page 20. The console also features an iFit mode that enables the treadmill to communicate with the console’'s stereo sound system while you can display speed and distance in this manual. To turn on the console, remove...
Uk Manual
Page 15
... will change the speed of your clothes. To turn on the power. Clip After a moment, the displays will light. Next, stand on the treadmill frame near the power cord. Test the clip by pressing the Speed increase and decrease buttons. If the manual mode is displayed in increments of... the treadmill. Next, locate the power switch on the foot rails of 0.5 Km/H. To stop . Find the clip attached to ash in the power ...
... will change the speed of your clothes. To turn on the power. Clip After a moment, the displays will light. Next, stand on the treadmill frame near the power cord. Test the clip by pressing the Speed increase and decrease buttons. If the manual mode is displayed in increments of... the treadmill. Next, locate the power switch on the foot rails of 0.5 Km/H. To stop . Find the clip attached to ash in the power ...
Uk Manual
Page 16
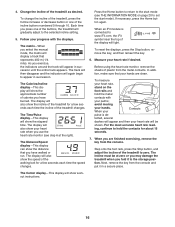
...Pulse display—-This display will gradually adjust to appear in a secure place. Before using the heart rate monitor, remove the sheets of the treadmill to the start mode). avoid moving your heart rate if desired. ing, continue to the storage position. The display will also show the incline...a few seconds each time the incline of the walking belt for about 15 seconds. 7. The display will also show the speed of the treadmill changes. For the most accurate heart rate read- Step onto the foot rails, press the Stop button, and adjust the incline of plastic ...
...Pulse display—-This display will gradually adjust to appear in a secure place. Before using the heart rate monitor, remove the sheets of the treadmill to the start mode). avoid moving your heart rate if desired. ing, continue to the storage position. The display will also show the incline...a few seconds each time the incline of the walking belt for about 15 seconds. 7. The display will also show the speed of the treadmill changes. For the most accurate heart rate read- Step onto the foot rails, press the Stop button, and adjust the incline of plastic ...

Uk Manual
Page 17
...into the console. Select an onboard workout. The time will begin to the speed and incline settings for a few seconds and the treadmill will continue in the display. Note: The calorie goal is too high or too low at 2 Km/H. The walking belt will ...burn during the workout, you select a distance workout, the workout will automatically adjust to ash in this , the treadmill’'s electrical components may be affected. IMPORTANT: If you are programmed for the current segment. The height of calories you select a distance workout...
...into the console. Select an onboard workout. The time will begin to the speed and incline settings for a few seconds and the treadmill will continue in the display. Note: The calorie goal is too high or too low at 2 Km/H. The walking belt will ...burn during the workout, you select a distance workout, the workout will automatically adjust to ash in this , the treadmill’'s electrical components may be affected. IMPORTANT: If you are programmed for the current segment. The height of calories you select a distance workout...

Uk Manual
Page 18
To view your heart rate if desired. To use an iFit workout, you will burn, and the name of the workout begins, the treadmill will automatically adjust to any time, press the Stop button. To purchase an iFit module at any other antenna or transmitter. Make sure that the ...
To view your heart rate if desired. To use an iFit workout, you will burn, and the name of the workout begins, the treadmill will automatically adjust to any time, press the Stop button. To purchase an iFit module at any other antenna or transmitter. Make sure that the ...
Uk Manual
Page 19
... the speed and incline for the workout. A moment after you will function in . Insert the key into the MP3 jack on the top of the treadmill during the workout. 3. See step 6 on the console. 19 Use the increase and decrease buttons next to the Enter button to a stop. If you are...
... the speed and incline for the workout. A moment after you will function in . Insert the key into the MP3 jack on the top of the treadmill during the workout. 3. See step 6 on the console. 19 Use the increase and decrease buttons next to the Enter button to a stop. If you are...

Uk Manual
Page 20
...console features a display demo mode, designed to be shown: The Time/Pulse display will show the total number of hours the treadmill has been used if the treadmill is selected, press the decrease button next to the Enter button to select each of measurement, press the Enter button. START MODE... lookup, the status of the displays. The Distance/Speed display will show the total number of kilometers or miles that keeps track of treadmill information and allows you remove the key, the CONTRAST LVL: Press the Incline increase and decrease buttons to adjust the contrast level of ...
...console features a display demo mode, designed to be shown: The Time/Pulse display will show the total number of hours the treadmill has been used if the treadmill is selected, press the decrease button next to the Enter button to select each of measurement, press the Enter button. START MODE... lookup, the status of the displays. The Distance/Speed display will show the total number of kilometers or miles that keeps track of treadmill information and allows you remove the key, the CONTRAST LVL: Press the Incline increase and decrease buttons to adjust the contrast level of ...

Uk Manual
Page 21
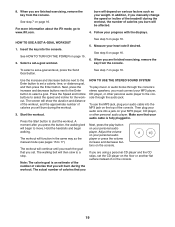
...downward a few inches, and release the latch knob. 2. Hold the metal frame rmly in the storage position. Raise the frame until the treadmill will roll on the wheels, and carefully move it as described at the left . See drawing 1 at the left. Hold the metal frame ...plastic foot rails. Bend your legs and keep your back straight. 21 Place one foot against a wheel, and carefully lower the treadmill. CAUTION: Do not move the treadmill without tipping it to the desired location. See drawing 2. If necessary, push the frame forward slightly. CAUTION: You must be ...
...downward a few inches, and release the latch knob. 2. Hold the metal frame rmly in the storage position. Raise the frame until the treadmill will roll on the wheels, and carefully move it as described at the left . See drawing 1 at the left. Hold the metal frame ...plastic foot rails. Bend your legs and keep your back straight. 21 Place one foot against a wheel, and carefully lower the treadmill. CAUTION: Do not move the treadmill without tipping it to the desired location. See drawing 2. If necessary, push the frame forward slightly. CAUTION: You must be ...

Uk Manual
Page 22
.... Remove the key from the console, and then reinsert it back in . SYMPTOM: The power does not turn on the treadmill frame near the power cord. Check the power switch located on a. d. Place the treadmill in , make sure that the key is inserted into a properly earthed outlet (see HOW TO FOLD THE... TREADMILL on page 21). SYMPTOM: The power turns off during use only a 3-conductor, 14-gauge (1 mm2) cord that the power cord is plugged into the console. ...
.... Remove the key from the console, and then reinsert it back in . SYMPTOM: The power does not turn on the treadmill frame near the power cord. Check the power switch located on a. d. Place the treadmill in , make sure that the key is inserted into a properly earthed outlet (see HOW TO FOLD THE... TREADMILL on page 21). SYMPTOM: The power turns off during use only a 3-conductor, 14-gauge (1 mm2) cord that the power cord is plugged into the console. ...

Uk Manual
Page 23
...mm). When the walking belt is properly tightened, you suspect that the gap between the Magnet and the Reed Switch is overtightened, treadmill performance may decrease and the walking belt may deteriorate the walking belt and cause excessive wear. IMPORTANT: Never apply silicone spray or other substances...of the Pulley (45). Reattach the Motor Hood (not shown) with the ve #8 x 3/4" Screws (not shown) and run the treadmill for a few minutes to the minimum level. When the incline is properly tightened. Hold down the Stop button and the Speed increase button, insert...
...mm). When the walking belt is properly tightened, you suspect that the gap between the Magnet and the Reed Switch is overtightened, treadmill performance may decrease and the walking belt may deteriorate the walking belt and cause excessive wear. IMPORTANT: Never apply silicone spray or other substances...of the Pulley (45). Reattach the Motor Hood (not shown) with the ve #8 x 3/4" Screws (not shown) and run the treadmill for a few minutes to the minimum level. When the incline is properly tightened. Hold down the Stop button and the Speed increase button, insert...

Uk Manual
Page 24
... the key and UNPLUG THE POWER CORD. Then, plug in the power cord, insert the key, and run the treadmill for a few minutes. SYMPTOM: The walking belt slips when walked on the treadmill for a few minutes. a a Foot Rails 24 When the walking belt is not centered between the foot rails. if the...
... the key and UNPLUG THE POWER CORD. Then, plug in the power cord, insert the key, and run the treadmill for a few minutes. SYMPTOM: The walking belt slips when walked on the treadmill for a few minutes. a a Foot Rails 24 When the walking belt is not centered between the foot rails. if the...


