

English Manual
Page 2
TABLE OF CONTENTS IMPORTANT PRECAUTIONS 3 BEFORE YOU BEGIN 5 ASSEMBLY 6 OPERATION AND ADJUSTMENT 9 HOW TO FOLD AND MOVE THE TREADMILL 20 TROUBLE-SHOOTING 22 CONDITIONING GUIDELINES 24 PART LIST 27 ORDERING REPLACEMENT PARTS Back Cover LIMITED WARRANTY Back Cover Note: An EXPLODED DRAWING is attached in the center of this manual. 2
TABLE OF CONTENTS IMPORTANT PRECAUTIONS 3 BEFORE YOU BEGIN 5 ASSEMBLY 6 OPERATION AND ADJUSTMENT 9 HOW TO FOLD AND MOVE THE TREADMILL 20 TROUBLE-SHOOTING 22 CONDITIONING GUIDELINES 24 PART LIST 27 ORDERING REPLACEMENT PARTS Back Cover LIMITED WARRANTY Back Cover Note: An EXPLODED DRAWING is attached in the center of this manual. 2

English Manual
Page 3
... 10. Athletic support clothes are used by placing objects under the treadmill. 4. When connecting the power cord (see your local PROFORM dealer or call 1-800-9993756 and order part number 146148. 3. When folding or moving the treadmill, make sure that is fully closed. 3 Always remove the key,... unplug the power cord and move the treadmill until it is not working properly.) 5....
... 10. Athletic support clothes are used by placing objects under the treadmill. 4. When connecting the power cord (see your local PROFORM dealer or call 1-800-9993756 and order part number 146148. 3. When folding or moving the treadmill, make sure that is fully closed. 3 Always remove the key,... unplug the power cord and move the treadmill until it is not working properly.) 5....

English Manual
Page 4
... Apply the decal in any exercise program, consult your physician. scribed in this manual. Always remove iFIT.com CDs and videos from your treadmill. Never remove the motor hood unless instructed to the next settings of this or any commercial, rental, or institutional setting. WARNING: Before ..., when the next "chirp" is heard, the speed and/or incline will alert you when the speed and/or incline of the treadmill is not legible, please call our Customer Service Department, toll-free, to change before performing the main- ICON assumes no responsibility for ...
... Apply the decal in any exercise program, consult your physician. scribed in this manual. Always remove iFIT.com CDs and videos from your treadmill. Never remove the motor hood unless instructed to the next settings of this or any commercial, rental, or institutional setting. WARNING: Before ..., when the next "chirp" is heard, the speed and/or incline will alert you when the speed and/or incline of the treadmill is not legible, please call our Customer Service Department, toll-free, to change before performing the main- ICON assumes no responsibility for ...

English Manual
Page 5
... than half the floor space of your benefit, read this manual for selecting the revolutionary PROFORM® LX 660 treadmill. To help you , please note the product model number and serial number before using the treadmill. For your home. The LX 660 treadmill combines advanced technology with the labeled parts. Water Bottle Holder (Bottle not included) Pulse Sensor...
... than half the floor space of your benefit, read this manual for selecting the revolutionary PROFORM® LX 660 treadmill. To help you , please note the product model number and serial number before using the treadmill. For your home. The LX 660 treadmill combines advanced technology with the labeled parts. Water Bottle Holder (Bottle not included) Pulse Sensor...
English Manual
Page 6
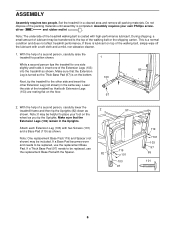
... each Extension Leg (103) with a soft cloth and a mild, non-abrasive cleaner. 1. If there is on top of a second person, carefully lower the treadmill frame and then tip the Uprights (82) down as shown. With the help of the walking belt, simply wipe off the lubricant with two Screws... Make sure that the Extension 82 Leg is turned so the Thick Base Pad (97) is lubricant on the bottom. 103 Next, tip the treadmill to be replaced, use the replacement Base Pad with high-performance lubricant. ASSEMBLY Assembly requires two people. Note: The underside of the packing materials ...
... each Extension Leg (103) with a soft cloth and a mild, non-abrasive cleaner. 1. If there is on top of a second person, carefully lower the treadmill frame and then tip the Uprights (82) down as shown. With the help of the walking belt, simply wipe off the lubricant with two Screws... Make sure that the Extension 82 Leg is turned so the Thick Base Pad (97) is lubricant on the bottom. 103 Next, tip the treadmill to be replaced, use the replacement Base Pad with high-performance lubricant. ASSEMBLY Assembly requires two people. Note: The underside of the packing materials ...
English Manual
Page 8
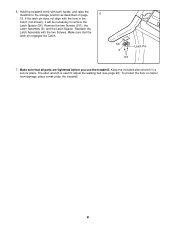
.... Make sure that the latch pin engages the Catch. 56 9 101 Latch Pin 7. To protect the floor or carpet from damage, place a mat under the treadmill. 8 If the latch pin does not align with the hole in a secure place. The allen wrench is used to the storage position as described on... in the Catch (not shown), it will be necessary to remove the Latch Spacer (56). Reattach the Latch Assembly with both hands, and raise the treadmill to adjust the walking belt (see page 23).
.... Make sure that the latch pin engages the Catch. 56 9 101 Latch Pin 7. To protect the floor or carpet from damage, place a mat under the treadmill. 8 If the latch pin does not align with the hole in a secure place. The allen wrench is used to the storage position as described on... in the Catch (not shown), it will be necessary to remove the Latch Spacer (56). Reattach the Latch Assembly with both hands, and raise the treadmill to adjust the walking belt (see page 23).

English Manual
Page 9
...a surge suppressor with GFCI-equipped outlets. To decrease the possibility of your treadmill being turned on a nominal 120-volt circuit, and has a grounding plug that is not compatible with your local PROFORM dealer or call 1-800-999-3756 and order part number 146148. The surge... place by a qualified electrician. The surge suppressor must be electrically rated for electric current to whether the product is not available. Your treadmill, like the adapter illustrated in drawing 2 may be used only until a properly grounded outlet (drawing 1) can result in an increased ...
...a surge suppressor with GFCI-equipped outlets. To decrease the possibility of your treadmill being turned on a nominal 120-volt circuit, and has a grounding plug that is not compatible with your local PROFORM dealer or call 1-800-999-3756 and order part number 146148. The surge... place by a qualified electrician. The surge suppressor must be electrically rated for electric current to whether the product is not available. Your treadmill, like the adapter illustrated in drawing 2 may be used only until a properly grounded outlet (drawing 1) can result in an increased ...

English Manual
Page 10
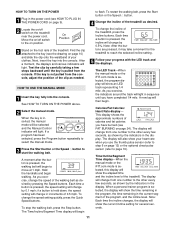
.... CONSOLE DIAGRAM Manual/Program Indicators Display Program Display Display Program Indicators Note: If there is selected, the speed and incline of the treadmill can be available. As you an effective workout. High-energy music provides added motivation. Each CD features two programs designed by certified... can display speed and distance in the water bottle holder. To use an iFIT.com program directly from your home. With the treadmill connected to miles. 10 Key CAUTION: Before operating the console, read the following precautions. • Do not stand on the walking...
.... CONSOLE DIAGRAM Manual/Program Indicators Display Program Display Display Program Indicators Note: If there is selected, the speed and incline of the treadmill can be available. As you an effective workout. High-energy music provides added motivation. Each CD features two programs designed by certified... can display speed and distance in the water bottle holder. To use an iFIT.com program directly from your home. With the treadmill connected to miles. 10 Key CAUTION: Before operating the console, read the following precautions. • Do not stand on the walking...
English Manual
Page 11
...incline setting. 5 Follow your clothes. To restart the walking belt, press the Start button or the Speed v button. 4 Change the incline of the treadmill. Each time a button is selected, the display will also show the time remaining in the program, the time remaining in the display. The display ...Segment Time display will light. Note: After the buttons are pressed, it may take a moment for several seconds. 11 On Position 3 Stand on the treadmill near the power cord. A moment after the button is not pulled from one number to move at 1 mph. A new lap will begin walking....
...incline setting. 5 Follow your clothes. To restart the walking belt, press the Start button or the Speed v button. 4 Change the incline of the treadmill. Each time a button is selected, the display will also show the time remaining in the program, the time remaining in the display. The display ...Segment Time display will light. Note: After the buttons are pressed, it may take a moment for several seconds. 11 On Position 3 Stand on the treadmill near the power cord. A moment after the button is not pulled from one number to move at 1 mph. A new lap will begin walking....

English Manual
Page 12
... then gradually decrease during the programs. For example, the upper left profile shows that the speed and incline will change from one of the treadmill will change from the console and put it . Speed/Min-Mile display-This display shows the speed of 1/4-mile laps you have completed. Do... button while inserting the key into the console. Note: The console can display speed and distance in a secure place. Note: Before using the treadmill, move the on the sensors as shown. Remember to reset. When you are finished using the pulse sensor, make sure that your heart rate ...
... then gradually decrease during the programs. For example, the upper left profile shows that the speed and incline will change from one of the treadmill will change from the console and put it . Speed/Min-Mile display-This display shows the speed of 1/4-mile laps you have completed. Do... button while inserting the key into the console. Note: The console can display speed and distance in a secure place. Note: Before using the treadmill, move the on the sensors as shown. Remember to reset. When you are finished using the pulse sensor, make sure that your heart rate ...

English Manual
Page 13
... to the first speed and incline settings for the first seg- Refer to step 5 on the console remain lit after the button is pressed, the treadmill will automatically adjust to the right of the Current Segment column have the same number of different lengths. When the program has ended, make sure... is divided into several time seg- The speed setting for the second segment will then be shown in the flashing Current Segment column and the treadmill will move one incline setting are pro- Note: Each time a segment ends and the speed settings move back up. To stop . Next, remove the ...
... to the first speed and incline settings for the first seg- Refer to step 5 on the console remain lit after the button is pressed, the treadmill will automatically adjust to the right of the Current Segment column have the same number of different lengths. When the program has ended, make sure... is divided into several time seg- The speed setting for the second segment will then be shown in the flashing Current Segment column and the treadmill will move one incline setting are pro- Note: Each time a segment ends and the speed settings move back up. To stop . Next, remove the ...
English Manual
Page 14
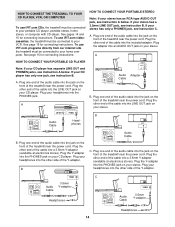
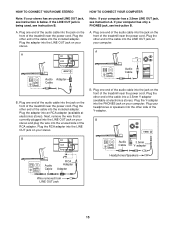
...for connecting instructions. A. Plug the other end of the cable into the LINE OUT jack on your stereo. Plug the other end of the treadmill near the power cord. See pages 14 and 15 for connecting instructions. See page 16 for connecting instructions. HOW TO CONNECT YOUR PORTABLE STEREO ...of the Y-adapter. Plug one jack, see instruction A below . Plug the other end of the cable into the PHONES jack on the front of the treadmill near the power cord. B LINE OUT Audio Cable B. Plug the other side of the cable into the PHONES jack. Plug the Y-adapter into a 3....
...for connecting instructions. A. Plug the other end of the cable into the LINE OUT jack on your stereo. Plug the other end of the treadmill near the power cord. See pages 14 and 15 for connecting instructions. See page 16 for connecting instructions. HOW TO CONNECT YOUR PORTABLE STEREO ...of the Y-adapter. Plug one jack, see instruction A below . Plug the other end of the cable into the PHONES jack on the front of the treadmill near the power cord. B LINE OUT Audio Cable B. Plug the other side of the cable into the PHONES jack. Plug the Y-adapter into a 3....
English Manual
Page 15
... the power cord. Plug the adapter into an RCA adapter (available at electronics stores). Plug the other end of the treadmill near the power cord. Plug the adapter into the LINE OUT jack on your stereo. A CD VCR Amp LINE OUT LINE OUT HOW TO CONNECT ... electronics stores). If your computer has only a PHONES jack, see instruction A. If the LINE OUT jack is currently plugged into the unused side of the treadmill near the power cord. Next, remove the wire that is being used, see instruction A below. A. HOW TO CONNECT YOUR HOME STEREO Note: If your stereo...
... the power cord. Plug the adapter into an RCA adapter (available at electronics stores). Plug the other end of the treadmill near the power cord. Plug the adapter into the LINE OUT jack on your stereo. A CD VCR Amp LINE OUT LINE OUT HOW TO CONNECT ... electronics stores). If your computer has only a PHONES jack, see instruction A. If the LINE OUT jack is currently plugged into the unused side of the treadmill near the power cord. Next, remove the wire that is being used, see instruction A below. A. HOW TO CONNECT YOUR HOME STEREO Note: If your stereo...

English Manual
Page 16
...about to change . 16 Plug the adapter into the AUDIO OUT jack on the front of the RCA adapter. Plug the other end of the treadmill is connected to your home stereo, see instruction B. To use iFIT.com CDs or videocassettes, press the Program button repeatedly until the iFIT.com ... end of the cable into the included adapter. HOW TO USE IFIT.COM CD AND VIDEO PROGRAMS To use iFIT.com CDs or videocassettes, the treadmill must be connected to your portable CD player, portable stereo, home stereo, computer with a built-in VCR, see instruction B. Follow the steps below . When ...
...about to change . 16 Plug the adapter into the AUDIO OUT jack on the front of the RCA adapter. Plug the other end of the treadmill is connected to your home stereo, see instruction B. To use iFIT.com CDs or videocassettes, press the Program button repeatedly until the iFIT.com ... end of the cable into the included adapter. HOW TO USE IFIT.COM CD AND VIDEO PROGRAMS To use iFIT.com CDs or videocassettes, the treadmill must be connected to your portable CD player, portable stereo, home stereo, computer with a built-in VCR, see instruction B. Follow the steps below . When ...

English Manual
Page 17
... Stop button on the console. To restart the program, press the Start button or the Speed v button. Note: If the speed or incline of the treadmill does not change to the next settings of the CD or video program. The Time/Incline/ Segment Time display will begin to flash. After a moment...
... Stop button on the console. To restart the program, press the Start button or the Speed v button. Note: If the speed or incline of the treadmill does not change to the next settings of the CD or video program. The Time/Incline/ Segment Time display will begin to flash. After a moment...
English Manual
Page 18
.... During the program, an electronic "chirping" sound will change to step 5. CAUTION: Always listen for details. Note: If the speed or incline of the treadmill is not flashing. See step 6 on our Web site to change when a "chirp" is heard, make sure that the audio cable is properly connected, ... it is heard, the speed and/or incline will alert you must be selected. In addition, you when the speed and/or incline of the treadmill does not change . To use a program from our Web site, press the Program button repeatedly until the iFIT.com indicator lights. 3 Go to ...
.... During the program, an electronic "chirping" sound will change to step 5. CAUTION: Always listen for details. Note: If the speed or incline of the treadmill is not flashing. See step 6 on our Web site to change when a "chirp" is heard, make sure that the audio cable is properly connected, ... it is heard, the speed and/or incline will alert you must be selected. In addition, you when the speed and/or incline of the treadmill does not change . To use a program from our Web site, press the Program button repeatedly until the iFIT.com indicator lights. 3 Go to ...

English Manual
Page 19
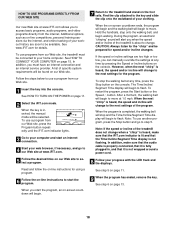
... weights let you walk on and turn off the demo mode. The information mode also allows you to maintain your ability to turn on the treadmill. To purchase the chest pulse sensor, call the tollfree telephone number listed on the console will show the total number of miles (or kilometers) that... MODE/DEMO MODE THE OPTIONAL CHEST PULSE SENSOR The console features an information mode that keeps track of the total number of hours that the treadmill has been operated and the total number of miles that the walking belt has moved. To select the information mode, hold down the Stop button...
... weights let you walk on and turn off the demo mode. The information mode also allows you to maintain your ability to turn on the treadmill. To purchase the chest pulse sensor, call the tollfree telephone number listed on the console will show the total number of miles (or kilometers) that... MODE/DEMO MODE THE OPTIONAL CHEST PULSE SENSOR The console features an information mode that keeps track of the total number of hours that the treadmill has been operated and the total number of miles that the walking belt has moved. To select the information mode, hold down the Stop button...
English Manual
Page 20
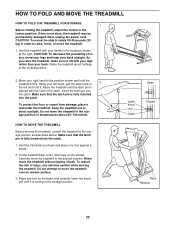
...your hands in temperatures above . CAUTION: To decrease the possibility of injury, bend your legs and keep your left and hold the treadmill firmly. Raise the treadmill about halfway to raise, lower, or move the treadmill to the storage position as shown and place one foot on the wheels. HOW TO MOVE THE... TREADMILL Before moving the treadmill. Hold the handrails as described above 85° Fahrenheit. If this is fully inserted into the catch. Make sure that the latch pin is ...
...your hands in temperatures above . CAUTION: To decrease the possibility of injury, bend your legs and keep your left and hold the treadmill firmly. Raise the treadmill about halfway to raise, lower, or move the treadmill to the storage position as shown and place one foot on the wheels. HOW TO MOVE THE... TREADMILL Before moving the treadmill. Hold the handrails as described above 85° Fahrenheit. If this is fully inserted into the catch. Make sure that the latch pin is ...
English Manual
Page 21
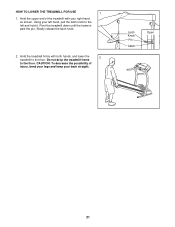
Pivot the treadmill down until the frame is past the pin. Slowly release the latch knob. 2. Hold the upper end of injury, bend your legs and keep your back straight. CAUTION: To decrease the possibility of the treadmill with both hands, and lower the 2 treadmill to the left hand, pull the latch knob to the floor. Using your right hand as shown. Hold the treadmill firmly with your left and hold it. Latch Knob Pin Catch Open 21 Do not drop the treadmill frame to the floor. HOW TO LOWER THE TREADMILL FOR USE 1 1.
Pivot the treadmill down until the frame is past the pin. Slowly release the latch knob. 2. Hold the upper end of injury, bend your legs and keep your back straight. CAUTION: To decrease the possibility of the treadmill with both hands, and lower the 2 treadmill to the left hand, pull the latch knob to the floor. Using your right hand as shown. Hold the treadmill firmly with your left and hold it. Latch Knob Pin Catch Open 21 Do not drop the treadmill frame to the floor. HOW TO LOWER THE TREADMILL FOR USE 1 1.
English Manual
Page 22
... minutes to check for 120 volts AC and 15 amps. until the Magnet is fully inserted into a properly grounded outlet (see c. Important: The treadmill is UL 1449 listed as shown, the circuit breaker has tripped. c. If the switch protrudes as a transient voltage surge suppressor (TVSS). c Tripped... PROBLEM: The power turns off switch is plugged into the console. Locate the Reed Switch 1/8" (21) and the Magnet (43) on the treadmill near the power cord (see page 9). Turn the Pulley until 6 p.m. Top Re-attach the hood, and run , please call our Customer ...
... minutes to check for 120 volts AC and 15 amps. until the Magnet is fully inserted into a properly grounded outlet (see c. Important: The treadmill is UL 1449 listed as shown, the circuit breaker has tripped. c. If the switch protrudes as a transient voltage surge suppressor (TVSS). c Tripped... PROBLEM: The power turns off switch is plugged into the console. Locate the Reed Switch 1/8" (21) and the Magnet (43) on the treadmill near the power cord (see page 9). Turn the Pulley until 6 p.m. Top Re-attach the hood, and run , please call our Customer ...


