
English Manual
Page 3
...more than one person on the treadmill at least eight feet of clearance behind it and two feet on the walking belt. When folding or moving the treadmill, make sure that could result in damage to raise, lower, or move the treadmill until it is turned off circuit breaker to ensure ...that meets all parts of the treadmill regularly. 21. Never move the on page 5 if the treadmill is damaged, the walking belt may change speed or stop unexpectedly, which ...
...more than one person on the treadmill at least eight feet of clearance behind it and two feet on the walking belt. When folding or moving the treadmill, make sure that could result in damage to raise, lower, or move the treadmill until it is turned off circuit breaker to ensure ...that meets all parts of the treadmill regularly. 21. Never move the on page 5 if the treadmill is damaged, the walking belt may change speed or stop unexpectedly, which ...

English Manual
Page 8
... inset drawing. Find the 3-wire connector on the bottom of the Wire Harness (42). If the connector does not slide easily and snap into place, turn the connector and then insert it. 47 42 Ties 72 43 42 Insert the 5-wire connector into place. Make sure that the connectors and wires... (47). Attach the end of the Right Handrail (72). IF THE CONNECTORS ARE NOT INSERTED PROPERLY, THE CONSOLE MAY BE DAMAGED WHEN THE POWER IS TURNED ON. 3-wire 5-wire 7. Securely tighten the plastic ties on the end of the Console Base (47) to prevent the Wire Harness from slipping. Ties 42...
... inset drawing. Find the 3-wire connector on the bottom of the Wire Harness (42). If the connector does not slide easily and snap into place, turn the connector and then insert it. 47 42 Ties 72 43 42 Insert the 5-wire connector into place. Make sure that the connectors and wires... (47). Attach the end of the Right Handrail (72). IF THE CONNECTORS ARE NOT INSERTED PROPERLY, THE CONSOLE MAY BE DAMAGED WHEN THE POWER IS TURNED ON. 3-wire 5-wire 7. Securely tighten the plastic ties on the end of the Console Base (47) to prevent the Wire Harness from slipping. Ties 42...
English Manual
Page 9
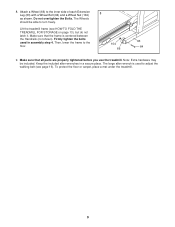
... should be included. Attach a Wheel (66) to the floor. 104 66 63 64 9. Make sure that all parts are properly tightened before you use the treadmill. Then, lower the frame to the inner side of each Extension Leg (63) with a Wheel Bolt (64) and a Wheel Nut (104) 8 as shown. ...13), but do not latch it. To protect the floor or carpet, place a mat under the treadmill. 9 Do not overtighten the Bolts. Lift the treadmill frame (see page 16). Firmly tighten the bolts used to turn freely. Keep the included allen wrenches in assembly step 4. 8. Make sure that the frame is ...
... should be included. Attach a Wheel (66) to the floor. 104 66 63 64 9. Make sure that all parts are properly tightened before you use the treadmill. Then, lower the frame to the inner side of each Extension Leg (63) with a Wheel Bolt (64) and a Wheel Nut (104) 8 as shown. ...13), but do not latch it. To protect the floor or carpet, place a mat under the treadmill. 9 Do not overtighten the Bolts. Lift the treadmill frame (see page 16). Firmly tighten the bolts used to turn freely. Keep the included allen wrenches in assembly step 4. 8. Make sure that the frame is ...
English Manual
Page 10
...properly grounded. To decrease the possibility of least resistance for electric current to whether the product is not compatible with your treadmill being turned on the surge suppressor to a 2-pole receptacle as a properly grounded outlet box cover. The surge suppressor must be seriously... could result in accordance with PERFORMANT LUBETM, a high-performance lubricant. IMPORTANT: Never apply silicone spray or other type of the treadmill. Check with the product-if it is grounded before using an adapter. 10 Grounding Pin Grounded Outlet Grounding Plug Grounded Outlet Box...
...properly grounded. To decrease the possibility of least resistance for electric current to whether the product is not compatible with your treadmill being turned on the surge suppressor to a 2-pole receptacle as a properly grounded outlet box cover. The surge suppressor must be seriously... could result in accordance with PERFORMANT LUBETM, a high-performance lubricant. IMPORTANT: Never apply silicone spray or other type of the treadmill. Check with the product-if it is grounded before using an adapter. 10 Grounding Pin Grounded Outlet Grounding Plug Grounded Outlet Box...

English Manual
Page 11
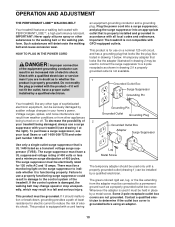
...console dry. Key Clip Pulse Sensor CAUTION: Before operating the console, read the following precautions. • Do not stand on the walking belt when turning on the power. • Always wear the clip (see page 10). STEP-BY-STEP CONSOLE OPERATION Before operating the console, make sure that ...(see SPEED DISPLAY on the console and place only a sealed water bottle in either miles or kilometers (see the drawing above ) while operating the treadmill. • Adjust the speed in small increments to move. Each time a button is pulled from the console, adjust the position of the walking ...
...console dry. Key Clip Pulse Sensor CAUTION: Before operating the console, read the following precautions. • Do not stand on the walking belt when turning on the power. • Always wear the clip (see page 10). STEP-BY-STEP CONSOLE OPERATION Before operating the console, make sure that ...(see SPEED DISPLAY on the console and place only a sealed water bottle in either miles or kilometers (see the drawing above ) while operating the treadmill. • Adjust the speed in small increments to move. Each time a button is pulled from the console, adjust the position of the walking ...
English Manual
Page 15
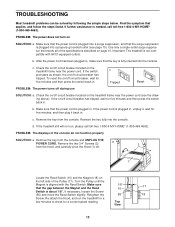
...as shown, the on the left side of the Pulley (17). b. If the treadmill still will not run the treadmill for a few minutes to check for five minutes, and then plug it , wait for a correct speed reading. Turn the Pulley until the Magnet is plugged in . PROBLEM: The power does not... turn on page 10. If the on /off circuit breaker located on the treadmill frame near the power cord. Top View 15 c Tripped Reset PROBLEM: ...
...as shown, the on the left side of the Pulley (17). b. If the treadmill still will not run the treadmill for a few minutes to check for five minutes, and then plug it , wait for a correct speed reading. Turn the Pulley until the Magnet is plugged in . PROBLEM: The power does not... turn on page 10. If the on /off circuit breaker located on the treadmill frame near the power cord. Top View 15 c Tripped Reset PROBLEM: ...

English Manual
Page 16
...has shifted to the right, turn . Be careful not to turn the left rear roller bolt clockwise 1/2 of a turn the bolt counterclockwise 1/2 of the specifications described on the treadmill for a few minutes. Repeat until the walking belt is overtightened, treadmill performance may decrease and the walking... walking platform. PROBLEM: The walking belt slows when walked on SOLUTION: a. Plug in the power cord, insert the key, and run the treadmill for a few minutes. ing belt 2 to keep the walking belt centered. If the walking belt is properly tightened. 16 b 2"-3" Rear ...
...has shifted to the right, turn . Be careful not to turn the left rear roller bolt clockwise 1/2 of a turn the bolt counterclockwise 1/2 of the specifications described on the treadmill for a few minutes. Repeat until the walking belt is overtightened, treadmill performance may decrease and the walking... walking platform. PROBLEM: The walking belt slows when walked on SOLUTION: a. Plug in the power cord, insert the key, and run the treadmill for a few minutes. ing belt 2 to keep the walking belt centered. If the walking belt is properly tightened. 16 b 2"-3" Rear ...


