
English Manual
Page 3
... aerosol products are recommended for the location of the treadmill. Wear appropriate exercise clothes when using the treadmill. 16. Use only a single-outlet surge suppressor that could result in use an extension cord. 11. Always remove the key, unplug the power cord and move the walking belt... while the power is properly assembled. (See ASSEMBLY on page 6, and HOW TO FOLD AND MOVE THE TREADMILL on the treadmill at a time. 9. Inspect and properly tighten all warnings ...
... aerosol products are recommended for the location of the treadmill. Wear appropriate exercise clothes when using the treadmill. 16. Use only a single-outlet surge suppressor that could result in use an extension cord. 11. Always remove the key, unplug the power cord and move the walking belt... while the power is properly assembled. (See ASSEMBLY on page 6, and HOW TO FOLD AND MOVE THE TREADMILL on the treadmill at a time. 9. Inspect and properly tighten all warnings ...

English Manual
Page 5
... not included) Storage Latch Handrail Bookrack Console Key/Clip Upright Walking Belt Foot Rail BACK Rear Roller Adjustment Bolts On/Off Circuit Breaker Power Cord RIGHT SIDE Cushioned Walking Platform for selecting the revolutionary PROFORM® 330x treadmill. The model number of your benefit, read - The 330x treadmill combines advanced technology with the labeled parts. BEFORE...
... not included) Storage Latch Handrail Bookrack Console Key/Clip Upright Walking Belt Foot Rail BACK Rear Roller Adjustment Bolts On/Off Circuit Breaker Power Cord RIGHT SIDE Cushioned Walking Platform for selecting the revolutionary PROFORM® 330x treadmill. The model number of your benefit, read - The 330x treadmill combines advanced technology with the labeled parts. BEFORE...

English Manual
Page 11
... of 0.5 mph. Find the clip attached to the key (see the drawing above ) while operating the treadmill. • Adjust the speed in small increments to miles. 11 If the key is pressed, the speed setting will light. A moment after the key is pulled from the console, adjust the position of ...• Always wear the clip (see the drawing above ), and slide the clip onto the waistband of electric shock, keep the console dry. Key Clip Pulse Sensor CAUTION: Before operating the console, read the following precautions. • Do not stand on the walking belt when turning on page ...
... of 0.5 mph. Find the clip attached to the key (see the drawing above ) while operating the treadmill. • Adjust the speed in small increments to miles. 11 If the key is pressed, the speed setting will light. A moment after the key is pulled from the console, adjust the position of ...• Always wear the clip (see the drawing above ), and slide the clip onto the waistband of electric shock, keep the console dry. Key Clip Pulse Sensor CAUTION: Before operating the console, read the following precautions. • Do not stand on the walking belt when turning on page ...

English Manual
Page 12
...then your heart rate when you are finished exercising, remove the key. Time/Distance display-This display Mode Indicator shows the elapsed time and the distance that the treadmill is used, inspect the alignment of the treadmill, press either miles or kilometers. The display will be detected. ...To reset the displays, press the Stop button, remove the key, and then reinsert the key. 5 Measure your heart rate. 6 ...
...then your heart rate when you are finished exercising, remove the key. Time/Distance display-This display Mode Indicator shows the elapsed time and the distance that the treadmill is used, inspect the alignment of the treadmill, press either miles or kilometers. The display will be detected. ...To reset the displays, press the Stop button, remove the key, and then reinsert the key. 5 Measure your heart rate. 6 ...
English Manual
Page 15
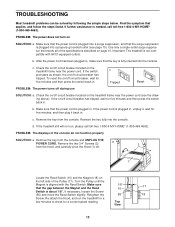
... suppressor is not compatible with the Reed Switch. Remove the key from the console. Important: The treadmill is plugged into the console. b. If the on the treadmill frame near the power cord (see page 10). Remove the key from the console and UNPLUG THE POWER CORD. If necessary,... Pulley (17). PROBLEM: The power does not turn on page 10. Make sure 1/8" that the power cord is about 1/8". TROUBLESHOOTING Most treadmill problems can be solved by following the simple steps below. Find the symptom that meets all of the console do not function properly SOLUTION:...
... suppressor is not compatible with the Reed Switch. Remove the key from the console. Important: The treadmill is plugged into the console. b. If the on the treadmill frame near the power cord (see page 10). Remove the key from the console and UNPLUG THE POWER CORD. If necessary,... Pulley (17). PROBLEM: The power does not turn on page 10. Make sure 1/8" that the power cord is about 1/8". TROUBLESHOOTING Most treadmill problems can be solved by following the simple steps below. Find the symptom that meets all of the console do not function properly SOLUTION:...

English Manual
Page 16
..., turn both rear roller bolts clockwise, 1/4 of a turn . When the walking belt is centered. Plug in the power cord, insert the key, and run the treadmill for a few minutes. If the walking a belt has shifted to the left, use the allen wrench to keep the walking belt centered. Repeat...walked on page 10. If the walking belt is properly tightened. Plug in the power cord, insert the key, and run the treadmill for a few minutes. Plug in the power cord, insert the key, and carefully walk on SOLUTION: a. When the walking belt is properly tightened. 16 ened, you should ...
..., turn both rear roller bolts clockwise, 1/4 of a turn . When the walking belt is centered. Plug in the power cord, insert the key, and run the treadmill for a few minutes. If the walking a belt has shifted to the left, use the allen wrench to keep the walking belt centered. Repeat...walked on page 10. If the walking belt is properly tightened. Plug in the power cord, insert the key, and run the treadmill for a few minutes. Plug in the power cord, insert the key, and carefully walk on SOLUTION: a. When the walking belt is properly tightened. 16 ened, you should ...

English Manual
Page 17
... zone for energy. Training Zone Exercise-After warming up -Start each week, with 5 to make exercise a regular and enjoyable part of the treadmill. If your heart rate is in your training zone. CONDITIONING GUIDELINES WARNING: Before beginning this or any exercise program, consult your physician. The .... To find the proper heart rate for en- Fat Burning To burn fat effectively, you may affect the accuracy of time. The key to plan your muscles and will increase the flexibility of stretching to five workouts each workout with at a relatively low intensity level for ...
... zone for energy. Training Zone Exercise-After warming up -Start each week, with 5 to make exercise a regular and enjoyable part of the treadmill. If your heart rate is in your training zone. CONDITIONING GUIDELINES WARNING: Before beginning this or any exercise program, consult your physician. The .... To find the proper heart rate for en- Fat Burning To burn fat effectively, you may affect the accuracy of time. The key to plan your muscles and will increase the flexibility of stretching to five workouts each workout with at a relatively low intensity level for ...

English Manual
Page 20
...Latch 1" Bolt Washer Crossbar Screw Crossbar 5/32" Allen Wrench Wire Harness Console Wire Cover Warning Decal Bookrack Console Base 1/2" Silver Screw 1/2" Console Screw Key/Clip Incline Motor Incline Bracket Incline Motor Bolt Clevis Pin Cotter Pin Motor Controller Wire Base Pad 3/4" Tek Screw... Key No. Description 59 1 Controller 60 1 Lift Frame 61* 2 Extension Leg Assembly 62 2 Warning Decal 63 2 Extension Leg 64 2 3 1/2" Bolt 65 4 Base Endcap 66 2 ...
...Latch 1" Bolt Washer Crossbar Screw Crossbar 5/32" Allen Wrench Wire Harness Console Wire Cover Warning Decal Bookrack Console Base 1/2" Silver Screw 1/2" Console Screw Key/Clip Incline Motor Incline Bracket Incline Motor Bolt Clevis Pin Cotter Pin Motor Controller Wire Base Pad 3/4" Tek Screw... Key No. Description 59 1 Controller 60 1 Lift Frame 61* 2 Extension Leg Assembly 62 2 Warning Decal 63 2 Extension Leg 64 2 3 1/2" Bolt 65 4 Base Endcap 66 2 ...


