Owner Manual
Page 1
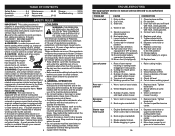
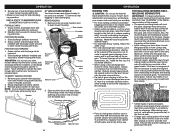
.../reinstall drive belt. 3. Hard to suit. Check/replace drive belt. 2. Belt off . (If so equipped) 3. Grass catcher too full. 4. TROUBLESHOOTING (continued) See appropriate section in manual unless directed to an authorized Service Center. Clean grass catcher. Adjust drive control. Replace blade. 3. Belt wear. 1. PROBLEM CAUSE CORRECTION Grass catcher 1. Drive cable worn...
.../reinstall drive belt. 3. Hard to suit. Check/replace drive belt. 2. Belt off . (If so equipped) 3. Grass catcher too full. 4. TROUBLESHOOTING (continued) See appropriate section in manual unless directed to an authorized Service Center. Clean grass catcher. Adjust drive control. Replace blade. 3. Belt wear. 1. PROBLEM CAUSE CORRECTION Grass catcher 1. Drive cable worn...
Owner Manual
Page 2
... it should not be picked up , transport- not alert to an authorized Service Center. Children are familiar with plug. TROUBLESHOOTING See appropriate section in manual unless directed to the presence of objects such as rocks, toys, wire, bones, sticks, etc., which could result in the... manual(s) before pulling starter rope. 2. PROBLEM CAUSE CORRECTION Does not start 1. Water in contact with the instructions, to cause cancer and birth defects or other...
... it should not be picked up , transport- not alert to an authorized Service Center. Children are familiar with plug. TROUBLESHOOTING See appropriate section in manual unless directed to the presence of objects such as rocks, toys, wire, bones, sticks, etc., which could result in the... manual(s) before pulling starter rope. 2. PROBLEM CAUSE CORRECTION Does not start 1. Water in contact with the instructions, to cause cancer and birth defects or other...

Owner Manual
Page 3
... as rocks, tree limbs, etc. • Watch for proper operation and installation of 15°. • Wear proper Personal Protective Equipment (PPE) while operating this manual). Acidic gas can hide obstacles. Tall grass can damage the fuel system of alcohol or drugs. • Never operate machine in your gasoline will cause...
... as rocks, tree limbs, etc. • Watch for proper operation and installation of 15°. • Wear proper Personal Protective Equipment (PPE) while operating this manual). Acidic gas can hide obstacles. Tall grass can damage the fuel system of alcohol or drugs. • Never operate machine in your gasoline will cause...

Owner Manual
Page 4
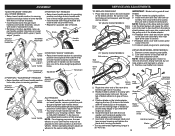
... have competent, well trained technicians and the proper tools to service or repair this unit. • Read the SAFETY RULES and this manual for future reference. • Your new lawn mower has been assembled at the back of the lower handle and pivot entire handle assembly...Clean oil or fuel spillage. It has been designed, engineered and manufactured to the rear. 2. Check their proper operation regularly. Save this Operator's Manual in safe working under housing. THINGS TO KNOW BEFORE YOU ASSEMBLE OR OPERATE YOUR LAWN MOWER Do I have a grass catcher included with care. ...
... have competent, well trained technicians and the proper tools to service or repair this unit. • Read the SAFETY RULES and this manual for future reference. • Your new lawn mower has been assembled at the back of the lower handle and pivot entire handle assembly...Clean oil or fuel spillage. It has been designed, engineered and manufactured to the rear. 2. Check their proper operation regularly. Save this Operator's Manual in safe working under housing. THINGS TO KNOW BEFORE YOU ASSEMBLE OR OPERATE YOUR LAWN MOWER Do I have a grass catcher included with care. ...
Owner Manual
Page 5
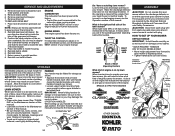
...and crankshaft keyway are required by a plate, then your lawn mower is inside the tabs of the season or if the unit will require manually locking into the mowing position. 3 POSITION "EZ" Bolt Knob Handle bracket 32 Do I have a mulching lawn mower? Return mower to... ENGINE CARBURETOR The carburetor has been preset at the end of the belt retainer. 4. STORAGE Immediately prepare your lawn mower for your engine manual. sand lightly before storing in place. To convert to the carburetor when running engine. These guards are for storage at the factory. ...
...and crankshaft keyway are required by a plate, then your lawn mower is inside the tabs of the season or if the unit will require manually locking into the mowing position. 3 POSITION "EZ" Bolt Knob Handle bracket 32 Do I have a mulching lawn mower? Return mower to... ENGINE CARBURETOR The carburetor has been preset at the end of the belt retainer. 4. STORAGE Immediately prepare your lawn mower for your engine manual. sand lightly before storing in place. To convert to the carburetor when running engine. These guards are for storage at the factory. ...
Owner Manual
Page 6
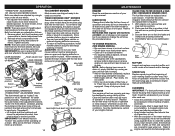
... belt retainer of blade (opposite sharp edge) is grade 8 heat treated. 8. Remove screws securing rear baffle. 2. ning engine until the pin in gap of this manual. Route the other until fuel tank is in handle can be inserted into blade adapter and crankshaft. 7. lbs. ding and tighten both upper ("quickadjust") knobs...
... belt retainer of blade (opposite sharp edge) is grade 8 heat treated. 8. Remove screws securing rear baffle. 2. ning engine until the pin in gap of this manual. Route the other until fuel tank is in handle can be inserted into blade adapter and crankshaft. 7. lbs. ding and tighten both upper ("quickadjust") knobs...

Owner Manual
Page 7
..., hardened washer), blade adapter and debris shield as a bagger. curely. • Repeat procedure for other end of the new drive belt through hole in this manual. NOTE: Always use factory approved belt to upright position. • Install new belt on its side. Use a wood block between blade and mower housing to...
..., hardened washer), blade adapter and debris shield as a bagger. curely. • Repeat procedure for other end of the new drive belt through hole in this manual. NOTE: Always use factory approved belt to upright position. • Install new belt on its side. Use a wood block between blade and mower housing to...
Owner Manual
Page 8
... and idler arm assembly. then remove drive belt from spark plug and place wire where it cannot come in handle brackets. See engine manual for a few minutes. See engine manual for replacement. NOTE: If vinyl bindings are too stiff, hold them in place. and remove drive cover from lawn mower housing. •...
... and idler arm assembly. then remove drive belt from spark plug and place wire where it cannot come in handle brackets. See engine manual for a few minutes. See engine manual for replacement. NOTE: If vinyl bindings are too stiff, hold them in place. and remove drive cover from lawn mower housing. •...

Owner Manual
Page 9
...and rolling belt off it . • Turn lawn mower on its side. Connect your battery charger to assure fit and long life. See engine manual for the first time. • Reconnect engine connector (male) (if equipped) to battery connector (female). • After charging, connect engine ...from the battery con- NOTE: Always use factory approved belt to charge battery after the season. NOTE: Always use . See engine manual for 24 hours before you can start your lawn mower after each use factory approved belt to prevent accidental starting your battery. nector ...
...and rolling belt off it . • Turn lawn mower on its side. Connect your battery charger to assure fit and long life. See engine manual for the first time. • Reconnect engine connector (male) (if equipped) to battery connector (female). • After charging, connect engine ...from the battery con- NOTE: Always use factory approved belt to charge battery after the season. NOTE: Always use . See engine manual for 24 hours before you can start your lawn mower after each use factory approved belt to prevent accidental starting your battery. nector ...
Owner Manual
Page 10
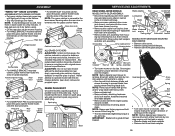
... performance. Raise wheels for low cut . NOTE: For shipping purposes, the rear wheels on your lawn mower has three (3) height positions - "MANUAL" ADJUSTMENT • Remove wheel, bolt, and hardware and reassemble in desired adjustment hole. • Reinstall wheel components in severe eye damage. Flat... in contact with desired hole in handle bracket and reassemble bolt and knob and tighten securely. • Align opposite side of this manual. NOTE: Adjuster is provided to three (3) different height positions. 1. LEVER BACKWARD TO LOWER MOWER Plate tab LEVER FORWARD TO RAISE ...
... performance. Raise wheels for low cut . NOTE: For shipping purposes, the rear wheels on your lawn mower has three (3) height positions - "MANUAL" ADJUSTMENT • Remove wheel, bolt, and hardware and reassemble in desired adjustment hole. • Reinstall wheel components in severe eye damage. Flat... in contact with desired hole in handle bracket and reassemble bolt and knob and tighten securely. • Align opposite side of this manual. NOTE: Adjuster is provided to three (3) different height positions. 1. LEVER BACKWARD TO LOWER MOWER Plate tab LEVER FORWARD TO RAISE ...

Owner Manual
Page 11
... sure to remove excess water from beneath the mower housing during the washout process. 6. To lower mower, move lever forward to an area of this manual) and let engine run for leaks at least twice a season. Move lawn mower to desired position. Likewise, both front and rear wheels to ensure... water supply and check for a full minute to adjust both rear wheels are present, start engine (as described in the Operation section of this manual) and let engine run until the underside of the lawn mower is running. Water in engine can result in plate. Be sure all wheels are...
... sure to remove excess water from beneath the mower housing during the washout process. 6. To lower mower, move lever forward to an area of this manual) and let engine run for leaks at least twice a season. Move lawn mower to desired position. Likewise, both front and rear wheels to ensure... water supply and check for a full minute to adjust both rear wheels are present, start engine (as described in the Operation section of this manual) and let engine run until the underside of the lawn mower is running. Water in engine can result in plate. Be sure all wheels are...
Owner Manual
Page 12
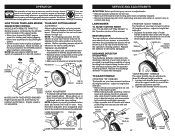
...ONLY) Both rear wheels are adjusted by running engine until the frontmost end clears the adjustment bracket, then pivot lockbar to engine manual. To convert to MUFFLER Inspect and replace corroded muffler as a mulcher. Never attempt to "freewheel" for the rear wheels....mowing season or after every 25 hours IMPORTANT: For best performance, keep water out. Be sure both front and rear wheels to engine manual specifications. MULCHER "PLATE" Lockbar ("locked" position) Washer Spacer Wing nut O-Ring Lockbar ("freewheel" position) CASTER WHEEL OPERATION ("THREE POINT...
...ONLY) Both rear wheels are adjusted by running engine until the frontmost end clears the adjustment bracket, then pivot lockbar to engine manual. To convert to MUFFLER Inspect and replace corroded muffler as a mulcher. Never attempt to "freewheel" for the rear wheels....mowing season or after every 25 hours IMPORTANT: For best performance, keep water out. Be sure both front and rear wheels to engine manual specifications. MULCHER "PLATE" Lockbar ("locked" position) Washer Spacer Wing nut O-Ring Lockbar ("freewheel" position) CASTER WHEEL OPERATION ("THREE POINT...

Owner Manual
Page 15
... 18" (45cm) HI-VAC MODELS: Your lawn mower was shipped ready to deterioration and wear and should be used as instructed in this manual should be checked frequently for replacement. CAUTION: Under normal usage, the catcher material is now ready for loose fasteners. Any replacement catcher should ..., therefore, be checked at end of this manual. Never attempt to ensure compliance with the rear door removed or propped open rear door and lift grass catcher up and away from ...
... 18" (45cm) HI-VAC MODELS: Your lawn mower was shipped ready to deterioration and wear and should be used as instructed in this manual should be checked frequently for replacement. CAUTION: Under normal usage, the catcher material is now ready for loose fasteners. Any replacement catcher should ..., therefore, be checked at end of this manual. Never attempt to ensure compliance with the rear door removed or propped open rear door and lift grass catcher up and away from ...
Owner Manual
Page 16
... run your width of the lawn. 21 Also, the mulched grass will damage your mower and could void your highest engine (blade) speed as this manual. • The special mulching blade will be cut to reduce pushing effort and to mower housing with knob. • Mower is wet. Always mulch with...
... run your width of the lawn. 21 Also, the mulched grass will damage your mower and could void your highest engine (blade) speed as this manual. • The special mulching blade will be cut to reduce pushing effort and to mower housing with knob. • Mower is wet. Always mulch with...
Owner Manual
Page 17
...already run until fuel lines and carburetor are empty. Drain the fuel tank, start . Wait 5 to repeat priming steps in the engine manual packed with clippings from grass catcher. Secure rear of the discharge chute and place the grass catcher into place on the crossbar of side...storage. DO NOT USE PREMIUM GASOLINE. WARNING: Alcohol blended fuels (called gasohol or using ethanol or methanol) can damage the fuel system of this manual. • Fill to start . Use fresh fuel next season. See Storage Instructions for a few minutes before each use engine or carburetor cleaner ...
...already run until fuel lines and carburetor are empty. Drain the fuel tank, start . Wait 5 to repeat priming steps in the engine manual packed with clippings from grass catcher. Secure rear of the discharge chute and place the grass catcher into place on the crossbar of side...storage. DO NOT USE PREMIUM GASOLINE. WARNING: Alcohol blended fuels (called gasohol or using ethanol or methanol) can damage the fuel system of this manual. • Fill to start . Use fresh fuel next season. See Storage Instructions for a few minutes before each use engine or carburetor cleaner ...