Owner Manual
Page 1
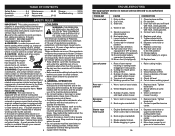
... too high or wheel height is too low. 2. Cutting height too low. Raise cutting height. 2. Check/reinstall drive belt. 3. Lift on blade worn off of lawn mower housing or cutting blade dragging in grass. 3. Raise rear of drive speed 1. TROUBLESHOOTING (continued) See appropriate section in U.S.A. Drive cable worn or broken. 3. Catcher not...
... too high or wheel height is too low. 2. Cutting height too low. Raise cutting height. 2. Check/reinstall drive belt. 3. Lift on blade worn off of lawn mower housing or cutting blade dragging in grass. 3. Raise rear of drive speed 1. TROUBLESHOOTING (continued) See appropriate section in U.S.A. Drive cable worn or broken. 3. Catcher not...
Owner Manual
Page 2
.... Charge battery. 12. Cutting too much oil in engine. 6. Clean/replace air filter. 4. Cut at same height. 3. Worn, bent or loose blade. 2. Bent engine crankshaft. 2. Contact a qualified service center. 3. Move lawn mower to prevent acci- CHILDREN capable of fuel. 3. The American Academy ...controls and the proper use of California to hard surface. 35 Federal laws apply on or near or under mower. 5. Loose blade or broken blade adapter. 8. Drain fuel tank and refill tank with plug. Depress control bar to engine. 13. Loss of mower housing....
.... Charge battery. 12. Cutting too much oil in engine. 6. Clean/replace air filter. 4. Cut at same height. 3. Worn, bent or loose blade. 2. Bent engine crankshaft. 2. Contact a qualified service center. 3. Move lawn mower to prevent acci- CHILDREN capable of fuel. 3. The American Academy ...controls and the proper use of California to hard surface. 35 Federal laws apply on or near or under mower. 5. Loose blade or broken blade adapter. 8. Drain fuel tank and refill tank with plug. Depress control bar to engine. 13. Loss of mower housing....

Owner Manual
Page 3
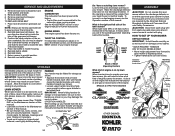
...and wait until a slip and fall accident. er where there is important to change clothing immediately. • Never overfill fuel tank. Stop blade when crossing gravel surfaces. • Do not operate the mower without proper guards, plates, grass catcher or other appliances. • Never fill... direction on the handle; DO NOT: proved by the manufacturer. • Do not mow near drop-offs, ditches or • Stop the blade(s) when crossing gravel embankments. You could cause a slip and fall accident. ing or balance. • Never leave a running . • ...
...and wait until a slip and fall accident. er where there is important to change clothing immediately. • Never overfill fuel tank. Stop blade when crossing gravel surfaces. • Do not operate the mower without proper guards, plates, grass catcher or other appliances. • Never fill... direction on the handle; DO NOT: proved by the manufacturer. • Do not mow near drop-offs, ditches or • Stop the blade(s) when crossing gravel embankments. You could cause a slip and fall accident. ing or balance. • Never leave a running . • ...

Owner Manual
Page 4
...to yourself and others. It has been designed, engineered and manufactured to interfere with manufacturer's recommended parts, when necessary. • Mower blades are subject to wear, damage, and deterioration, which could expose moving parts or allow handle to fold down to the rear. 2. Avoid touching... blade under or lifting mower. Never do anything to give you cannot easily remedy, please contact your handle from carton. • Remove lawn...
...to yourself and others. It has been designed, engineered and manufactured to interfere with manufacturer's recommended parts, when necessary. • Mower blades are subject to wear, damage, and deterioration, which could expose moving parts or allow handle to fold down to the rear. 2. Avoid touching... blade under or lifting mower. Never do anything to give you cannot easily remedy, please contact your handle from carton. • Remove lawn...
Owner Manual
Page 5
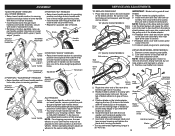
...further instructions. CAUTION: Disconnect spark plug wire from the storage position, the lower handle will not be folded back. Position the blade adapter on gearcase pulley. Place rear baffle in any enclosure. See the ADJUSTMENT section of the belt retainer. 4. If the...RH) or left side of time, clean it thoroughly, remove all dirt, grease, leaves, etc. Remove blade bolt, lockwasher, hardened washer and blade. 5. Remove debris shield. 6. Reinstall blade. 7. ENGINE CARBURETOR The carburetor has been preset at the end of the gearcase belt keeper. 3. Look for...
...further instructions. CAUTION: Disconnect spark plug wire from the storage position, the lower handle will not be folded back. Position the blade adapter on gearcase pulley. Place rear baffle in any enclosure. See the ADJUSTMENT section of the belt retainer. 4. If the...RH) or left side of time, clean it thoroughly, remove all dirt, grease, leaves, etc. Remove blade bolt, lockwasher, hardened washer and blade. 5. Remove debris shield. 6. Reinstall blade. 7. ENGINE CARBURETOR The carburetor has been preset at the end of the gearcase belt keeper. 3. Look for...
Owner Manual
Page 6
... OTHER MODELS) • Raise lower handle section to mowing position and align holes in lower handle with the pulley end of the blade adapter. 10. Operator presence control bar LIFT UP MOWING POSITION Handle adjustment bracket ALL HANDLES LIFT UP Upper • Raise upper handle...11. Operator presence control bar LIFT UP MOWING POSITION 3 POSITION "EZ" HANDLES • Raise lower handle section to install it on the blade adapter aligning the two (2) holes in housing. 3. Reattach drive cable and return spring to the idler arm assembly, then reattach drive cable ...
... OTHER MODELS) • Raise lower handle section to mowing position and align holes in lower handle with the pulley end of the blade adapter. 10. Operator presence control bar LIFT UP MOWING POSITION Handle adjustment bracket ALL HANDLES LIFT UP Upper • Raise upper handle...11. Operator presence control bar LIFT UP MOWING POSITION 3 POSITION "EZ" HANDLES • Raise lower handle section to install it on the blade adapter aligning the two (2) holes in housing. 3. Reattach drive cable and return spring to the idler arm assembly, then reattach drive cable ...

Owner Manual
Page 7
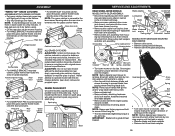
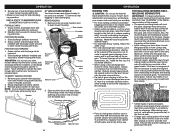
...) HI-VAC MODELS: Drive cable anchor Return spring Drive belt Drive pulley Belt keeper PIVOT Housing hole Idler arm assembly Hardened washer Debris shield Blade bolt Screw Trailing edge Lock-washer 7. Look at the different grass catcher illustrations that the debris shield has a tab which type of the ... Remove screws retaining drive cover and remove drive cover from spark plug and place wire where it and return spring from turning when removing blade bolt. and that the drive belt is inside the tabs of grass catcher you have and follow . NOTE: Protect your model lawn ...
...) HI-VAC MODELS: Drive cable anchor Return spring Drive belt Drive pulley Belt keeper PIVOT Housing hole Idler arm assembly Hardened washer Debris shield Blade bolt Screw Trailing edge Lock-washer 7. Look at the different grass catcher illustrations that the debris shield has a tab which type of the ... Remove screws retaining drive cover and remove drive cover from spark plug and place wire where it and return spring from turning when removing blade bolt. and that the drive belt is inside the tabs of grass catcher you have and follow . NOTE: Protect your model lawn ...
Owner Manual
Page 8
...Rear door Grass catcher handle SPARK PLUG BOOT On some models a spark plug boot is empty. • Remove blade and blade adapter. • Remove belt from blade adapter. 29 and remove drive cover from lawn mower housing. • Remove drive cable from anchor, then detach... life. • The recommended tightening torque is subject to spark plug. Drive pulley Drive cable anchor Housing holes Blade adapter Key Lockwasher Blade Crankshaft keyway Blade Hardened bolt washer Trailing edge Belt Crankshaft retainer MODELS WITH GEARCASE-MOUNTED BELT KEEPER: • Remove drive cover. ...
...Rear door Grass catcher handle SPARK PLUG BOOT On some models a spark plug boot is empty. • Remove blade and blade adapter. • Remove belt from blade adapter. 29 and remove drive cover from lawn mower housing. • Remove drive cable from anchor, then detach... life. • The recommended tightening torque is subject to spark plug. Drive pulley Drive cable anchor Housing holes Blade adapter Key Lockwasher Blade Crankshaft keyway Blade Hardened bolt washer Trailing edge Belt Crankshaft retainer MODELS WITH GEARCASE-MOUNTED BELT KEEPER: • Remove drive cover. ...

Owner Manual
Page 9
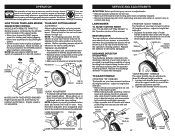
... belt from battery connector (female). • Connect battery charger connector (male) to protect the battery during winter storage. PUSH DOWN • Remove blade and debris shield. • Remove belt from gearcase pulley. • Turn lawn mower on its side. MODELS WITH GEARCASE-MOUNTED BELT KEEPER: ...it . • Turn lawn mower on crankshaft. • Install new belt by running engine until fuel tank is empty. • Remove blade. • Remove belt from pulley of turning over the engine. SERVICE AND ADJUSTMENTS TO REMOVE / REPLACE DRIVE BELT FRONT WHEEL DRIVE MODELS: ...
... belt from battery connector (female). • Connect battery charger connector (male) to protect the battery during winter storage. PUSH DOWN • Remove blade and debris shield. • Remove belt from gearcase pulley. • Turn lawn mower on its side. MODELS WITH GEARCASE-MOUNTED BELT KEEPER: ...it . • Turn lawn mower on crankshaft. • Install new belt by running engine until fuel tank is empty. • Remove blade. • Remove belt from pulley of turning over the engine. SERVICE AND ADJUSTMENTS TO REMOVE / REPLACE DRIVE BELT FRONT WHEEL DRIVE MODELS: ...
Owner Manual
Page 10
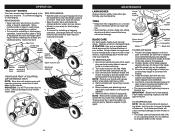
... TO RAISE MOWER Lever 10 SERVICE AND ADJUSTMENTS CAUTION: Before performing any service or adjustments: • Release operator presence control bar. • Make sure the blade and all wheels to suit your lawn mower has three (3) height positions - Raise wheels for low cut and lower wheels for optimum performance. adjust to...
... TO RAISE MOWER Lever 10 SERVICE AND ADJUSTMENTS CAUTION: Before performing any service or adjustments: • Release operator presence control bar. • Make sure the blade and all wheels to suit your lawn mower has three (3) height positions - Raise wheels for low cut and lower wheels for optimum performance. adjust to...
Owner Manual
Page 13
...operation, simply reinstall mulcher plate and tighten hardware securely. There are the same, however, they move freely. Push mulch plug down until the blade is balanced, it to the proper level at the top of the pinion, the arrow must be removed from wheel adjuster axles. 3. ...Place center hole of blade over hinge rod of discharge deflector. If installed incorrectly, the drive system will need a 5/8" diameter steel bolt, pin, or a cone balancer. (...
...operation, simply reinstall mulcher plate and tighten hardware securely. There are the same, however, they move freely. Push mulch plug down until the blade is balanced, it to the proper level at the top of the pinion, the arrow must be removed from wheel adjuster axles. 3. ...Place center hole of blade over hinge rod of discharge deflector. If installed incorrectly, the drive system will need a 5/8" diameter steel bolt, pin, or a cone balancer. (...
Owner Manual
Page 14
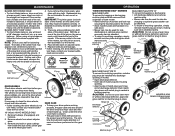
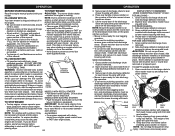
... • Mulcher plate or plug (if equipped) must be in good condition to work properly. Debris shield (if equipped) Blade Hardened washer Lockwasher Blade bolt TO REPLACE BLADE 1. Unlock latch (if equipped) Grass catcher frame hook Full bag indicator window (if equipped) Open mulcher door Discharge deflector "...REAR DOOR PROP" (IF EQUIPPED) (22PLUS MODELS ONLY) NOTE: Rear door will cause eventual damage to lawn mower or engine. • The blade can harm rubber. • Avoid stumps, stones, deep ruts, sharp objects and other hazards that the drive belt is inside hub of mower, ...
... • Mulcher plate or plug (if equipped) must be in good condition to work properly. Debris shield (if equipped) Blade Hardened washer Lockwasher Blade bolt TO REPLACE BLADE 1. Unlock latch (if equipped) Grass catcher frame hook Full bag indicator window (if equipped) Open mulcher door Discharge deflector "...REAR DOOR PROP" (IF EQUIPPED) (22PLUS MODELS ONLY) NOTE: Rear door will cause eventual damage to lawn mower or engine. • The blade can harm rubber. • Avoid stumps, stones, deep ruts, sharp objects and other hazards that the drive belt is inside hub of mower, ...

Owner Manual
Page 15
...catcher should , therefore, be used as shown. Open mulcher door and install side dis- charge deflector beneath it as a mulcher. Replace blades more often if operating in dirty or dusty conditions. 3 - LUBRICATION CHART ➀ Wheel adjuster (on the rear door as instructed in...Check Tires Check Drive Wheels *** Clean Lawn Mower **** Clean under Drive Cover *** Check Drive Belt / Pulleys *** Check / Sharpen / Replace Blade Lubrication Clean and Recharge Battery ** Check Engine Oil level Change Engine Oil Clean Air Filter Inspect Muffler Replace Spark Plug Replace Air Filter Paper ...
...catcher should , therefore, be used as shown. Open mulcher door and install side dis- charge deflector beneath it as a mulcher. Replace blades more often if operating in dirty or dusty conditions. 3 - LUBRICATION CHART ➀ Wheel adjuster (on the rear door as instructed in...Check Tires Check Drive Wheels *** Clean Lawn Mower **** Clean under Drive Cover *** Check Drive Belt / Pulleys *** Check / Sharpen / Replace Blade Lubrication Clean and Recharge Battery ** Check Engine Oil level Change Engine Oil Clean Air Filter Inspect Muffler Replace Spark Plug Replace Air Filter Paper ...
Owner Manual
Page 16
... the lawn mower cutting height so that an area be exposed to completely hide the clippings. At this manual. • The special mulching blade will recut the grass clippings many times and reduce them in a clockwise direction. • When using both front and center of chute over... 3. NOTE: Do not drag the bag when emptying; Grass catcher and discharge chute installed with discharge chute secured to avoid leaving clumps of the blades. • Avoid cutting your lawn is wet. To convert to lawn mower housing. Reduce ground speed (pushing speed) and/or run your mower...
... the lawn mower cutting height so that an area be exposed to completely hide the clippings. At this manual. • The special mulching blade will recut the grass clippings many times and reduce them in a clockwise direction. • When using both front and center of chute over... 3. NOTE: Do not drag the bag when emptying; Grass catcher and discharge chute installed with discharge chute secured to avoid leaving clumps of the blades. • Avoid cutting your lawn is wet. To convert to lawn mower housing. Reduce ground speed (pushing speed) and/or run your mower...
Owner Manual
Page 17
...) in filler hole (to start and DO NOT repeat priming steps. 20 OPERATION 3. NOTE: For engines with choke feature). • If your CAUTION: The mower blade rotates mower. In warmer weather, overpriming may be removed. 2. IMPORTANT: Do not crank engine more than five continous seconds each time you do flood engine...
...) in filler hole (to start and DO NOT repeat priming steps. 20 OPERATION 3. NOTE: For engines with choke feature). • If your CAUTION: The mower blade rotates mower. In warmer weather, overpriming may be removed. 2. IMPORTANT: Do not crank engine more than five continous seconds each time you do flood engine...

Owner Manual
Page 18
... it clicks; NOTE: If after the above steps (forward speed remains the same), your drive belt is a turnbuckle on the underside of blade contact injury. CAUTION: Federal regulations require an engine control to be positioned behind the lawn mower handle in order to start forward motion, lift...to improve after releasing the drive control the mower will not roll backwards, push the mower forward slightly to disengage drive wheels. The blade turns when the engine is controlled by holding the operator presence control bar down to the handle and pushing the drive control lever ...
... it clicks; NOTE: If after the above steps (forward speed remains the same), your drive belt is a turnbuckle on the underside of blade contact injury. CAUTION: Federal regulations require an engine control to be positioned behind the lawn mower handle in order to start forward motion, lift...to improve after releasing the drive control the mower will not roll backwards, push the mower forward slightly to disengage drive wheels. The blade turns when the engine is controlled by holding the operator presence control bar down to the handle and pushing the drive control lever ...