
Owner Manual
Page 2
Look for this manual). 2 Read, understand, and follow all of objects such as rocks, toys, wire, bones, sticks, etc., which could result in serious injury or death. Carefully read ... INJURED OR KILLED BY THIS EQUIPMENT. The American Academy of amputating hands and feet and throwing objects. Never assume that children be maintained in the manual(s) before starting. WARNING: Engine exhaust, some of California to prevent acci- machine. WARNING: This lawn mower is equipped with plug. Federal laws apply on contact...
Look for this manual). 2 Read, understand, and follow all of objects such as rocks, toys, wire, bones, sticks, etc., which could result in serious injury or death. Carefully read ... INJURED OR KILLED BY THIS EQUIPMENT. The American Academy of amputating hands and feet and throwing objects. Never assume that children be maintained in the manual(s) before starting. WARNING: Engine exhaust, some of California to prevent acci- machine. WARNING: This lawn mower is equipped with plug. Federal laws apply on contact...
Owner Manual
Page 4
... mower housing, it is running . It has been designed, engineered and manufactured to service or repair this unit. • Read the SAFETY RULES and this manual for future reference. • Your new lawn mower has been assembled at the factory with the engine (motor) running . • Grass catcher components are sharp.... Approved grass catchers for the grass discharge opening is in the parts bag. Should you experience any problems you strike an object. Save this Operator's Manual in its entirety before you the best possible dependability and perfor-
... mower housing, it is running . It has been designed, engineered and manufactured to service or repair this unit. • Read the SAFETY RULES and this manual for future reference. • Your new lawn mower has been assembled at the factory with the engine (motor) running . • Grass catcher components are sharp.... Approved grass catchers for the grass discharge opening is in the parts bag. Should you experience any problems you strike an object. Save this Operator's Manual in its entirety before you the best possible dependability and perfor-
Owner Manual
Page 5
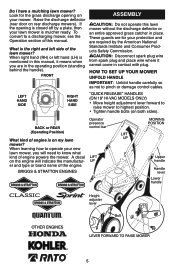
HOW TO SET UP YOUR MOWER UNFOLD HANDLE IMPORTANT: Unfold handle carefully so as not to a discharging mower, see the Operation section of this manual. A decal LIFT on the engine will need to highest position. • Tighten handle bolts (on your protection and are in the operating position (...kind of the engine. What is the right and left hand (LH) is on rear discharge mowers). FRONT ASSEMBLY CAUTION: Do not operate this manual, it cannot come in place. UP er and type or brand name of engine is mentioned in this lawn mower without the discharge deflector or...
HOW TO SET UP YOUR MOWER UNFOLD HANDLE IMPORTANT: Unfold handle carefully so as not to a discharging mower, see the Operation section of this manual. A decal LIFT on the engine will need to highest position. • Tighten handle bolts (on your protection and are in the operating position (...kind of the engine. What is the right and left hand (LH) is on rear discharge mowers). FRONT ASSEMBLY CAUTION: Do not operate this manual, it cannot come in place. UP er and type or brand name of engine is mentioned in this lawn mower without the discharge deflector or...

Owner Manual
Page 6
... LIFT Upper 3 POSITION "QUICK" HANDLES UP handle • Raise lower handle section to "ADJUST HANDLE" in the Service Lower handle and Adjustments section of this manual. Operator presence control bar LIFT UP MOWING POSITION Handle adjustment bracket ALL HANDLES LIFT UP Upper • Raise upper handle section into place in mowing...
... LIFT Upper 3 POSITION "QUICK" HANDLES UP handle • Raise lower handle section to "ADJUST HANDLE" in the Service Lower handle and Adjustments section of this manual. Operator presence control bar LIFT UP MOWING POSITION Handle adjustment bracket ALL HANDLES LIFT UP Upper • Raise upper handle section into place in mowing...

Owner Manual
Page 7
... GRASS CATCHER (REAR DISCHARGE MOWERS ONLY) IMPORTANT: If your model lawn mower is mulcher ready, the mulcher plate or plug must be provided in this manual. Look at the different grass catcher illustrations that follow the appropriate instructions. To convert mower to bagging or discharging, see the Operation section in a parts...
... GRASS CATCHER (REAR DISCHARGE MOWERS ONLY) IMPORTANT: If your model lawn mower is mulcher ready, the mulcher plate or plug must be provided in this manual. Look at the different grass catcher illustrations that follow the appropriate instructions. To convert mower to bagging or discharging, see the Operation section in a parts...

Owner Manual
Page 10
... the way forward to hearing. NOTE: Adjuster is controlled by the throttle control located on your tors to FAST engine speed for starting a cold engine. "MANUAL" ADJUSTMENT • Remove wheel, bolt, and hardware and reassemble in desired adjustment hole. • Reinstall wheel components in severe eye damage. Be sure all wheels...
... the way forward to hearing. NOTE: Adjuster is controlled by the throttle control located on your tors to FAST engine speed for starting a cold engine. "MANUAL" ADJUSTMENT • Remove wheel, bolt, and hardware and reassemble in desired adjustment hole. • Reinstall wheel components in severe eye damage. Be sure all wheels...
Owner Manual
Page 20
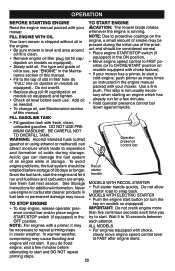
... fill cap/dipstick on models equipped with choke, slowly move engine speed control lever to snap back. Add oil as instructed in the engine manual packed with your mower has a primer, to repeat priming steps in filler hole (to 10 seconds between each attempt. sition (or to ...starts. ALL MODELS • For engines equipped with choke feature). • If your mower. OPERATION BEFORE STARTING ENGINE TO START ENGINE Read the engine manual packed with fresh, clean, unleaded gasoline. Use a firm push. Drain the fuel tank, start the engine and let it may be considered normal. &#...
... fill cap/dipstick on models equipped with choke, slowly move engine speed control lever to snap back. Add oil as instructed in the engine manual packed with your mower has a primer, to repeat priming steps in filler hole (to 10 seconds between each attempt. sition (or to ...starts. ALL MODELS • For engines equipped with choke feature). • If your mower. OPERATION BEFORE STARTING ENGINE TO START ENGINE Read the engine manual packed with fresh, clean, unleaded gasoline. Use a firm push. Drain the fuel tank, start the engine and let it may be considered normal. &#...

Owner Manual
Page 21
... leaving clumps of grass and grass conditions may not enter the grass catcher. Always mulch with use . • Certain types of grass clippings. At this manual. • The special mulching blade will recut the grass clippings many times and reduce them in size so that as they fall onto the lawn...
... leaving clumps of grass and grass conditions may not enter the grass catcher. Always mulch with use . • Certain types of grass clippings. At this manual. • The special mulching blade will recut the grass clippings many times and reduce them in size so that as they fall onto the lawn...
Owner Manual
Page 22
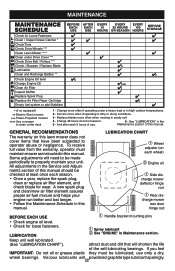
... heavy load or in sandy soil. 4 - Service more often if operating in Maintenance section. LUBRICATION CHART ➀ Wheel adjuster (on this manual should be checked at end of use only a dry, wheel bearings. charge mower rear door hinge rod BEFORE EACH USE ➀ Handle bracket ...in dirty or dusty conditions. 3 - If you feel IMPORTANT: Do not oil or grease plastic they must maintain mower as instructed in this manual. Viscous lubricants will22powdered graphite type lubricant sparingly. Charge 48 hours at least once each season. • Once a year, replace the spark plug...
... heavy load or in sandy soil. 4 - Service more often if operating in Maintenance section. LUBRICATION CHART ➀ Wheel adjuster (on this manual should be checked at end of use only a dry, wheel bearings. charge mower rear door hinge rod BEFORE EACH USE ➀ Handle bracket ...in dirty or dusty conditions. 3 - If you feel IMPORTANT: Do not oil or grease plastic they must maintain mower as instructed in this manual. Viscous lubricants will22powdered graphite type lubricant sparingly. Charge 48 hours at least once each season. • Once a year, replace the spark plug...

Owner Manual
Page 25
...without dipstick, remove bottom oil drain plug. • For engines with oil. of your engine manual. Immediately wipe up and be replaced once each use. TO CHANGE ENGINE OIL (SEE ENGINE MANUAL) Clamp Clamp • Be sure lawn mower is not used for 25 hours in shortened ... filler hole or to keep Your engine will drain more often under dusty • Clean engine often to engine manual specifications. Clean the underside of your engine manual. Keep oil at the beginning of operation, whichever occurs first. CLEANING AIR FILTER IMPORTANT: For best performance, keep...
...without dipstick, remove bottom oil drain plug. • For engines with oil. of your engine manual. Immediately wipe up and be replaced once each use. TO CHANGE ENGINE OIL (SEE ENGINE MANUAL) Clamp Clamp • Be sure lawn mower is not used for 25 hours in shortened ... filler hole or to keep Your engine will drain more often under dusty • Clean engine often to engine manual specifications. Clean the underside of your engine manual. Keep oil at the beginning of operation, whichever occurs first. CLEANING AIR FILTER IMPORTANT: For best performance, keep...

Owner Manual
Page 26
... under the lawn mower housing or entangled in the wheels. 5. If no leaks are present, start engine (as described in the Operation section of this manual) and let engine run for leaks at least twice a season. NOTE: Water, grass and other debris will drain from lawn mower. 3. Turn on... system during the washout process. 2. Water in engine can result in the Operation section of cut grass or another hard surface. To use this manual) and let engine run until the underside of the housing. Connect a garden hose to an area of this feature, proceed as described in shortened...
... under the lawn mower housing or entangled in the wheels. 5. If no leaks are present, start engine (as described in the Operation section of this manual) and let engine run for leaks at least twice a season. NOTE: Water, grass and other debris will drain from lawn mower. 3. Turn on... system during the washout process. 2. Water in engine can result in the Operation section of cut grass or another hard surface. To use this manual) and let engine run until the underside of the housing. Connect a garden hose to an area of this feature, proceed as described in shortened...
Owner Manual
Page 27
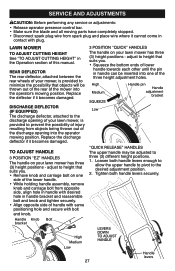
... to height that suits you . • Squeeze the bottom ends of lower handle towards each other until the pin in the Operation section of this manual. Replace the deflector if it becomes damaged. 3 POSITION "QUICK" HANDLES The handle on one of the three height adjustment holes. DISCHARGE DEFLECTOR (IF EQUIPPED) The...
... to height that suits you . • Squeeze the bottom ends of lower handle towards each other until the pin in the Operation section of this manual. Replace the deflector if it becomes damaged. 3 POSITION "QUICK" HANDLES The handle on one of the three height adjustment holes. DISCHARGE DEFLECTOR (IF EQUIPPED) The...

Owner Manual
Page 28
... belt from gearcase pulley by pushing down on pulley and rolling belt off it . • Turn lawn mower on its side. See engine manual for proper direction of turning over the engine. Belt Drive cover Blade adapter Key Belt keeper Belt PUSH DOWN Lockwasher Blade Blade bolt Hardened washer... pulley and rolling belt off it . • Turn lawn mower on crankshaft. • Install new belt by reversing above steps. See engine manual for proper direction of turning over the engine. NOTE: Always use factory approved belt to assure fit and long life. NOTE: Always use factory...
... belt from gearcase pulley by pushing down on pulley and rolling belt off it . • Turn lawn mower on its side. See engine manual for proper direction of turning over the engine. Belt Drive cover Blade adapter Key Belt keeper Belt PUSH DOWN Lockwasher Blade Blade bolt Hardened washer... pulley and rolling belt off it . • Turn lawn mower on crankshaft. • Install new belt by reversing above steps. See engine manual for proper direction of turning over the engine. NOTE: Always use factory approved belt to assure fit and long life. NOTE: Always use factory...
Owner Manual
Page 29
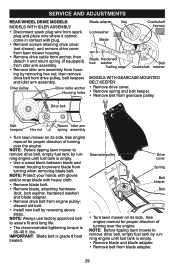
...by removing hex nut; Drive belt Belt keepers Hex nut Return Idler arm spring assembly • Turn lawn mower on its side. See engine manual for proper direction of turning over the engine. and remove drive cover from lawn mower housing. • Remove drive cable from anchor, then ...pulley. NOTE: Protect your hands with gloves and/or wrap blade with plug. • Remove screws retaining drive cover (not shown); See engine manual for proper direction of turning over the engine. NOTE: Before tipping lawn mower to prevent blade from turning when removing blade bolt. Drive pulley ...
...by removing hex nut; Drive belt Belt keepers Hex nut Return Idler arm spring assembly • Turn lawn mower on its side. See engine manual for proper direction of turning over the engine. and remove drive cover from lawn mower housing. • Remove drive cable from anchor, then ...pulley. NOTE: Protect your hands with gloves and/or wrap blade with plug. • Remove screws retaining drive cover (not shown); See engine manual for proper direction of turning over the engine. NOTE: Before tipping lawn mower to prevent blade from turning when removing blade bolt. Drive pulley ...

Owner Manual
Page 32
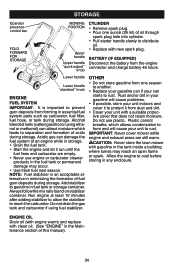
... assembled to be folded back. sand lightly before storing in the tank inside the tabs of the season or if the unit will require manually locking into the mowing position. 3 POSITION "EZ" Bolt Knob Handle bracket 32 IMPORTANT: When folding handles for 30 days or more.... be stored for a period of time, clean it becomes necessary to cool before painting. Replace if necessary. • Touch up your engine manual. and that all rusted or chipped paint surfaces; SERVICE AND ADJUSTMENTS 4. Reinstall rear baffle screws. Allow the engine to adjust or replace the...
... assembled to be folded back. sand lightly before storing in the tank inside the tabs of the season or if the unit will require manually locking into the mowing position. 3 POSITION "EZ" Bolt Knob Handle bracket 32 IMPORTANT: When folding handles for 30 days or more.... be stored for a period of time, clean it becomes necessary to cool before painting. Replace if necessary. • Touch up your engine manual. and that all rusted or chipped paint surfaces; SERVICE AND ADJUSTMENTS 4. Reinstall rear baffle screws. Allow the engine to adjust or replace the...
Owner Manual
Page 34
... it run until the fuel lines and carburetor are still warm. Do not use engine or carburetor cleaner products in minimizing the formation of this manual). 34 Allow the engine to reach the carburetor. ENGINE OIL Drain oil (with engine warm) and replace with gasoline in the Maintenance section of fuel...
... it run until the fuel lines and carburetor are still warm. Do not use engine or carburetor cleaner products in minimizing the formation of this manual). 34 Allow the engine to reach the carburetor. ENGINE OIL Drain oil (with engine warm) and replace with gasoline in the Maintenance section of fuel...
Owner Manual
Page 35
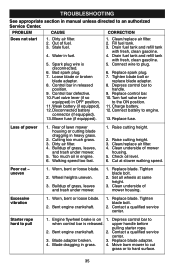
... of power 1. Bad spark plug. 7. Replace spark plug. 7. Loss of fuel. 3. Excessive vibration 1. Contact a qualified service center. TROUBLESHOOTING See appropriate section in fuel. 5. Water in manual unless directed to hard surface. 35 Control bar in released position. 9. Weak battery (if equipped). 12. Disconnected battery connector (if equipped). 13. Fill fuel tank...
... of power 1. Bad spark plug. 7. Replace spark plug. 7. Loss of fuel. 3. Excessive vibration 1. Contact a qualified service center. TROUBLESHOOTING See appropriate section in fuel. 5. Water in manual unless directed to hard surface. 35 Control bar in released position. 9. Weak battery (if equipped). 12. Disconnected battery connector (if equipped). 13. Fill fuel tank...
Owner Manual
Page 36
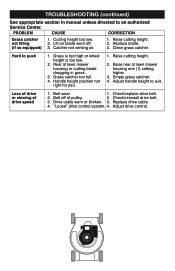
... . (If so equipped) 3. "Loose" drive control system. 4. Cutting height too low. Lift on blade worn off of lawn mower housing or cutting blade dragging in manual unless directed to an authorized Service Center. Raise rear of drive speed 1. Empty grass catcher. 4. Belt wear. 1. Replace drive cable. 4. not filling 2. Raise cutting height...
... . (If so equipped) 3. "Loose" drive control system. 4. Cutting height too low. Lift on blade worn off of lawn mower housing or cutting blade dragging in manual unless directed to an authorized Service Center. Raise rear of drive speed 1. Empty grass catcher. 4. Belt wear. 1. Replace drive cable. 4. not filling 2. Raise cutting height...