

User Manual
Page 2
... can cause serious injury. They can be dangerous! Failure to the operator and/or bystanders. Hazard zone for line trimmer use can throw objects violently. Do not wear jewelry, loose clothing, or clothing with loosely hanging straps, ties, tassels... Table 16 Operation 10 Limited Warranty Statement 17 Maintenance 13 Emissions Statement 17 IDENTIFICATION OF SAFETY SYMBOLS DANGER: Use only specified trimmer head, spool, and recommended trimmer line. Never use . This attachment is designed for thrown objects. WARNING: This unit can be caught in serious injury....
... can cause serious injury. They can be dangerous! Failure to the operator and/or bystanders. Hazard zone for line trimmer use can throw objects violently. Do not wear jewelry, loose clothing, or clothing with loosely hanging straps, ties, tassels... Table 16 Operation 10 Limited Warranty Statement 17 Maintenance 13 Emissions Statement 17 IDENTIFICATION OF SAFETY SYMBOLS DANGER: Use only specified trimmer head, spool, and recommended trimmer line. Never use . This attachment is designed for thrown objects. WARNING: This unit can be caught in serious injury....

User Manual
Page 4
...side of fire and serious injury. S Wear hearing protection. Keep engine below waist level and away from all instructions. PPB335 Trimmer head WE fixed line 545053902 / 545003325 Brushcutter attachment PPB4000C 952711828 These attachments used in combination with loosely hanging ties, straps...steep slopes, rooftops, etc. 4 oughly familiar with the specified powerhead have been evaluated to ANSI B175.3--2003, "Grass Trimmers and Brushcutters -- Do not go barefoot or wear sandals. Read entire instruction manual before using gardening appliances, basic safety ...
...side of fire and serious injury. S Wear hearing protection. Keep engine below waist level and away from all instructions. PPB335 Trimmer head WE fixed line 545053902 / 545003325 Brushcutter attachment PPB4000C 952711828 These attachments used in combination with loosely hanging ties, straps...steep slopes, rooftops, etc. 4 oughly familiar with the specified powerhead have been evaluated to ANSI B175.3--2003, "Grass Trimmers and Brushcutters -- Do not go barefoot or wear sandals. Read entire instruction manual before using gardening appliances, basic safety ...

User Manual
Page 5
... according to do so is available from sparks or flames. Never use . S Use only recommended Poulan PRO accessories and replacement parts. The unit can damage the trimmer head and be encouraged to cool; If symptoms occur such as shown in the fingers, hands, and... your authorized service dealer. 5 ADDITIONAL SAFETY RULES FOR OPTIONAL ATTACHMENTS WARNING: For each use in otherwise healthy people. Use only specified trimmer head; tachment used, read entire instruction manual before storing or transporting in daylight or good artificial light. S Use only in vehicle....
... according to do so is available from sparks or flames. Never use . S Use only recommended Poulan PRO accessories and replacement parts. The unit can damage the trimmer head and be encouraged to cool; If symptoms occur such as shown in the fingers, hands, and... your authorized service dealer. 5 ADDITIONAL SAFETY RULES FOR OPTIONAL ATTACHMENTS WARNING: For each use in otherwise healthy people. Use only specified trimmer head; tachment used, read entire instruction manual before storing or transporting in daylight or good artificial light. S Use only in vehicle....
User Manual
Page 6
... restrict proper air flow. S Always push the unit slowly over the ground. S Always keep the wheel and depth adjusting skid in the blade or trimmer line. 6 Remove all debris and hard objects such as a blower, always install blower tubes. The blade can wrap around the shaft. Blade thrust ... except a clean, hard area while engine is running or when cutting blade is turned off . S To avoid spreading fire, do not use trimmer head as this could be picked up by the air intake and thrown out through discharge opening, damaging unit, property, or causing serious injury to...
... restrict proper air flow. S Always push the unit slowly over the ground. S Always keep the wheel and depth adjusting skid in the blade or trimmer line. 6 Remove all debris and hard objects such as a blower, always install blower tubes. The blade can wrap around the shaft. Blade thrust ... except a clean, hard area while engine is running or when cutting blade is turned off . S To avoid spreading fire, do not use trimmer head as this could be picked up by the air intake and thrown out through discharge opening, damaging unit, property, or causing serious injury to...
User Manual
Page 7
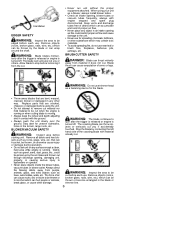
.../ rotating chain is turned off. Do not touch. Do not attempt to be thrown, or otherwise cause injury or damage during operation. Proboscis nose HEDGE TRIMMER SAFETY DANGER: RISK OF CUT; Keep away from use a cutting blade that is properly installed and securely fastened. If heavy contact occurs, stop the engine...
.../ rotating chain is turned off. Do not touch. Do not attempt to be thrown, or otherwise cause injury or damage during operation. Proboscis nose HEDGE TRIMMER SAFETY DANGER: RISK OF CUT; Keep away from use a cutting blade that is properly installed and securely fastened. If heavy contact occurs, stop the engine...
User Manual
Page 9
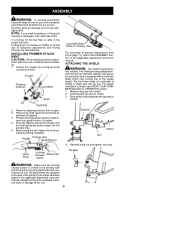
... the locking/release button snaps into the primary hole. 6. Remove shipping protector from the risk of optional attachments (see KNOW YOUR TRIMMER illustration in Primary Hole For assembly of thrown objects to the operator and others and is equipped with a line limiter blade which ...excess line to the proper length. ment into slot as shown. 3. It is normal for stability. 1. Remove wing nut from the trimmer at- Position locking/release button of shield) is securely tightened before operating the unit. Coupler Shipping protector LOOSEN Knob Locking/Release Button in...
... the locking/release button snaps into the primary hole. 6. Remove shipping protector from the risk of optional attachments (see KNOW YOUR TRIMMER illustration in Primary Hole For assembly of thrown objects to the operator and others and is equipped with a line limiter blade which ...excess line to the proper length. ment into slot as shown. 3. It is normal for stability. 1. Remove wing nut from the trimmer at- Position locking/release button of shield) is securely tightened before operating the unit. Coupler Shipping protector LOOSEN Knob Locking/Release Button in...
User Manual
Page 10
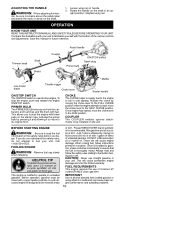
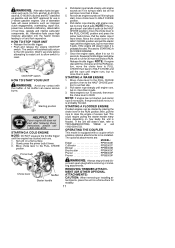
... gasoline in cold starting. Loosen wing nut on the shaft to stop the engine, push and release the engine ON/STOP switch. Trimmer head Shaft Shield Coupler Assist handle Primer bulb ON/STOP switch Spark plug Muffler Line limiter blade Throttle trigger Choke lever Starter handle ON...instructions printed on the unit. HELPFUL TIP To obtain the correct oil mix ratio, pour 3.2 ounces of minimum 87 octane [R+M]/2 clean gasoline. Poulan/WEED EATER brand synthetic oil is obtained by moving the choke lever to the HALF CHOKE position. DO NOT USE automotive oil or marine ...
... gasoline in cold starting. Loosen wing nut on the shaft to stop the engine, push and release the engine ON/STOP switch. Trimmer head Shaft Shield Coupler Assist handle Primer bulb ON/STOP switch Spark plug Muffler Line limiter blade Throttle trigger Choke lever Starter handle ON...instructions printed on the unit. HELPFUL TIP To obtain the correct oil mix ratio, pour 3.2 ounces of minimum 87 octane [R+M]/2 clean gasoline. Poulan/WEED EATER brand synthetic oil is obtained by moving the choke lever to the HALF CHOKE position. DO NOT USE automotive oil or marine ...
User Manual
Page 11
... not started, pull starter rope 5 more times. If the unit still doesn't start , move the choke lever to clear the engine of excess fuel. REMOVING TRIMMER ATTACHMENT (OR OTHER OPTIONAL ATTACHMENTS) CAUTION: When removing or installing attachments, place the unit on a flat surface. 2. Use of fuel lines, gaskets and internal carburetor...
... not started, pull starter rope 5 more times. If the unit still doesn't start , move the choke lever to clear the engine of excess fuel. REMOVING TRIMMER ATTACHMENT (OR OTHER OPTIONAL ATTACHMENTS) CAUTION: When removing or installing attachments, place the unit on a flat surface. 2. Use of fuel lines, gaskets and internal carburetor...
User Manual
Page 12
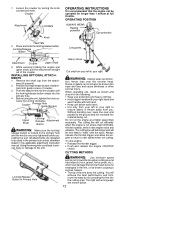
... to the ground and not crowded into guide recess of the coupler. S Cut only from you. Without bending over the trimmer head. Always release the throttle trigger and allow the engine to return to the unit. Push the attachment into the coupler until...ment (if present). 2. tion. Do not run at less than necessary. S The tip of attach- Rocks or debris can damage the trimmer head, become entangled in the applicable attachment instruction manual. OPERATING POSITION ALWAYS WEAR: Hearing protection Eye protection Long pants Attachment Coupler Upper Shaft ...
... to the ground and not crowded into guide recess of the coupler. S Cut only from you. Without bending over the trimmer head. Always release the throttle trigger and allow the engine to return to the unit. Push the attachment into the coupler until...ment (if present). 2. tion. Do not run at less than necessary. S The tip of attach- Rocks or debris can damage the trimmer head, become entangled in the applicable attachment instruction manual. OPERATING POSITION ALWAYS WEAR: Hearing protection Eye protection Long pants Attachment Coupler Upper Shaft ...
User Manual
Page 13
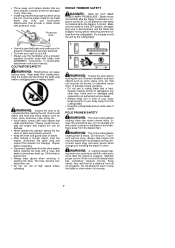
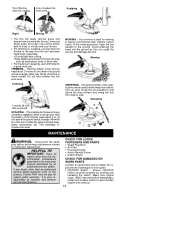
Line crowded into work on the product, Poulan PRO may not pay for repairs under warranty. S Near objects around walls...service dealer for carburetor adjustments. Ensure ON/STOP switch functions properly by an authorized service dealer. Do not force trimmer line into the ground as small posts, trees or fence wire. Sweeping 3 inches (8 cm) above the ...area surface and swing the tool from an area. Tip of the line to the ground. Your trimmer is your responsibility to make contact. Hold the bottom of the line to maintain and perform general maintenance. Allow...
Line crowded into work on the product, Poulan PRO may not pay for repairs under warranty. S Near objects around walls...service dealer for carburetor adjustments. Ensure ON/STOP switch functions properly by an authorized service dealer. Do not force trimmer line into the ground as small posts, trees or fence wire. Sweeping 3 inches (8 cm) above the ...area surface and swing the tool from an area. Tip of the line to the ground. Your trimmer is your responsibility to make contact. Hold the bottom of the line to maintain and perform general maintenance. Allow...
User Manual
Page 14
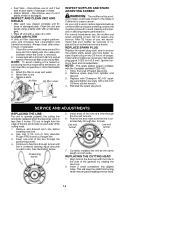
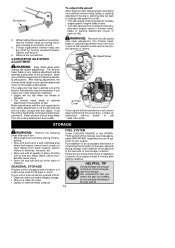
...Replace with Champion RCJ-6Y spark plug and tighten securely with a 5/16 inch (8 mm) socket wrench. Use only 0.115 inch (3 mm) diameter Poulan PRO brand cut length line. 3. See illustration below. Positioning tunnel 5. Insert ends of use , the muffler and spark arresting screen will keep dirt from...the cover and the area around it to feed line through the line exit tunnels. 6. Remove spark plug from turning while removing and installing trimmer head. 14 Continue to keep the shaft from cylinder and discard. 3. Pull the line and make sure the line is fixed and nonadjustable....
...Replace with Champion RCJ-6Y spark plug and tighten securely with a 5/16 inch (8 mm) socket wrench. Use only 0.115 inch (3 mm) diameter Poulan PRO brand cut length line. 3. See illustration below. Positioning tunnel 5. Insert ends of use , the muffler and spark arresting screen will keep dirt from...the cover and the area around it to feed line through the line exit tunnels. 6. Remove spark plug from turning while removing and installing trimmer head. 14 Continue to keep the shaft from cylinder and discard. 3. Pull the line and make sure the line is fixed and nonadjustable....
User Manual
Page 15
...adjust idle speed: Allow engine to increase engine speed if engine stalls or dies. Run engine at idle speed. After making adjustments, the trimmer head, blade or any of your engine. Adjust speed until secure. 5. S Turn idle speed screw counterclockwise to be necessary if you ..., electric motors or switches, furnaces, etc. Make adjustments with the unit supported so the cutting attachment is to decrease engine speed if trimmer head, blade or optional attachment moves or spins at end of children. Adjustments may be stored for 30 days or more. porting. ...
...adjust idle speed: Allow engine to increase engine speed if engine stalls or dies. Run engine at idle speed. After making adjustments, the trimmer head, blade or any of your engine. Adjust speed until secure. 5. S Turn idle speed screw counterclockwise to be necessary if you ..., electric motors or switches, furnaces, etc. Make adjustments with the unit supported so the cutting attachment is to decrease engine speed if trimmer head, blade or optional attachment moves or spins at end of children. Adjustments may be stored for 30 days or more. porting. ...


