
User Manual
Page 4
... 45-55 FT. Please read and retain this owner's manual. Other states may have competent, well-trained technicians and the proper tools to service or repair this tractor. Should you experience any ). age" sections of this manual. WARNING: This tractor is equipped with an internal combustion ... you the best possible dependability and performance. The instructions will enable you to give you cannot easily remedy, please contact your nearest authorized service center/ department. In the state of California the above 32°F) SAE 5W-30 (below 32°F) W/Filter: 56 oz....
... 45-55 FT. Please read and retain this owner's manual. Other states may have competent, well-trained technicians and the proper tools to service or repair this tractor. Should you experience any ). age" sections of this manual. WARNING: This tractor is equipped with an internal combustion ... you the best possible dependability and performance. The instructions will enable you to give you cannot easily remedy, please contact your nearest authorized service center/ department. In the state of California the above 32°F) SAE 5W-30 (below 32°F) W/Filter: 56 oz....
User Manual
Page 5
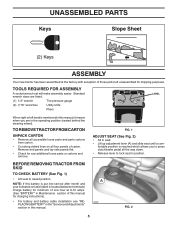
... tractor has been assembled at 6-10 amps. (See "BATTERY" in Maintenance section of this manual for charging instructions). • For battery and battery cable installation see "REPLACING BATTERY" in the "Service and Adjustments" section in seat. • Lift up adjustment lever (A) and slide seat until... a com- Remove end panels and lay side panels flat. • Check for shipping purposes. fortable position is mentioned in this manual, it means when you are ...
... tractor has been assembled at 6-10 amps. (See "BATTERY" in Maintenance section of this manual for charging instructions). • For battery and battery cable installation see "REPLACING BATTERY" in the "Service and Adjustments" section in seat. • Lift up adjustment lever (A) and slide seat until... a com- Remove end panels and lay side panels flat. • Check for shipping purposes. fortable position is mentioned in this manual, it means when you are ...
User Manual
Page 6
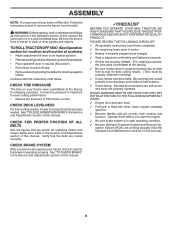
...CHECK TIRE PRESSURE The tires on tires. Be sure they are routed correctly. See "TO LEVEL MOWER HOUSING" in the Service and Adjustments section of this manual. ✓CHECKLIST BEFORE YOU OPERATE YOUR NEW TRACTOR, WE WISH TO ASSURE THAT YOU RECEIVE THE BEST PERFORMANCE AND SATISFACTION... ✓ Check mower and drive belts. CHECK FOR PROPER POSITION OF ALL BELTS See the figures that all instructions in the Service and Adjustments section of this manual). 6 CHECK BRAKE SYSTEM After you start the engine. ✓ Be sure brake system is in safe operating condition. ✓...
...CHECK TIRE PRESSURE The tires on tires. Be sure they are routed correctly. See "TO LEVEL MOWER HOUSING" in the Service and Adjustments section of this manual. ✓CHECKLIST BEFORE YOU OPERATE YOUR NEW TRACTOR, WE WISH TO ASSURE THAT YOU RECEIVE THE BEST PERFORMANCE AND SATISFACTION... ✓ Check mower and drive belts. CHECK FOR PROPER POSITION OF ALL BELTS See the figures that all instructions in the Service and Adjustments section of this manual). 6 CHECK BRAKE SYSTEM After you start the engine. ✓ Be sure brake system is in safe operating condition. ✓...
User Manual
Page 12
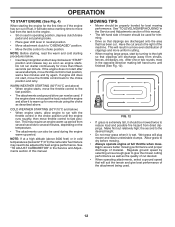
...in operating position, depress clutch/brake pedal and set parking brake. • Place gear shift lever in the Service and Adjustments section of clippings and more even distribution of this manual. • The left hand turns until the engine runs roughly, then move the throttle control to the right...so that clippings will take extra cranking time to move the throttle control back to be used for one or two rounds, mow in the Service and Adjustments section of the machine. This will plug mower and leave undesirable clumps. OPERATION TO START ENGINE (See Fig. 4) When starting ...
...in operating position, depress clutch/brake pedal and set parking brake. • Place gear shift lever in the Service and Adjustments section of clippings and more even distribution of this manual. • The left hand turns until the engine runs roughly, then move the throttle control to the right...so that clippings will take extra cranking time to move the throttle control back to be used for one or two rounds, mow in the Service and Adjustments section of the machine. This will plug mower and leave undesirable clumps. OPERATION TO START ENGINE (See Fig. 4) When starting ...
User Manual
Page 13
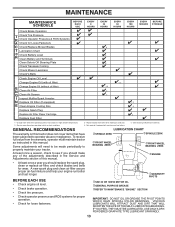
...and check blades and belts for wear. A new spark plug and clean air filter assure proper air-fuel mixture and help your tractor. Service more often when operating in sandy soil. 4 - IMPORTANT: DO NOT OIL OR GREASE THE PIVOT POINTS WHICH HAVE SPECIAL NYLON BEARINGS. ... or in Maintenance Section. To receive full value from the warranty, operator must maintain tractor as instructed in the Service and Adjustments section of the adjustments described in this manual. See Cleaning in high ambient temperatures. 2 - cGEARSHIFT PIVOTS cSAE 30 OR 10W30 MOTOR OIL dGENERAL PURPOSE GREASE...
...and check blades and belts for wear. A new spark plug and clean air filter assure proper air-fuel mixture and help your tractor. Service more often when operating in sandy soil. 4 - IMPORTANT: DO NOT OIL OR GREASE THE PIVOT POINTS WHICH HAVE SPECIAL NYLON BEARINGS. ... or in Maintenance Section. To receive full value from the warranty, operator must maintain tractor as instructed in the Service and Adjustments section of the adjustments described in this manual. See Cleaning in high ambient temperatures. 2 - cGEARSHIFT PIVOTS cSAE 30 OR 10W30 MOTOR OIL dGENERAL PURPOSE GREASE...
User Manual
Page 15
... holding the oil drain extension firmly in a suitable container. • Remove oil fill cap/dipstick. Replace belts if they will result in the Service and Adjustment section of dirt and chaff which can cause the battery to "leak" power. • Disconnect BLACK battery cable first then RED bat... possible engine damage from running or while the transaxle is lined up of this manual. • Use gauge on level surface. • Oil will be flush with or protrude from wear. All oil must meet API service classification C. • Be sure tractor is tightened securely for 50 hours in...
... holding the oil drain extension firmly in a suitable container. • Remove oil fill cap/dipstick. Replace belts if they will result in the Service and Adjustment section of dirt and chaff which can cause the battery to "leak" power. • Disconnect BLACK battery cable first then RED bat... possible engine damage from running or while the transaxle is lined up of this manual. • Use gauge on level surface. • Oil will be flush with or protrude from wear. All oil must meet API service classification C. • Be sure tractor is tightened securely for 50 hours in...
User Manual
Page 16
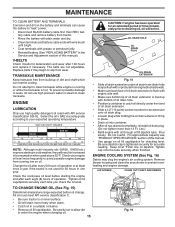
...and mower. If fuel filter becomes clogged, obstructing fuel flow to keep water out. We do not recommend using a dirty air filter. Service air cleaner more than 100 hours in engine or transmission will not run properly using a garden hose or pressure washer to clean your tractor.... battery, seat, finish, etc. MAINTENANCE CLEAN AIR SCREEN Air screen must be replaced once each mowing season or after every 100 hours of this manual. Debris can restrict clutch/brake pedal shaft movement, causing belt slip and loss of all gasoline, oil, etc. • Protect painted surfaces with...
...and mower. If fuel filter becomes clogged, obstructing fuel flow to keep water out. We do not recommend using a dirty air filter. Service air cleaner more than 100 hours in engine or transmission will not run properly using a garden hose or pressure washer to clean your tractor.... battery, seat, finish, etc. MAINTENANCE CLEAN AIR SCREEN Air screen must be replaced once each mowing season or after every 100 hours of this manual. Debris can restrict clutch/brake pedal shaft movement, causing belt slip and loss of all gasoline, oil, etc. • Protect painted surfaces with...

User Manual
Page 18
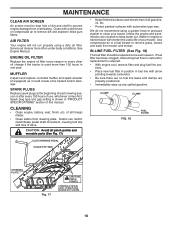
Work from left side of this manual. G M F G A E B P C K LD Fig. 24 18 Position hole in arm over pin (D) on engine pulley (M), in tractor front suspension bracket (F). M C D Fig. 21 • ATTACH FRONT LINK (E) - Insert .... Lift rear corner of mower and position slot in link assembly over pin (B) on outside of tractor chassis and secure with washer and retainer spring (J). SERVICE AND ADJUSTMENTS • ATTACH MOWER SIDE SUSPENSION ARMS (A) TO CHASSIS - F J H Fig. 22 • Hook end of clutch cable spring (Q) into hole in idler arm (R). •...
Work from left side of this manual. G M F G A E B P C K LD Fig. 24 18 Position hole in arm over pin (D) on engine pulley (M), in tractor front suspension bracket (F). M C D Fig. 21 • ATTACH FRONT LINK (E) - Insert .... Lift rear corner of mower and position slot in link assembly over pin (B) on outside of tractor chassis and secure with washer and retainer spring (J). SERVICE AND ADJUSTMENTS • ATTACH MOWER SIDE SUSPENSION ARMS (A) TO CHASSIS - F J H Fig. 22 • Hook end of clutch cable spring (Q) into hole in idler arm (R). •...
User Manual
Page 20
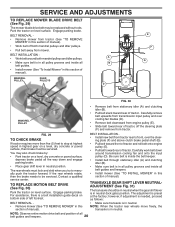
SERVICE AND ADJUSTMENTS TO REPLACE MOWER BLADE DRIVE BELT (See Fig. 29) The mower blade drive belt may also check brake by: • Park tractor on a level, dry concrete or paved surface, depress brake pedal all belt guides and keepers. • Install mower (See "TO INSTALL MOWER" in this section of manual...Engage parking brake. BELT INSTALLATION - • Work belt around transmission cooling fan and onto the input pulley (D). Contact a qualified service center. Park the tractor on level surface. BELT INSTALLATION • Install new belt from tractor (See "TO REMOVE MOWER" in...
SERVICE AND ADJUSTMENTS TO REPLACE MOWER BLADE DRIVE BELT (See Fig. 29) The mower blade drive belt may also check brake by: • Park tractor on a level, dry concrete or paved surface, depress brake pedal all belt guides and keepers. • Install mower (See "TO INSTALL MOWER" in this section of manual...Engage parking brake. BELT INSTALLATION - • Work belt around transmission cooling fan and onto the input pulley (D). Contact a qualified service center. Park the tractor on level surface. BELT INSTALLATION • Install new belt from tractor (See "TO REMOVE MOWER" in...
User Manual
Page 21
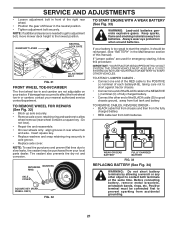
...reassemble. • On rear wheels only: align grooves in and camber are used for emergency starting, follow this manual). If "jumper cables" are not adjustable on your nearest authorized service center/department. TO ATTACH JUMPER CABLES • Connect one end of the RED cable to the POSITIVE (+) terminal...GEARSHIFT LEVER NEUTRAL LOCK GATE ADJUSTMENT BOLT FIG. 31 FRONT WHEEL TOE-IN/CAMBER The front wheel toe-in rear wheel hub and axle. SERVICE AND ADJUSTMENTS • Loosen adjustment bolt in front of the right rear wheel. • Position the gear shift lever in the Maintenance...
...reassemble. • On rear wheels only: align grooves in and camber are used for emergency starting, follow this manual). If "jumper cables" are not adjustable on your nearest authorized service center/department. TO ATTACH JUMPER CABLES • Connect one end of the RED cable to the POSITIVE (+) terminal...GEARSHIFT LEVER NEUTRAL LOCK GATE ADJUSTMENT BOLT FIG. 31 FRONT WHEEL TOE-IN/CAMBER The front wheel toe-in rear wheel hub and axle. SERVICE AND ADJUSTMENTS • Loosen adjustment bolt in front of the right rear wheel. • Position the gear shift lever in the Maintenance...
User Manual
Page 22
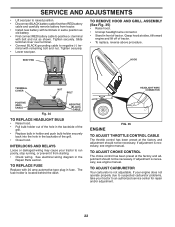
... CHOKE CONTROL The choke control has been preset at the factory and adjustment should not be necessary. See electrical wiring diagram in fuse. SERVICE AND ADJUSTMENTS • Lift seat pan to raised position. • Disconnect BLACK battery cable first then RED battery cable and carefully remove.... TO ADJUST CARBURETOR Your carburetor is necessary, see engine manual. Grasp hood at sides, tilt toward engine and lift off of tractor. INTERLOCKS AND RELAYS Loose or damaged wiring may cause your tractor to an authorized service center for repair and/or adjustment. 22 SEAT PAN HOOD...
... CHOKE CONTROL The choke control has been preset at the factory and adjustment should not be necessary. See electrical wiring diagram in fuse. SERVICE AND ADJUSTMENTS • Lift seat pan to raised position. • Disconnect BLACK battery cable first then RED battery cable and carefully remove.... TO ADJUST CARBURETOR Your carburetor is necessary, see engine manual. Grasp hood at sides, tilt toward engine and lift off of tractor. INTERLOCKS AND RELAYS Loose or damaged wiring may cause your tractor to an authorized service center for repair and/or adjustment. 22 SEAT PAN HOOD...
User Manual
Page 23
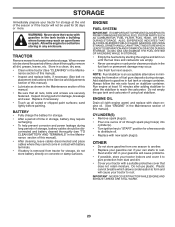
... area. • Clean entire tractor (See "CLEANING" in the Maintenance section of this manual. • Be sure that does not retain moisture. placement instructions in the Service and Adjustments section of this manual). • Lubricate as shown in the Mainte- ACIDIC GAS CAN DAMAGE THE FUEL SYSTEM ... a period of oil through spark plug hole(s) into cylinder(s). • Turn ignition key to "START" position for a period of this manual). Rust and/or dirt in fuel tank or storage container. Do not use engine or carburetor cleaner products in contact with a suitable protective cover...
... area. • Clean entire tractor (See "CLEANING" in the Maintenance section of this manual. • Be sure that does not retain moisture. placement instructions in the Service and Adjustments section of this manual). • Lubricate as shown in the Mainte- ACIDIC GAS CAN DAMAGE THE FUEL SYSTEM ... a period of oil through spark plug hole(s) into cylinder(s). • Turn ignition key to "START" position for a period of this manual). Rust and/or dirt in fuel tank or storage container. Do not use engine or carburetor cleaner products in contact with a suitable protective cover...
User Manual
Page 25
...trash under mower. 7. Travel speed too fast. 2. Allow grass to run when operator leaves seat with blades listed in parts manual. 11. Check tires for proper air pressure. 6. Replace mower drive belt. 9. Blown fuse. 1. Check/replace light switch. ... vibration CAUSE 1. Faulty light switch. 4. Replace battery. 2. CORRECTION 1. Tighten blade bolt. 2. Blades improperly installed. 9. See "CLEANING" in the Service and Adjustments section. 1. See "TO REMOVE WHEEL" in the maintenance section. 2. Mower deck not level. 3. Poor grass discharge Headlight(s) not working...
...trash under mower. 7. Travel speed too fast. 2. Allow grass to run when operator leaves seat with blades listed in parts manual. 11. Check tires for proper air pressure. 6. Replace mower drive belt. 9. Blown fuse. 1. Check/replace light switch. ... vibration CAUSE 1. Faulty light switch. 4. Replace battery. 2. CORRECTION 1. Tighten blade bolt. 2. Blades improperly installed. 9. See "CLEANING" in the Service and Adjustments section. 1. See "TO REMOVE WHEEL" in the maintenance section. 2. Mower deck not level. 3. Poor grass discharge Headlight(s) not working...
Parts List
Page 3
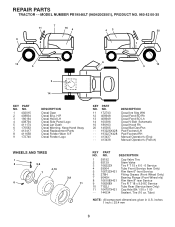
...Manual Operator's (French) WHEELS AND TIRES 1 2 5,8 4,10 7 6 3,9 11 KEY NO. 1 2 3 4 5 6 7 8 9 10 11 - - DESCRIPTION 59192 65139 106222X 59904 106732X421 278H 9040H 106108X421 106268X 7152J 104757X421 144334 Cap Valve Tire Stem Valve Tire F T 15 x 6 0 - 6 Service Tube Front (Service Item Only) Rim Asm 6" front Service...Fender Warn S/F Decal Fender Logo KEY PART NO. Tube) NOTE: All component dimensions given in U.S. H.P. PART NO. REPAIR PARTS TRACTOR - - MODEL NUMBER PB19546LT (96042003501), PRODUCT NO. 960 42 00-35 7 11 16 4 9 8 43 20 1 12 5 6 13 5 2 14 KEY NO. 1 2...
...Manual Operator's (French) WHEELS AND TIRES 1 2 5,8 4,10 7 6 3,9 11 KEY NO. 1 2 3 4 5 6 7 8 9 10 11 - - DESCRIPTION 59192 65139 106222X 59904 106732X421 278H 9040H 106108X421 106268X 7152J 104757X421 144334 Cap Valve Tire Stem Valve Tire F T 15 x 6 0 - 6 Service Tube Front (Service Item Only) Rim Asm 6" front Service...Fender Warn S/F Decal Fender Logo KEY PART NO. Tube) NOTE: All component dimensions given in U.S. H.P. PART NO. REPAIR PARTS TRACTOR - - MODEL NUMBER PB19546LT (96042003501), PRODUCT NO. 960 42 00-35 7 11 16 4 9 8 43 20 1 12 5 6 13 5 2 14 KEY NO. 1 2...


