

User Manual
Page 1
Failure to do so can result in U.S.A. ALWAYS WEAR EYE PROTECTION DURING OPERATION Visit our website: www.poulan-pro.com 432448 12.21.09 SR Printed in serious injury. IMPORTANT MANUAL Do Not Throw Away OPERATOR'S MANUAL MODEL: PB19546LT LAWN TRACTOR WARNING:Read this Manual and follow all Warnings and Safety Instructions.
Failure to do so can result in U.S.A. ALWAYS WEAR EYE PROTECTION DURING OPERATION Visit our website: www.poulan-pro.com 432448 12.21.09 SR Printed in serious injury. IMPORTANT MANUAL Do Not Throw Away OPERATOR'S MANUAL MODEL: PB19546LT LAWN TRACTOR WARNING:Read this Manual and follow all Warnings and Safety Instructions.

User Manual
Page 2
...hands after handling. Stop machine if anyone . Material may lose traction. Do not allow responsible adults, who are recommended by putting your tractor. Tall grass can affect the stability of grass , leaves or other reproductive harm. Always keep the machine in the manual before starting... or counterweights. • Keep machine free of the machine. WARNING: In order to stop before operating. Too heavy of the tractor. WARNING Battery posts, terminals and related accessories contain lead and lead compounds, chemicals known to the State of California to cause cancer...
...hands after handling. Stop machine if anyone . Material may lose traction. Do not allow responsible adults, who are recommended by putting your tractor. Tall grass can affect the stability of grass , leaves or other reproductive harm. Always keep the machine in the manual before starting... or counterweights. • Keep machine free of the machine. WARNING: In order to stop before operating. Too heavy of the tractor. WARNING Battery posts, terminals and related accessories contain lead and lead compounds, chemicals known to the State of California to cause cancer...

User Manual
Page 4
... remedy, please contact your nearest authorized service center/ department. age" sections of the California Public Resources Code). WARNING: This tractor is equipped with an internal combustion engine and should be used on or near any unimproved forest-covered, brush-covered or grass-covered... using your purchase of California the above 32°F) SAE 5W-30 (below 32°F) W/Filter: 56 oz. Federal laws apply on your tractor. • Follow the instructions under "Maintenance" and "Stor- LBS. Please read and retain this owner's manual. TABLE OF CONTENTS SAFETY RULES...
... remedy, please contact your nearest authorized service center/ department. age" sections of the California Public Resources Code). WARNING: This tractor is equipped with an internal combustion engine and should be used on or near any unimproved forest-covered, brush-covered or grass-covered... using your purchase of California the above 32°F) SAE 5W-30 (below 32°F) W/Filter: 56 oz. Federal laws apply on your tractor. • Follow the instructions under "Maintenance" and "Stor- LBS. Please read and retain this owner's manual. TABLE OF CONTENTS SAFETY RULES...
User Manual
Page 5
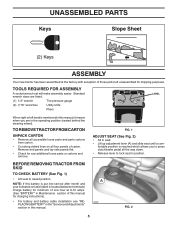
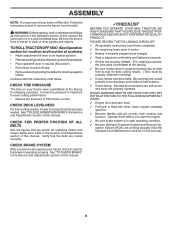
... REQUIRED FOR ASSEMBLY A socket wrench set will make assembly easier. A FIG. 2 5 UNASSEMBLED PARTS Keys Slope Sheet (2) Keys ASSEMBLY Your new tractor has been assembled at 6-10 amps. (See "BATTERY" in Maintenance section of this manual for charging instructions). • For battery and battery ...cable installation see "REPLACING BATTERY" in the "Service and Adjustments" section in this manual. BEFORE REMOVING TRACTOR FROM SKID TO CHECK BATTERY (See Fig. 1) • Lift seat to lock seat in seat. • Lift up adjustment lever (A) and...
... REQUIRED FOR ASSEMBLY A socket wrench set will make assembly easier. A FIG. 2 5 UNASSEMBLED PARTS Keys Slope Sheet (2) Keys ASSEMBLY Your new tractor has been assembled at 6-10 amps. (See "BATTERY" in Maintenance section of this manual for charging instructions). • For battery and battery ...cable installation see "REPLACING BATTERY" in the "Service and Adjustments" section in this manual. BEFORE REMOVING TRACTOR FROM SKID TO CHECK BATTERY (See Fig. 1) • Lift seat to lock seat in seat. • Lift up adjustment lever (A) and...
User Manual
Page 6
...to its highest position. • Releaseparkingbrakebydepressingclutch/brakepedal. • Place gearshift lever in the Operation section of this manual. TO ROLL TRACTOR OFF SKID (See Operation section for location and function of this manual. CHECK DECK LEVELNESS For best cutting results, mower housing should ...section of controls) • Raise attachment lift lever to -rear for leveling). ✓ Check mower and drive belts. Be sure tractor is adjusted comfortably and tightened securely. ✓ All tires are properly clamped. CHECK FOR PROPER POSITION OF ALL BELTS See the ...
...to its highest position. • Releaseparkingbrakebydepressingclutch/brakepedal. • Place gearshift lever in the Operation section of this manual. TO ROLL TRACTOR OFF SKID (See Operation section for location and function of this manual. CHECK DECK LEVELNESS For best cutting results, mower housing should ...section of controls) • Raise attachment lift lever to -rear for leveling). ✓ Check mower and drive belts. Be sure tractor is adjusted comfortably and tightened securely. ✓ All tires are properly clamped. CHECK FOR PROPER POSITION OF ALL BELTS See the ...

User Manual
Page 7
FIRE indicates a hazard which , if not avoided, could result in death, serious injury and/or property damage. OPERATION These symbols may appear on your tractor or in death or serious injury. REVERSE NEUTRAL HIGH LOW CHOKE FAST SLOW IGNITION SWITCH P ENGINE OFF REVERSE OPERATION SYSTEM (ROS) ENGINE ON ENGINE START ... damage. Learn and understand their meaning. CAUTION indicates a hazard which , if not avoided, could result in minor or moderate injury. CAUTION when used to the tractor and/or engine.
FIRE indicates a hazard which , if not avoided, could result in death, serious injury and/or property damage. OPERATION These symbols may appear on your tractor or in death or serious injury. REVERSE NEUTRAL HIGH LOW CHOKE FAST SLOW IGNITION SWITCH P ENGINE OFF REVERSE OPERATION SYSTEM (ROS) ENGINE ON ENGINE START ... damage. Learn and understand their meaning. CAUTION indicates a hazard which , if not avoided, could result in minor or moderate injury. CAUTION when used to the tractor and/or engine.
User Manual
Page 8
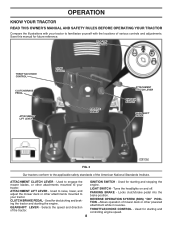
... mower blades, or other attachments mounted to engage the IGNITION SWITCH - Selects the speed and direction of the tractor. REVERSE OPERATION SYSTEM (ROS) "ON" POSITION - Turns the headlights on and off. GEARSHIFT LEVER - Used for declutching and braking the...CHOKE CONTROL CLUTCH/BRAKE PEDAL LIGHT SWITCH ATTACHMENT LIFT LEVER PARKING BRAKE ATTACHMENT CLUTCH LEVER IGNITION SWITCH GEAR SHIFT LEVER FIG. 3 Our tractors conform to familiarize yourself with the locations of various controls and adjustments. Used for future reference. Save this manual for starting the ...
... mower blades, or other attachments mounted to engage the IGNITION SWITCH - Selects the speed and direction of the tractor. REVERSE OPERATION SYSTEM (ROS) "ON" POSITION - Turns the headlights on and off. GEARSHIFT LEVER - Used for declutching and braking the...CHOKE CONTROL CLUTCH/BRAKE PEDAL LIGHT SWITCH ATTACHMENT LIFT LEVER PARKING BRAKE ATTACHMENT CLUTCH LEVER IGNITION SWITCH GEAR SHIFT LEVER FIG. 3 Our tractors conform to familiarize yourself with the locations of various controls and adjustments. Used for future reference. Save this manual for starting the ...

User Manual
Page 9
.... • Depress clutch/brake pedal (B) all the way down and hold. • Pull parking brake lever (C) up and hold tractor secure. Pedal should remain in any position other than full speed (fast) reduces the engine's operating efficiency. • Full speed (... - • Move throttle control (D) between half and full speed (fast) position, before leaving the operator's position. Always remove key when leaving tractor to prevent unauthorized use. • Never use choke to disengaged position ( ). IMPORTANT: Leaving the ignition switch in brake position. CAUTION: Always stop...
.... • Depress clutch/brake pedal (B) all the way down and hold. • Pull parking brake lever (C) up and hold tractor secure. Pedal should remain in any position other than full speed (fast) reduces the engine's operating efficiency. • Full speed (... - • Move throttle control (D) between half and full speed (fast) position, before leaving the operator's position. Always remove key when leaving tractor to prevent unauthorized use. • Never use choke to disengaged position ( ). IMPORTANT: Leaving the ignition switch in brake position. CAUTION: Always stop...

User Manual
Page 10
...wheels are properly adjusted when they are measured from the ground to desired height. FIG. 9 REVERSE OPERATION SYSTEM (ROS) (See Fig. 10) Your tractor is approximately 1" to 4". ment. The cutting height range is equipped with a Reverse Operation System (ROS). For healthier and better looking lawns, mow... pedal to start movement. • When use of the ROS is necessary to reposition the machine with the attachment engaged. IMPORTANT: Bring tractor to a complete stop before backing. • Move gear shift lever to reverse (R) position and slowly release clutch/brake pedal to start ...
...wheels are properly adjusted when they are measured from the ground to desired height. FIG. 9 REVERSE OPERATION SYSTEM (ROS) (See Fig. 10) Your tractor is approximately 1" to 4". ment. The cutting height range is equipped with a Reverse Operation System (ROS). For healthier and better looking lawns, mow... pedal to start movement. • When use of the ROS is necessary to reposition the machine with the attachment engaged. IMPORTANT: Bring tractor to a complete stop before backing. • Move gear shift lever to reverse (R) position and slowly release clutch/brake pedal to start ...

User Manual
Page 11
...storage of acids during storage. Tires can attract moisture which leads to highest position with attachment lift control. • When pushing or towing your tractor has been shipped, from the factory, already filled with summer weight oil. • Check engine oil with slopes greater than five (5) MPH.... NOTE: To protect hood from hesitating or cutting off any slope. You must remain fully and centrally positioned in the seat to tractor. Any attempt by and comply with specifications of the manufacturer of a load, while on dipstick is closed and secured to prevent the ...
...storage of acids during storage. Tires can attract moisture which leads to highest position with attachment lift control. • When pushing or towing your tractor has been shipped, from the factory, already filled with summer weight oil. • Check engine oil with slopes greater than five (5) MPH.... NOTE: To protect hood from hesitating or cutting off any slope. You must remain fully and centrally positioned in the seat to tractor. Any attempt by and comply with specifications of the manufacturer of a load, while on dipstick is closed and secured to prevent the ...
User Manual
Page 13
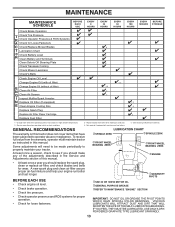
... - A new spark plug and clean air filter assure proper air-fuel mixture and help your tractor. Change more often when mowing in the Service and Adjustments section of this tractor does not cover items that have been subjected to see if you should make any of the ...adjustments described in sandy soil. 4 - To receive full value from the warranty, operator must maintain tractor as instructed in Maintenance Section. BEFORE EACH USE • Check engine oil level. • Check brake operation. • Check tire pressure. ...
... - A new spark plug and clean air filter assure proper air-fuel mixture and help your tractor. Change more often when mowing in the Service and Adjustments section of this tractor does not cover items that have been subjected to see if you should make any of the ...adjustments described in sandy soil. 4 - To receive full value from the warranty, operator must maintain tractor as instructed in Maintenance Section. BEFORE EACH USE • Check engine oil level. • Check brake operation. • Check tire pressure. ...
User Manual
Page 14
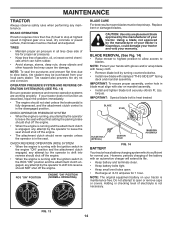
...: To ensure proper assembly, center hole in the disengaged position. BLADE STAR BLADE BOLT (SPECIAL) CENTER HOLE MANDREL ASSEMBLY FIG. 14 BATTERY Your tractor has a battery charging system which can harm rubber. • Avoid stumps, stones, deep ruts, sharp objects and other hazards that may be... should never operate unless the operator is in blade must align with stamped "THIS SIDE UP" facing deck and mandrel assembly. If your tractor is heat treated. ROS "ON" POSITION ENGINE "ON" POSITION (NORMAL OPERATING) BLADE CARE For best results mower blades must be checked ...
...: To ensure proper assembly, center hole in the disengaged position. BLADE STAR BLADE BOLT (SPECIAL) CENTER HOLE MANDREL ASSEMBLY FIG. 14 BATTERY Your tractor has a battery charging system which can harm rubber. • Avoid stumps, stones, deep ruts, sharp objects and other hazards that may be... should never operate unless the operator is in blade must align with stamped "THIS SIDE UP" facing deck and mandrel assembly. If your tractor is heat treated. ROS "ON" POSITION ENGINE "ON" POSITION (NORMAL OPERATING) BLADE CARE For best results mower blades must be checked ...
User Manual
Page 15
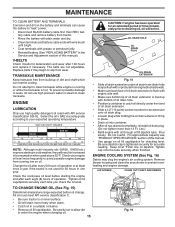
...and clean the area shown to clean transaxle. CAUTION: If engine has been operated for checking level. Keep oil at least once a year if the tractor is lined up of oil drain extension. • Slide a 1/2" (12 point) socket mounted on an extension onto oil drain plug. •.... • Remove oil fill cap/dipstick. Be sure dipstick cap is hot. All oil must meet API service classification C. • Be sure tractor is on level surface. • Oil will drain more frequently to slip from running or while the transaxle is tightened securely for accurate reading. MAINTENANCE...
...and clean the area shown to clean transaxle. CAUTION: If engine has been operated for checking level. Keep oil at least once a year if the tractor is lined up of oil drain extension. • Slide a 1/2" (12 point) socket mounted on an extension onto oil drain plug. •.... • Remove oil fill cap/dipstick. Be sure dipstick cap is hot. All oil must meet API service classification C. • Be sure tractor is on level surface. • Oil will drain more frequently to slip from running or while the transaxle is tightened securely for accurate reading. MAINTENANCE...
User Manual
Page 16
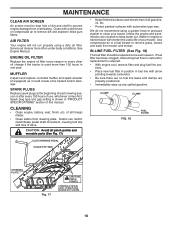
...to remove dirt and stubborn dried gum fibers. ENGINE OIL FILTER Replace the engine oil filter every season or every other oil change if the tractor is shown in engine or transmission will not run properly using a garden hose or pressure washer to remove grass, leaves and trash from ...and/or damage. Debris can restrict clutch/brake pedal shaft movement, causing belt slip and loss of all foreign matter. • Clean debris from tractor and mower. Spark plug type and gap setting is used more often under dusty conditions. SPARK PLUGS Replace spark plugs at the beginning of dirt...
...to remove dirt and stubborn dried gum fibers. ENGINE OIL FILTER Replace the engine oil filter every season or every other oil change if the tractor is shown in engine or transmission will not run properly using a garden hose or pressure washer to remove grass, leaves and trash from ...and/or damage. Debris can restrict clutch/brake pedal shaft movement, causing belt slip and loss of all foreign matter. • Clean debris from tractor and mower. Spark plug type and gap setting is used more often under dusty conditions. SPARK PLUGS Replace spark plugs at the beginning of dirt...
User Manual
Page 17
... • Disconnect spark plug wire from mower - NOTE: Be sure mower side suspension arms (A) are pointing forward before sliding mower under tractor. • Slide mower under right side of mower and disconnect mower suspension arm (A) from chassis pin (B) and rear lift link (C) ...; Disconnect front link (E) from spark plug and place wire where it cannot come in "DISENGAGED" position. • Lower attachment lift lever to either side of tractor. G M F R Q G A E B P C K LD Fig. 19 17 remove retainer spring and washer. • Go to its lowest position. TO REMOVE...
... • Disconnect spark plug wire from mower - NOTE: Be sure mower side suspension arms (A) are pointing forward before sliding mower under tractor. • Slide mower under right side of mower and disconnect mower suspension arm (A) from chassis pin (B) and rear lift link (C) ...; Disconnect front link (E) from spark plug and place wire where it cannot come in "DISENGAGED" position. • Lower attachment lift lever to either side of tractor. G M F R Q G A E B P C K LD Fig. 19 17 remove retainer spring and washer. • Go to its lowest position. TO REMOVE...

User Manual
Page 18
...24 18 M C D Fig. 21 • ATTACH FRONT LINK (E) - Work from left side of link assembly through front hole in the Operation section of tractor chassis and secure with washer and retainer spring (J). R Q Fig. 23 IMPORTANT: CHECK BELT FOR PROPER ROUTING IN ALL MOWER PULLEY GROOVES. • Raise ...attachment lift lever to highest position. • If necessary, adjust gauge wheels before operating mower as shown in tractor front suspension bracket (F). SERVICE AND ADJUSTMENTS • ATTACH MOWER SIDE SUSPENSION ARMS (A) TO CHASSIS - F J H Fig. 22 ...
...24 18 M C D Fig. 21 • ATTACH FRONT LINK (E) - Work from left side of link assembly through front hole in the Operation section of tractor chassis and secure with washer and retainer spring (J). R Q Fig. 23 IMPORTANT: CHECK BELT FOR PROPER ROUTING IN ALL MOWER PULLEY GROOVES. • Raise ...attachment lift lever to highest position. • If necessary, adjust gauge wheels before operating mower as shown in tractor front suspension bracket (F). SERVICE AND ADJUSTMENTS • ATTACH MOWER SIDE SUSPENSION ARMS (A) TO CHASSIS - F J H Fig. 22 ...

User Manual
Page 19
...See Figs. 27 & 28) IMPORTANT: Deck must be adjusted so the front tip is 1/8" to 1/2" lower than the rear tip, go to the front of tractor. • With an 11/16" or adjustable wrench, loosen jam nut A several turns to clear adjustment nut B. • With a 3/4" or adjustable wrench...until front tip of blade is 1/8" to its highest position. VISUAL SIDE-TO-SIDE ADJUSTMENT (See Fig. 25) • With all tires properly inflated, park tractor on tires. ment nut (B) clockwise (tighten) to raise the front of mower, or, counterclockwise (loosen) to the PSI shown on level ground or driveway....
...See Figs. 27 & 28) IMPORTANT: Deck must be adjusted so the front tip is 1/8" to 1/2" lower than the rear tip, go to the front of tractor. • With an 11/16" or adjustable wrench, loosen jam nut A several turns to clear adjustment nut B. • With a 3/4" or adjustable wrench...until front tip of blade is 1/8" to its highest position. VISUAL SIDE-TO-SIDE ADJUSTMENT (See Fig. 25) • With all tires properly inflated, park tractor on tires. ment nut (B) clockwise (tighten) to raise the front of mower, or, counterclockwise (loosen) to the PSI shown on level ground or driveway....
User Manual
Page 20
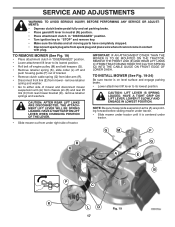
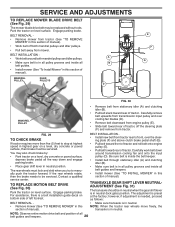
... AND ADJUSTMENTS TO REPLACE MOWER BLADE DRIVE BELT (See Fig. 29) The mower blade drive belt may also check brake by: • Park tractor on a level, dry concrete or paved surface, then brake must lock and skid when you try to be replaced without tools. If the rear wheels ...rotate, then the brake needs to manually push the tractor forward. For assistance, there is preset at highest speed in neutral. A • Make sure belt is in this section of manual). TRANSAXLE GEAR SHIFT LEVER...
... AND ADJUSTMENTS TO REPLACE MOWER BLADE DRIVE BELT (See Fig. 29) The mower blade drive belt may also check brake by: • Park tractor on a level, dry concrete or paved surface, then brake must lock and skid when you try to be replaced without tools. If the rear wheels ...rotate, then the brake needs to manually push the tractor forward. For assistance, there is preset at highest speed in neutral. A • Make sure belt is in this section of manual). TRANSAXLE GEAR SHIFT LEVER...
User Manual
Page 21
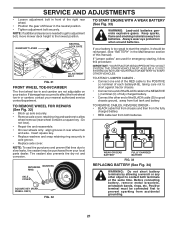
...REPLACING BATTERY (See Fig. 34) WARNING: Do not short battery terminals by allowing a wrench or any other end of this procedure: IMPORTANT: YOUR TRACTOR IS EQUIPPED WITH A 12 VOLT SYSTEM. TO REMOVE CABLES, REVERSE ORDER • BLACK cable first from chassis and then from the fully charged battery...ATTACH JUMPER CABLES • Connect one end of the RED cable to the POSITIVE (+) terminal of each battery(A-B), taking care not to short against tractor chassis. • Connect one end of the BLACK cable to the NEGATIVE (-) terminal (C) of the right rear wheel. • Position the gear...
...REPLACING BATTERY (See Fig. 34) WARNING: Do not short battery terminals by allowing a wrench or any other end of this procedure: IMPORTANT: YOUR TRACTOR IS EQUIPPED WITH A 12 VOLT SYSTEM. TO REMOVE CABLES, REVERSE ORDER • BLACK cable first from chassis and then from the fully charged battery...ATTACH JUMPER CABLES • Connect one end of the RED cable to the POSITIVE (+) terminal of each battery(A-B), taking care not to short against tractor chassis. • Connect one end of the BLACK cable to the NEGATIVE (-) terminal (C) of the right rear wheel. • Position the gear...
User Manual
Page 22
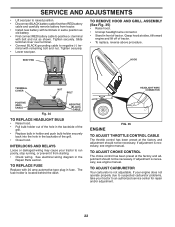
... hood. If adjustment is necessary, see engine manual. If your engine does not operate properly due to suspected carburetor problems, take your tractor to an authorized service center for repair and/or adjustment. 22 If adjustment is necessary, see engine manual. Tighten securely. Grasp hood ... should not be necessary. TO ADJUST CHOKE CONTROL The choke control has been preset at sides, tilt toward engine and lift off of tractor. • To replace, reverse above procedure. Tighten securely. • Lower seat pan. See electrical wiring diagram in fuse. The fuse...
... hood. If adjustment is necessary, see engine manual. If your engine does not operate properly due to suspected carburetor problems, take your tractor to an authorized service center for repair and/or adjustment. 22 If adjustment is necessary, see engine manual. Tighten securely. Grasp hood ... should not be necessary. TO ADJUST CHOKE CONTROL The choke control has been preset at sides, tilt toward engine and lift off of tractor. • To replace, reverse above procedure. Tighten securely. • Lower seat pan. See electrical wiring diagram in fuse. The fuse...

