
User Manual
Page 1
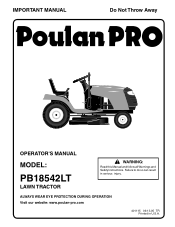
IMPORTANT MANUAL Do Not Throw Away 02478 OPERATOR'S MANUAL MODEL: PB18542LT LAWN TRACTOR WARNING: Read this Manual and follow all Warnings and Safety Instructions. ALWAYS WEAR EYE PROTECTION DURING OPERATION Visit our website: www.poulan-pro.com 401115 09.13.05 TR Printed in serious injury. Failure to do so can result in U.S.A.
IMPORTANT MANUAL Do Not Throw Away 02478 OPERATOR'S MANUAL MODEL: PB18542LT LAWN TRACTOR WARNING: Read this Manual and follow all Warnings and Safety Instructions. ALWAYS WEAR EYE PROTECTION DURING OPERATION Visit our website: www.poulan-pro.com 401115 09.13.05 TR Printed in serious injury. Failure to do so can result in U.S.A.

User Manual
Page 2
... catcher, discharge guard, or other debris build-up and down the slope. SLOPE OPERATION Battery posts, terminals and related accessories Slopes are involved in the manual before turning. • Never leave a running machine unattended. Stop the blades when crossing gravel surfaces. 2 on the machine and in a large percentage of grass , leaves...
... catcher, discharge guard, or other debris build-up and down the slope. SLOPE OPERATION Battery posts, terminals and related accessories Slopes are involved in the manual before turning. • Never leave a running machine unattended. Stop the blades when crossing gravel surfaces. 2 on the machine and in a large percentage of grass , leaves...
User Manual
Page 4
... and performance. age" sections of a new tractor. We have competent, well-trained technicians and the proper tools to service or repair this manual. The instructions will enable you to give you experience any ). A spark arrester for and using your purchase of this owner...'s manual. CUSTOMER RESPONSIBILITIES • Read and observe the safety rules. • Follow a regular schedule in effective working order by the operator. LBS. Always observe...
... and performance. age" sections of a new tractor. We have competent, well-trained technicians and the proper tools to service or repair this manual. The instructions will enable you to give you experience any ). A spark arrester for and using your purchase of this owner...'s manual. CUSTOMER RESPONSIBILITIES • Read and observe the safety rules. • Follow a regular schedule in effective working order by the operator. LBS. Always observe...

User Manual
Page 6
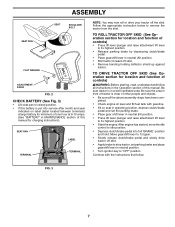
... and tighten securely. • Snap steering wheel insert into operating position and sit on seat pan so head of shoulder bolt is mentioned in this manual, it means when you assemble must be tightened securely. Remove end panels and lay side panels flat. • Check for shipping purposes. STEERING WHEEL...
... and tighten securely. • Snap steering wheel insert into operating position and sit on seat pan so head of shoulder bolt is mentioned in this manual, it means when you assemble must be tightened securely. Remove end panels and lay side panels flat. • Check for shipping purposes. STEERING WHEEL...
User Manual
Page 7
... on label (label located between terminals) charge battery for charging instructions). Be sure the area in front of tractor is clear of this manual for minimum of this manual. Move gearshift lever to 1st gear. • Slowly release clutch/brake pedal and slowly drive tractor off the skid. Be sure tractor is...
... on label (label located between terminals) charge battery for charging instructions). Be sure the area in front of tractor is clear of this manual for minimum of this manual. Move gearshift lever to 1st gear. • Slowly release clutch/brake pedal and slowly drive tractor off the skid. Be sure tractor is...

User Manual
Page 8
...safe operating condition. ✓ Be sure Operator Presence System and Reverse Operation System (ROS) are properly in "PRODUCT SPECIFICATIONS" section of this manual. CHECK FOR PROPER POSITION OF ALL BELTS See the figures that the brake is properly leveled side-to-side/ front-to-rear for... leveling). ✓ Check mower and drive belts. See "TO ADJUST BRAKE" in this manual. Correct tire pressure is important for shipping purposes. Operate them before you learn how to PSI shown in flated. (For shipping purposes,...
...safe operating condition. ✓ Be sure Operator Presence System and Reverse Operation System (ROS) are properly in "PRODUCT SPECIFICATIONS" section of this manual. CHECK FOR PROPER POSITION OF ALL BELTS See the figures that the brake is properly leveled side-to-side/ front-to-rear for... leveling). ✓ Check mower and drive belts. See "TO ADJUST BRAKE" in this manual. Correct tire pressure is important for shipping purposes. Operate them before you learn how to PSI shown in flated. (For shipping purposes,...

User Manual
Page 10
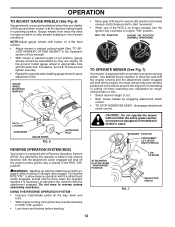
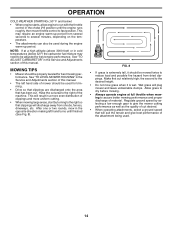
Save this manual for starting and stopping the engine. GEARSHIFT LEVER - LIFT LEVER PLUNGER - Locks clutch/brake pedal into the brake position. Allows operation of various controls and .../BRAKE PEDAL - IGNITION SWITCH - Used for declutching and braking the tractor and starting and controlling engine speed. 10 OPERATION KNOW YOUR TRACTOR READ THIS OWNER'S MANUAL AND SAFETY RULES BEFORE OPERATING YOUR TRACTOR Compare the illustrations with your tractor to release attachment lift lever when changing its position. Used for starting...
Save this manual for starting and stopping the engine. GEARSHIFT LEVER - LIFT LEVER PLUNGER - Locks clutch/brake pedal into the brake position. Allows operation of various controls and .../BRAKE PEDAL - IGNITION SWITCH - Used for declutching and braking the tractor and starting and controlling engine speed. 10 OPERATION KNOW YOUR TRACTOR READ THIS OWNER'S MANUAL AND SAFETY RULES BEFORE OPERATING YOUR TRACTOR Compare the illustrations with your tractor to release attachment lift lever when changing its position. Used for starting...
User Manual
Page 12
... while mowing is at level surface. • Adjust mower to desired cutting height (See "TO ADJUST MOWER CUTTING HEIGHT" in the Operation section of this manual). • With mower in place. WARNING: Backing up with tractor on mowers so equipped,or the deflector shield in desired height of cut...
... while mowing is at level surface. • Adjust mower to desired cutting height (See "TO ADJUST MOWER CUTTING HEIGHT" in the Operation section of this manual). • With mower in place. WARNING: Backing up with tractor on mowers so equipped,or the deflector shield in desired height of cut...

User Manual
Page 13
... throttle control to choke ( ) position. CAUTION: Wipe off any slope. • Choose the slowest speed before storage of this manual). • To change engine oil, see the Maintenance section in this manual. NOTE: Before starting up or down hills with slopes greater than 15° and do not drive across any spilled...
... throttle control to choke ( ) position. CAUTION: Wipe off any slope. • Choose the slowest speed before storage of this manual). • To change engine oil, see the Maintenance section in this manual. NOTE: Before starting up or down hills with slopes greater than 15° and do not drive across any spilled...
User Manual
Page 14
See "TO LEVEL MOWER HOUSING" in the Service and Adjustments section of this manual. Allow grass to dry before mowing. • Always operate engine at a high altitude (above 3000 feet) or in cold temperatures (below ) • When engine starts, ... an engine warm-up period. This may need to fast position. See "TO ADJUST CARBURETOR" in the opposite direction making left hand side of this manual. • The left hand turns until the engine runs roughly, then move throttle control to be properly leveled for best engine performance.
See "TO LEVEL MOWER HOUSING" in the Service and Adjustments section of this manual. Allow grass to dry before mowing. • Always operate engine at a high altitude (above 3000 feet) or in cold temperatures (below ) • When engine starts, ... an engine warm-up period. This may need to fast position. See "TO ADJUST CARBURETOR" in the opposite direction making left hand side of this manual. • The left hand turns until the engine runs roughly, then move throttle control to be properly leveled for best engine performance.

User Manual
Page 15
Tighten front axle pivot bolt to see if you should make any of the adjustments described in the Service and Adjustments section of this manual. • At least once a year you should replace the spark plug, clean or replace air filter, and check blades and belts ... items that have been subjected to properly maintain your engine run better and last longer. maint_sch-tractore.ROS.e GENERAL RECOMMENDATIONS The warranty on this manual. LUBRICATION CHART dSPINDLE ZERK dSPINDLE ZERK dFRONT WHEEL BEARING ZERK dFRONT WHEEL BEARING ZERK At least once a season, check to 35 ft.-lbs....
Tighten front axle pivot bolt to see if you should make any of the adjustments described in the Service and Adjustments section of this manual. • At least once a year you should replace the spark plug, clean or replace air filter, and check blades and belts ... items that have been subjected to properly maintain your engine run better and last longer. maint_sch-tractore.ROS.e GENERAL RECOMMENDATIONS The warranty on this manual. LUBRICATION CHART dSPINDLE ZERK dSPINDLE ZERK dFRONT WHEEL BEARING ZERK dFRONT WHEEL BEARING ZERK At least once a season, check to 35 ft.-lbs....

User Manual
Page 16
...;at tires due to slow leaks, tire sealant may be checked and adjusted. (See "TO ADJUST BRAKE" in the Service and Adjustments section of this manual). • Keep tires free of the steel bolt or pin and hold the bolt or pin parallel with the ground. Lbs. If either end of... this manual). BRAKE OPERATION If tractor requires more than five (5) feet to shift into reverse should remain in a horizontal position. TIRES • Maintain proper air pressure...
...;at tires due to slow leaks, tire sealant may be checked and adjusted. (See "TO ADJUST BRAKE" in the Service and Adjustments section of this manual). • Keep tires free of the steel bolt or pin and hold the bolt or pin parallel with the ground. Lbs. If either end of... this manual). BRAKE OPERATION If tractor requires more than five (5) feet to shift into reverse should remain in a horizontal position. TIRES • Maintain proper air pressure...

User Manual
Page 17
... battery cable first then RED bat- NOTE: The original equipment battery on your expected operating temperature. Adding or checking level of this manual. • Use gauge on the battery and terminals can restrict cooling. tery cable and remove battery from running low on level surface. ...;tting of operation. Replace belts if they will result in one year. For approximate capacity see "PRODUCT SPECIFICATIONS" section of this manual). TO CLEAN BATTERY AND TERMINALS Corrosion and dirt on oil fill cap/dipstick for deterioration and wear after each time you check...
... battery cable first then RED bat- NOTE: The original equipment battery on your expected operating temperature. Adding or checking level of this manual. • Use gauge on the battery and terminals can restrict cooling. tery cable and remove battery from running low on level surface. ...;tting of operation. Replace belts if they will result in one year. For approximate capacity see "PRODUCT SPECIFICATIONS" section of this manual). TO CLEAN BATTERY AND TERMINALS Corrosion and dirt on oil fill cap/dipstick for deterioration and wear after each time you check...

User Manual
Page 18
... using a dirty air filter. Water in "PRODUCT SPECIFICATIONS" section of all foreign matter. • Keep finished surfaces and wheels free of this manual. See Engine Manual. SPARK PLUGS Replace spark plugs at the beginning of your tractor unless the engine and transmission are properly positioned. • Immediately wipe up any...
... using a dirty air filter. Water in "PRODUCT SPECIFICATIONS" section of all foreign matter. • Keep finished surfaces and wheels free of this manual. See Engine Manual. SPARK PLUGS Replace spark plugs at the beginning of your tractor unless the engine and transmission are properly positioned. • Immediately wipe up any...

User Manual
Page 20
... MOWER" in flated (See "PRODUCT SPECIFICATIONS" section of adjustment nut will not properly adjust your mower. tions. 20 NOTE: Each full turn of this manual). • Work belt off both front links an equal number of removal instruc- If tires are properly in this section of this...
... MOWER" in flated (See "PRODUCT SPECIFICATIONS" section of adjustment nut will not properly adjust your mower. tions. 20 NOTE: Each full turn of this manual). • Work belt off both front links an equal number of removal instruc- If tires are properly in this section of this...

User Manual
Page 21
...mower (See "TO REMOVE MOWER" in highest gear on brake rod. • If distance is other than five (5) feet in this section of manual). Remove belt upwards from transaxle pulley by deflecting belt keepers. • Remove belt from center span keeper and pull belt away from around... TRANSAXLE PULLEY FIG. 21 OPERATING ARM FIG. 20 21 If the rear wheels rotate, the brake needs to be adjusted or the pads need to manually push the tractor forward. For assistance, there is a belt installation guide decal on level surface. Retighten jam nut against nut "A". • Road test...
...mower (See "TO REMOVE MOWER" in highest gear on brake rod. • If distance is other than five (5) feet in this section of manual). Remove belt upwards from transaxle pulley by deflecting belt keepers. • Remove belt from center span keeper and pull belt away from around... TRANSAXLE PULLEY FIG. 21 OPERATING ARM FIG. 20 21 If the rear wheels rotate, the brake needs to be adjusted or the pads need to manually push the tractor forward. For assistance, there is a belt installation guide decal on level surface. Retighten jam nut against nut "A". • Road test...

User Manual
Page 22
... ADJUST STEERING WHEEL ALIGNMENT If steering wheel crossbars are positioned straight forward, remove steering wheel and reassemble per instructions in the Assembly section of this manual). TO REMOVE WHEEL FOR REPAIRS (See Fig. 23) • Block up axle securely. • Remove axle cover, retaining ring and washers to affect the front... batteries. SERVICE AND ADJUSTMENTS TRANSAXLE GEAR SHIFT LEVER NEUTRALADJUSTMENT (See Fig. 22) The transaxle should be recharged. (See "BATTERY" in the Maintenance section of this manual.
... ADJUST STEERING WHEEL ALIGNMENT If steering wheel crossbars are positioned straight forward, remove steering wheel and reassemble per instructions in the Assembly section of this manual). TO REMOVE WHEEL FOR REPAIRS (See Fig. 23) • Block up axle securely. • Remove axle cover, retaining ring and washers to affect the front... batteries. SERVICE AND ADJUSTMENTS TRANSAXLE GEAR SHIFT LEVER NEUTRALADJUSTMENT (See Fig. 22) The transaxle should be recharged. (See "BATTERY" in the Maintenance section of this manual.

User Manual
Page 23
... CABLE The throttle control has been preset at the factory and adjustment should not be necessary. If adjustment is necessary, see engne manual. TO ADJUST CARBURETOR Your carburetor is located behind the dash. Before connecting battery, remove metal bracelets, wristwatch bands, rings, etc.... grounding. • Lift seat pan to an authorized service center for repair and/or adjustment. If adjustment is necessary, see engine manual. Tighten securely. See electrical wiring diagram in the backside of tractor. SERVICE AND ADJUSTMENTS REPLACING BATTERY (See Figs. 25 and 26)...
... CABLE The throttle control has been preset at the factory and adjustment should not be necessary. If adjustment is necessary, see engne manual. TO ADJUST CARBURETOR Your carburetor is located behind the dash. Before connecting battery, remove metal bracelets, wristwatch bands, rings, etc.... grounding. • Lift seat pan to an authorized service center for repair and/or adjustment. If adjustment is necessary, see engine manual. Tighten securely. See electrical wiring diagram in the backside of tractor. SERVICE AND ADJUSTMENTS REPLACING BATTERY (See Figs. 25 and 26)...

User Manual
Page 24
...surfaces. ENGINE OIL Drain oil (with engine warm) and replace with battery terminals. • If battery is removed from one ounce of this manual). • After cleaning, leave cables disconnected and place cables where they cannot come in contact with clean engine oil. (See "ENGINE" ... into cylinder(s). • Turn ignition key to give protection from tractor for damage, breakage and wear. Run engine at the end of this manual). • Inspect and replace belts, if necessary (See belt re- IMPORTANT: NEVER COVERTRACTORWHILE ENGINE AND EXHAUST AREAS ARE STILL WARM. 24 Allow...
...surfaces. ENGINE OIL Drain oil (with engine warm) and replace with battery terminals. • If battery is removed from one ounce of this manual). • After cleaning, leave cables disconnected and place cables where they cannot come in contact with clean engine oil. (See "ENGINE" ... into cylinder(s). • Turn ignition key to give protection from tractor for damage, breakage and wear. Run engine at the end of this manual). • Inspect and replace belts, if necessary (See belt re- IMPORTANT: NEVER COVERTRACTORWHILE ENGINE AND EXHAUST AREAS ARE STILL WARM. 24 Allow...

User Manual
Page 26
..., leaves and trash under mower. 4. Clean underside of grass, leaves, and trash around mandrels to run when operator leaves seat with blades listed in this manual. 11. Headlight(s) not working (if so equipped) 1. Bulb(s) or lamp(s) burned out. 3. Replace bulb(s) or lamp(s). 3. Check wiring, switches and connections. Replace blade mandrel. 5. Place...
..., leaves and trash under mower. 4. Clean underside of grass, leaves, and trash around mandrels to run when operator leaves seat with blades listed in this manual. 11. Headlight(s) not working (if so equipped) 1. Bulb(s) or lamp(s) burned out. 3. Replace bulb(s) or lamp(s). 3. Check wiring, switches and connections. Replace blade mandrel. 5. Place...


