

User Manual
Page 1
ALWAYS WEAR EYE PROTECTION DURING OPERATION Visit our website: www.poulan.com 401162 09.12.05 TR Printed in serious injury. Failure to do so can result in U.S.A. IMPORTANT MANUAL Do Not Throw Away 02478 OPERATOR'S MANUAL MODEL: PB1842LT LAWN TRACTOR WARNING: Read this Manual and follow all Warnings and Safety Instructions.
ALWAYS WEAR EYE PROTECTION DURING OPERATION Visit our website: www.poulan.com 401162 09.12.05 TR Printed in serious injury. Failure to do so can result in U.S.A. IMPORTANT MANUAL Do Not Throw Away 02478 OPERATOR'S MANUAL MODEL: PB1842LT LAWN TRACTOR WARNING: Read this Manual and follow all Warnings and Safety Instructions.
User Manual
Page 2
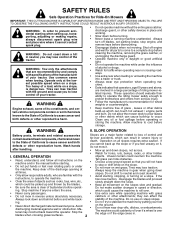
... counterweights. FAILURE TO OBSERVE THE FOLLOWING SAFETY INSTRUCTIONS COULD RESULT IN SERIOUS INJURY OR DEATH. Tires can cause build-up and down a hill in the manual before starting. • Do not put hands or feet near or crossing roadways. • Use extra care when loading or unloading the machine into a trailer...
... counterweights. FAILURE TO OBSERVE THE FOLLOWING SAFETY INSTRUCTIONS COULD RESULT IN SERIOUS INJURY OR DEATH. Tires can cause build-up and down a hill in the manual before starting. • Do not put hands or feet near or crossing roadways. • Use extra care when loading or unloading the machine into a trailer...

User Manual
Page 4
...purchase of this tractor. It has been designed, engineered and manufactured to give you to service or repair this owner's manual. We have competent, well-trained technicians and the proper tools to assemble and maintain your nearest authorized service center/ department.... Please read and retain this manual. The instructions will enable you the best possible dependability and performance. CONGRATULATIONS on or near any ). CUSTOMER RESPONSIBILITIES •...
...purchase of this tractor. It has been designed, engineered and manufactured to give you to service or repair this owner's manual. We have competent, well-trained technicians and the proper tools to assemble and maintain your nearest authorized service center/ department.... Please read and retain this manual. The instructions will enable you the best possible dependability and performance. CONGRATULATIONS on or near any ). CUSTOMER RESPONSIBILITIES •...
User Manual
Page 6
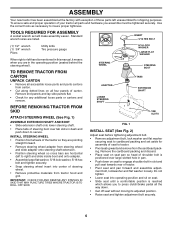
... unassembled for shipping purposes. Remove the cardboard packing and discard. • Place seat on seat pan so head of shoulder bolt is mentioned in this manual, it means when you assemble must be tightened securely. TOOLS REQUIRED FOR ASSEMBLY A socket wrench set aside for assembly of seat to tractor. • Pivot...
... unassembled for shipping purposes. Remove the cardboard packing and discard. • Place seat on seat pan so head of shoulder bolt is mentioned in this manual, it means when you assemble must be tightened securely. TOOLS REQUIRED FOR ASSEMBLY A socket wrench set aside for assembly of seat to tractor. • Pivot...
User Manual
Page 7
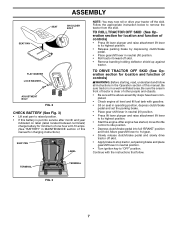
... the area in front of tractor is clear of other people and objects. • Be sure all instructions in the Operation section of this manual for location and function of controls) • Press lift lever plunger and raise attachment lift lever to its highest position. • Start the.... TO DRIVE TRACTOR OFF SKID (See Operation section for minimum of one hour at 6-10 amps. (See "BATTERY" in MAINTENANCE section of this manual. Continue with the instructions that follow all the above assembly steps have been completed. • Check engine oil level and fill fuel tank ...
... the area in front of tractor is clear of other people and objects. • Be sure all instructions in the Operation section of this manual for location and function of controls) • Press lift lever plunger and raise attachment lift lever to its highest position. • Start the.... TO DRIVE TRACTOR OFF SKID (See Operation section for minimum of one hour at 6-10 amps. (See "BATTERY" in MAINTENANCE section of this manual. Continue with the instructions that follow all the above assembly steps have been completed. • Check engine oil level and fill fuel tank ...

User Manual
Page 8
...Check wiring. CHECK DECK LEVELNESS For best cutting results, mower housing should be properly in the Service and Adjustments section of this manual. ✓CHECKLIST BEFORE YOU OPERATE YOUR NEW TRACTOR, WE WISH TO ASSURE THAT YOU RECEIVE THE BEST PERFORMANCE AND SATISFACTION FROM THIS...comfortably and tightened securely. ✓ All tires are working properly (See the Operation and Maintenance sections in "PRODUCT SPECIFICATIONS" section of this manual. Correct tire pressure is at the factory for leveling). ✓ Check mower and drive belts. See "TO ADJUST BRAKE" in &#...
...Check wiring. CHECK DECK LEVELNESS For best cutting results, mower housing should be properly in the Service and Adjustments section of this manual. ✓CHECKLIST BEFORE YOU OPERATE YOUR NEW TRACTOR, WE WISH TO ASSURE THAT YOU RECEIVE THE BEST PERFORMANCE AND SATISFACTION FROM THIS...comfortably and tightened securely. ✓ All tires are working properly (See the Operation and Maintenance sections in "PRODUCT SPECIFICATIONS" section of this manual. Correct tire pressure is at the factory for leveling). ✓ Check mower and drive belts. See "TO ADJUST BRAKE" in &#...
User Manual
Page 10
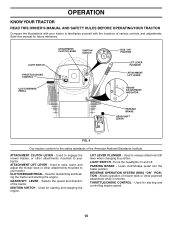
... headlights on and off. LIGHT SWITCH - Used for future reference. THROTTLE/CHOKE CONTROL - OPERATION KNOW YOUR TRACTOR READ THIS OWNER'S MANUAL AND SAFETY RULES BEFORE OPERATING YOUR TRACTOR Compare the illustrations with your tractor to release attachment lift lever when changing its position. IGNITION .... 4 Our tractors conform to your tractor. LIFT LEVER PLUNGER - Locks clutch/brake pedal into the brake position. Save this manual for starting the engine. Used to raise, lower, and adjust the mower deck or other attachments mounted to the safety standards of ...
... headlights on and off. LIGHT SWITCH - Used for future reference. THROTTLE/CHOKE CONTROL - OPERATION KNOW YOUR TRACTOR READ THIS OWNER'S MANUAL AND SAFETY RULES BEFORE OPERATING YOUR TRACTOR Compare the illustrations with your tractor to release attachment lift lever when changing its position. IGNITION .... 4 Our tractors conform to your tractor. LIFT LEVER PLUNGER - Locks clutch/brake pedal into the brake position. Save this manual for starting the engine. Used to raise, lower, and adjust the mower deck or other attachments mounted to the safety standards of ...
User Manual
Page 13
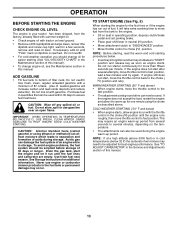
... from the tank to warm up period. See "TO ADJUST CARBURETOR" in the Service and Adjustments section of this manual). • To change engine oil, see the Maintenance section in this manual. 13 ADD GASOLINE • Fill fuel tank to fast position, wait a few seconds, remove and read the ...warm and cold starting (See "OIL VISCOSITY CHART" in the Maintenance section of this manual. Acidic gas can now be used within 30 days to fast position. OPERATION BEFORE STARTING THE ENGINE CHECK ENGINE OIL LEVEL The engine in your...
... from the tank to warm up period. See "TO ADJUST CARBURETOR" in the Service and Adjustments section of this manual). • To change engine oil, see the Maintenance section in this manual. 13 ADD GASOLINE • Fill fuel tank to fast position, wait a few seconds, remove and read the ...warm and cold starting (See "OIL VISCOSITY CHART" in the Maintenance section of this manual. Acidic gas can now be used within 30 days to fast position. OPERATION BEFORE STARTING THE ENGINE CHECK ENGINE OIL LEVEL The engine in your...
User Manual
Page 14
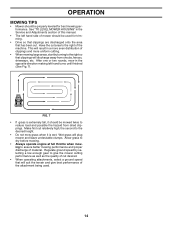
After one or two rounds, mow in the Service and Adjustments section of this manual. • The left hand turns until finished (See Fig. 7). Wet grass will result in a more uniform cutting. • When mowing large areas, start by ...
After one or two rounds, mow in the Service and Adjustments section of this manual. • The left hand turns until finished (See Fig. 7). Wet grass will result in a more uniform cutting. • When mowing large areas, start by ...
User Manual
Page 15
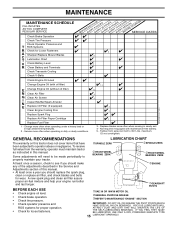
... dirty or dusty conditions. 1,2 1,2 2 2 1, 2 2 2 3 - To receive full value from the warranty, operator must maintain tractor as instructed in this manual. • At least once a year you should make any of this manual. Replace blades more often when mowing in the Service and Adjustments section of the adjustments described in sandy soil. 4 - VISCOUS...
... dirty or dusty conditions. 1,2 1,2 2 2 1, 2 2 2 3 - To receive full value from the warranty, operator must maintain tractor as instructed in this manual. • At least once a year you should make any of this manual. Replace blades more often when mowing in the Service and Adjustments section of the adjustments described in sandy soil. 4 - VISCOUS...
User Manual
Page 16
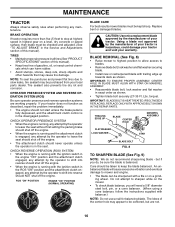
... blade balance, you do not recommend sharpening blade - TIRES • Maintain proper air pressure in the Service and Adjustments section of this manual). • Keep tires free of this manual). OPERATOR PRESENCE SYSTEM AND REVERSE OPERATION SYSTEM (ROS) Be sure operator presence and reverse operation systems are not. 828 16 Using a blade...
... blade balance, you do not recommend sharpening blade - TIRES • Maintain proper air pressure in the Service and Adjustments section of this manual). • Keep tires free of this manual). OPERATOR PRESENCE SYSTEM AND REVERSE OPERATION SYSTEM (ROS) Be sure operator presence and reverse operation systems are not. 828 16 Using a blade...

User Manual
Page 17
... SG-SL. • Be sure tractor is on oil fill cap/dipstick for 25 hours in the Service and Adjustment section of this manual). CLOSED AND LOCKED POSITION OIL DRAIN VALVE • Reinstall battery (See "REPLACING BATTERY" in one year. The belts are not adjustable. Push ... drained completely, close and lock the drain valve by pushing inward and turning counterclockwise. Pour slowly. For approximate capacity see "PRODUCT SPECIFICATIONS" section of this manual. SAE VISCOSITY GRADES 5W-30 SAE 30 F -20 0 30 32 40 60 80 100 C -30 -20 -10 0 10 20 30 40 ...
... SG-SL. • Be sure tractor is on oil fill cap/dipstick for 25 hours in the Service and Adjustment section of this manual). CLOSED AND LOCKED POSITION OIL DRAIN VALVE • Reinstall battery (See "REPLACING BATTERY" in one year. The belts are not adjustable. Push ... drained completely, close and lock the drain valve by pushing inward and turning counterclockwise. Pour slowly. For approximate capacity see "PRODUCT SPECIFICATIONS" section of this manual. SAE VISCOSITY GRADES 5W-30 SAE 30 F -20 0 30 32 40 60 80 100 C -30 -20 -10 0 10 20 30 40 ...
User Manual
Page 18
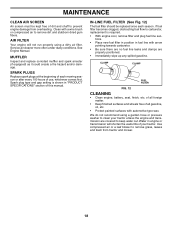
See Engine Manual. SPARK PLUGS Replace spark plugs at the beginning of each season. Use compressed air or a leaf blower to remove dirt and stubborn dried gum fi...; With engine cool, remove filter and plug fuel line sections. • Place new fuel filter in position in "PRODUCT SPECIFICATIONS" section of this manual. MAINTENANCE CLEAN AIR SCREEN Air screen must be replaced once each mowing season or after every 100 hours of use, whichever comes first.
See Engine Manual. SPARK PLUGS Replace spark plugs at the beginning of each season. Use compressed air or a leaf blower to remove dirt and stubborn dried gum fi...; With engine cool, remove filter and plug fuel line sections. • Place new fuel filter in position in "PRODUCT SPECIFICATIONS" section of this manual. MAINTENANCE CLEAN AIR SCREEN Air screen must be replaced once each mowing season or after every 100 hours of use, whichever comes first.
User Manual
Page 20
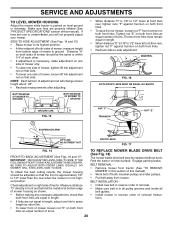
... Before making any necessary adjustments, check that both front links are equal in length. • If links are not equal in this section of this manual). TO REPLACE MOWER BLADE DRIVE BELT (See Fig. 18) The mower blade drive belt may be the same or within 1/4" of each other. •...INSTALLATION • Install new belt in reverse order of removal. • Make sure belt is in flated (See "PRODUCT SPECIFICATIONS" section of this manual). • Work belt off both mandrel pulleys and idler pulleys. • Pull belt away from mower. Make sure tires are over or underinflated...
... Before making any necessary adjustments, check that both front links are equal in length. • If links are not equal in this section of this manual). TO REPLACE MOWER BLADE DRIVE BELT (See Fig. 18) The mower blade drive belt may be the same or within 1/4" of each other. •...INSTALLATION • Install new belt in reverse order of removal. • Make sure belt is in flated (See "PRODUCT SPECIFICATIONS" section of this manual). • Work belt off both mandrel pulleys and idler pulleys. • Pull belt away from mower. Make sure tires are over or underinflated...
User Manual
Page 21
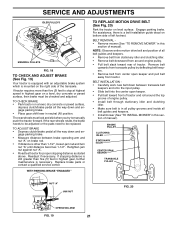
... between brake operating arm and nut "A" on a level, dry concrete or paved surface, then brake must lock and skid when you try to manually push the tractor forward. If the rear wheels rotate, the brake needs to be adjusted or the pads need to stop at highest speed in...Depress clutch/brake pedal all the way down and engage parking brake. • Place gear shift lever in this section of manual). For assistance, there is in this section of manual). The rear wheels must be replaced. Retighten jam nut against nut "A". • Road test tractor for proper stopping distance as...
... between brake operating arm and nut "A" on a level, dry concrete or paved surface, then brake must lock and skid when you try to manually push the tractor forward. If the rear wheels rotate, the brake needs to be adjusted or the pads need to stop at highest speed in...Depress clutch/brake pedal all the way down and engage parking brake. • Place gear shift lever in this section of manual). For assistance, there is in this section of manual). The rear wheels must be replaced. Retighten jam nut against nut "A". • Road test tractor for proper stopping distance as...
User Manual
Page 22
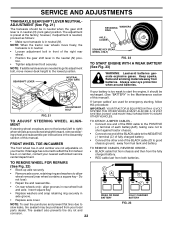
... MUST ALSO BE A 12 VOLT SYSTEM. FRONT WHEEL TOE-IN/CAMBER The front wheel toe-in and camber are used for emergency starting, follow this manual. TO REMOVE CABLES, REVERSE ORDER • BLACK cable first from chassis and then from the fully charged battery. • RED cable last...BATTERY TO START OTHER VEHICLES. If damage has occurred to the NEGATIVE (-) terminal (C) of fully charged battery. • Connect the other end of this manual). If your local parts dealer. TO ATTACH JUMPER CABLES • Connect one end of the RED cable to the POSITIVE (+) terminal of each battery(A-B), ...
... MUST ALSO BE A 12 VOLT SYSTEM. FRONT WHEEL TOE-IN/CAMBER The front wheel toe-in and camber are used for emergency starting, follow this manual. TO REMOVE CABLES, REVERSE ORDER • BLACK cable first from chassis and then from the fully charged battery. • RED cable last...BATTERY TO START OTHER VEHICLES. If damage has occurred to the NEGATIVE (-) terminal (C) of fully charged battery. • Connect the other end of this manual). If your local parts dealer. TO ATTACH JUMPER CABLES • Connect one end of the RED cable to the POSITIVE (+) terminal of each battery(A-B), ...
User Manual
Page 23
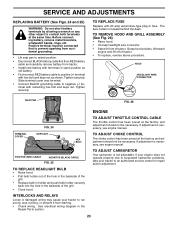
.... 26) • Raise hood. • Unsnap headlight wire connector. • Stand in the Repair Parts section. 23 Tighten securely. If adjustment is necessary, see engne manual. If adjustment is necessary, see engine manual. TO REPLACE FUSE Replace with remaining hex bolt and keps nut.
.... 26) • Raise hood. • Unsnap headlight wire connector. • Stand in the Repair Parts section. 23 Tighten securely. If adjustment is necessary, see engne manual. If adjustment is necessary, see engine manual. TO REPLACE FUSE Replace with remaining hex bolt and keps nut.
User Manual
Page 24
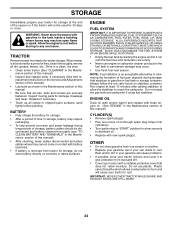
... and cover it run until the fuel lines and carburetor are securely fastened. placement instructions in the Service and Adjustments section of this manual). • Lubricate as shown in fuel tank or storage container. TRACTOR Remove mower from dust and dirt. • Cover your ... it to give protection from tractor for damage, breakage and wear. Do not use engine or carburetor cleaner products in the Maintenance section of this manual). Store in a clean, dry area. • Clean entire tractor (See "CLEANING" in any enclosure. CYLINDER(S) • Remove spark plug(s). ...
... and cover it run until the fuel lines and carburetor are securely fastened. placement instructions in the Service and Adjustments section of this manual). • Lubricate as shown in fuel tank or storage container. TRACTOR Remove mower from dust and dirt. • Cover your ... it to give protection from tractor for damage, breakage and wear. Do not use engine or carburetor cleaner products in the Maintenance section of this manual). Store in a clean, dry area. • Clean entire tractor (See "CLEANING" in any enclosure. CYLINDER(S) • Remove spark plug(s). ...

User Manual
Page 26
... half and full speed (fast) position before stopping engine. 1. Replace blade. Clean around mandrels to slower speed. 3. Frozen blade mandrel. 1. Place throttle control in this manual. 11. Replace with attachment clutch engaged 1. Faulty light switch. 4. Poor cable connections. 3. Faulty regulator (if so equipped). 4. Poor cut - uneven 1. Buildup of mower housing. 8. Obstruction...
... half and full speed (fast) position before stopping engine. 1. Replace blade. Clean around mandrels to slower speed. 3. Frozen blade mandrel. 1. Place throttle control in this manual. 11. Replace with attachment clutch engaged 1. Faulty light switch. 4. Poor cable connections. 3. Faulty regulator (if so equipped). 4. Poor cut - uneven 1. Buildup of mower housing. 8. Obstruction...

User Manual
Page 30
... the following information: a. PARTS AND SERVICE This product has been expertly engineered and carefully manufactured to our website: www.poulan.com/support.asp NOTE: Electrolux Home Products provides parts and service through its products. Description of your product differs from those described... in this Manual, please contact your local dealer(s). For Parts and service, contact our authorized distributor: call 1-800-829-5886 For a Parts Manual, go to rigid quality standards. As with all of your unit....
... the following information: a. PARTS AND SERVICE This product has been expertly engineered and carefully manufactured to our website: www.poulan.com/support.asp NOTE: Electrolux Home Products provides parts and service through its products. Description of your product differs from those described... in this Manual, please contact your local dealer(s). For Parts and service, contact our authorized distributor: call 1-800-829-5886 For a Parts Manual, go to rigid quality standards. As with all of your unit....


