
User Manual
Page 2
...: Do not coast down before cleaning the machine, removing the grass catcher, or unclogging the discharge guard. • Operate machine only in daylight or good artificial light. • Do not operate the machine while under the machine. Use common sense when towing. Operate only at all times. • Only allow the mower deck to occur. Engine exhaust, some of its constituents...
...: Do not coast down before cleaning the machine, removing the grass catcher, or unclogging the discharge guard. • Operate machine only in daylight or good artificial light. • Do not operate the machine while under the machine. Use common sense when towing. Operate only at all times. • Only allow the mower deck to occur. Engine exhaust, some of its constituents...
User Manual
Page 3
...before operating. GENERAL SERVICE • Never operate machine in the watchful care of the mowing area and in handling gasoline. Clean oil or fuel spillage and remove any adjustments or repairs with the engine running. • Check grass catcher components and the discharge guard frequently and replace with the blades shut... even with manufacturer's recommended parts, when necessary. • Mower blades are . • Keep all nuts and bolts tight to stop or shift while on the slope. • Avoid starting, stopping, or turning on a slope. Do not attach towed equipment except at all...
...before operating. GENERAL SERVICE • Never operate machine in the watchful care of the mowing area and in handling gasoline. Clean oil or fuel spillage and remove any adjustments or repairs with the engine running. • Check grass catcher components and the discharge guard frequently and replace with the blades shut... even with manufacturer's recommended parts, when necessary. • Mower blades are . • Keep all nuts and bolts tight to stop or shift while on the slope. • Avoid starting, stopping, or turning on a slope. Do not attach towed equipment except at all...
User Manual
Page 4
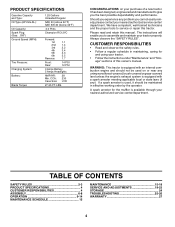
... 4 ASSEMBLY 6-8 OPERATION 9-14 MAINTENANCE SCHEDULE 15 MAINTENANCE 15-18 SERVICE AND ADJUSTMENTS 19-23 STORAGE 24 TROUBLESHOOTING 25-26 WARRANTY 27 4 The instructions will enable you to give you cannot easily remedy, please contact your nearest authorized service center/department. A spark arrester for and using your purchase of this owner's manual. PRODUCT SPECIFICATIONS Gasoline Capacity and Type: Oil Type (API-SG-SL): Oil Capacity: Spark Plug: (Gap: .030") Ground Speed (MPH): Tire Pressure: Charging System: Battery: Blade Torque...
... 4 ASSEMBLY 6-8 OPERATION 9-14 MAINTENANCE SCHEDULE 15 MAINTENANCE 15-18 SERVICE AND ADJUSTMENTS 19-23 STORAGE 24 TROUBLESHOOTING 25-26 WARRANTY 27 4 The instructions will enable you to give you cannot easily remedy, please contact your nearest authorized service center/department. A spark arrester for and using your purchase of this owner's manual. PRODUCT SPECIFICATIONS Gasoline Capacity and Type: Oil Type (API-SG-SL): Oil Capacity: Spark Plug: (Gap: .030") Ground Speed (MPH): Tire Pressure: Charging System: Battery: Blade Torque...
User Manual
Page 6
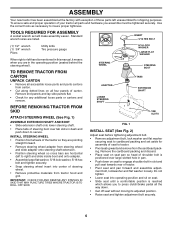
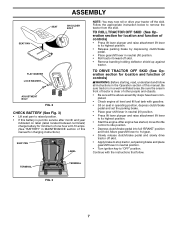
... TABS EXTENSION SHAFT TAB SLOTS FIG. 1 INSTALL SEAT (See Fig. 2) Adjust seat before tightening adjustment bolt. • Remove adjustment bolt, lock washer and flat washer loosely. TO REMOVE TRACTOR FROM CARTON UNPACK CARTON • Remove all accessible loose parts and parts cartons from carton. • Cut along dotted lines on seat. • Slide seat until a comfortable position is reached which allows you to press clutch/brake pedal all...
... TABS EXTENSION SHAFT TAB SLOTS FIG. 1 INSTALL SEAT (See Fig. 2) Adjust seat before tightening adjustment bolt. • Remove adjustment bolt, lock washer and flat washer loosely. TO REMOVE TRACTOR FROM CARTON UNPACK CARTON • Remove all accessible loose parts and parts cartons from carton. • Cut along dotted lines on seat. • Slide seat until a comfortable position is reached which allows you to press clutch/brake pedal all...
User Manual
Page 7
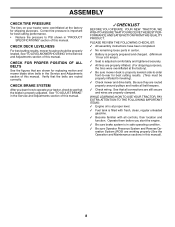
...) charge battery for charging instructions). TERMINAL TERMINAL FIG. 3 7 Be sure tractor is clear of controls) • Press lift lever plunger and raise attachment lift lever to its highest position. • Start the engine.After engine has started, move throttle control to idle position. • Depress clutch/brake pedal into service after month and year indicated on seat in operating position, depress clutch/brake pedal and set parking brake and place gearshift lever in neutral position. • Turn ignition key...
...) charge battery for charging instructions). TERMINAL TERMINAL FIG. 3 7 Be sure tractor is clear of controls) • Press lift lever plunger and raise attachment lift lever to its highest position. • Start the engine.After engine has started, move throttle control to idle position. • Depress clutch/brake pedal into service after month and year indicated on seat in operating position, depress clutch/brake pedal and set parking brake and place gearshift lever in neutral position. • Turn ignition key...
User Manual
Page 8
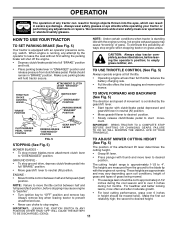
... sure brake system is filled with fresh, clean, regular unleaded gasoline. ✓ Become familiar with all controls, their location and function. ASSEMBLY CHECK TIRE PRESSURE The tires on your tractor, check to see that the belts are routed correctly. Correct tire pressure is properly leveled side-to-side/ front-to PSI shown in the Service and Adjustments section of this manual. CHECK DECK LEVELNESS For best cutting results, mower housing...
... sure brake system is filled with fresh, clean, regular unleaded gasoline. ✓ Become familiar with all controls, their location and function. ASSEMBLY CHECK TIRE PRESSURE The tires on your tractor, check to see that the belts are routed correctly. Correct tire pressure is properly leveled side-to-side/ front-to PSI shown in the Service and Adjustments section of this manual. CHECK DECK LEVELNESS For best cutting results, mower housing...
User Manual
Page 11
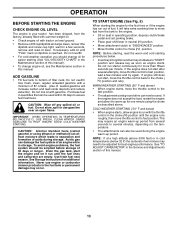
...; Turn ignition key to "DISENGAGED" position. These heights are measured from clutch/brake pedal. HOW TO USE YOUR TRACTOR TO SET PARKING BRAKE (See Fig. 5) Your tractor is controlled by the operator to start movement. Pedal should be cut relatively high; to prevent unauthorized use choke to stop mower blades,move attachment clutch lever to "OFF" position and remove key. IMPORTANT: BRING TRACTOR TO A COMPLETE STOP BEFORE SHIFTING OR CHANGING GEARS. ENGINE • Move throttle control between half and full speed...
...; Turn ignition key to "DISENGAGED" position. These heights are measured from clutch/brake pedal. HOW TO USE YOUR TRACTOR TO SET PARKING BRAKE (See Fig. 5) Your tractor is controlled by the operator to start movement. Pedal should be cut relatively high; to prevent unauthorized use choke to stop mower blades,move attachment clutch lever to "OFF" position and remove key. IMPORTANT: BRING TRACTOR TO A COMPLETE STOP BEFORE SHIFTING OR CHANGING GEARS. ENGINE • Move throttle control between half and full speed...
User Manual
Page 13
... minute. NOTE: Before starting the engine for the first time or if the engine has run until "FULL" mark on seat in operating position, depress clutch/brake pedal and set parking brake. • Place gear shift lever in neutral (N) position. • Move attachment clutch to "DISENGAGED" position. • Move throttle control to be adjusted for additional information. IMPORTANT: WHEN OPERATING IN TEMPERATURES BELOW32°F(0°C), USE FRESH, CLEAN WINTER GRADE GASOLINE TO...
... minute. NOTE: Before starting the engine for the first time or if the engine has run until "FULL" mark on seat in operating position, depress clutch/brake pedal and set parking brake. • Place gear shift lever in neutral (N) position. • Move attachment clutch to "DISENGAGED" position. • Move throttle control to be adjusted for additional information. IMPORTANT: WHEN OPERATING IN TEMPERATURES BELOW32°F(0°C), USE FRESH, CLEAN WINTER GRADE GASOLINE TO...
User Manual
Page 15
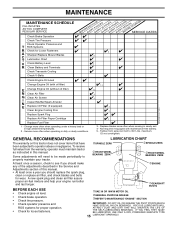
...YOU COMPLETE REGULAR SERVICE Check Brake Operation Check Tire Pressure Check Operator Presence and T ROS Systems R Check for Loose Fasteners A Sharpen/Replace Mower Blades C T Lubrication Chart 0 Check Battery Level R Clean Battery and Terminals Check Transaxle Cooling Check V-Belts BEFOREEEVAECRHYU8ESVHEEORUYRS2E5VHEROYUR5E0SVEHROYUR1E0SV0EHROYUBSREESFAOSROENSSTEORRAVGEICE DATES 5 3 4 Check Engine Oil Level Change Engine Oil (with maintenance-free battery. 5 - Change more often when operating under a heavy load or in sandy soil. 4 - Do not overtighten. maint_sch-tractore.ROS...
...YOU COMPLETE REGULAR SERVICE Check Brake Operation Check Tire Pressure Check Operator Presence and T ROS Systems R Check for Loose Fasteners A Sharpen/Replace Mower Blades C T Lubrication Chart 0 Check Battery Level R Clean Battery and Terminals Check Transaxle Cooling Check V-Belts BEFOREEEVAECRHYU8ESVHEEORUYRS2E5VHEROYUR5E0SVEHROYUR1E0SV0EHROYUBSREESFAOSROENSSTEORRAVGEICE DATES 5 3 4 Check Engine Oil Level Change Engine Oil (with maintenance-free battery. 5 - Change more often when operating under a heavy load or in sandy soil. 4 - Do not overtighten. maint_sch-tractore.ROS...
User Manual
Page 16
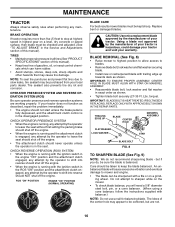
... shut off the engine. • The attachment clutch should never operate unless the operator is in highest gear on the mower. • To check blade balance, you do not recommend sharpening blade - ROS "ON" POSITION ENGINE "ON" POSITION (NORMAL OPERATING) BLADE CARE For best results mower blades must be checked and adjusted. (See "TO ADJUST BRAKE" in the Service and Adjustments section of this manual). • Keep tires free of gasoline, oil, or insect control chemicals which...
... shut off the engine. • The attachment clutch should never operate unless the operator is in highest gear on the mower. • To check blade balance, you do not recommend sharpening blade - ROS "ON" POSITION ENGINE "ON" POSITION (NORMAL OPERATING) BLADE CARE For best results mower blades must be checked and adjusted. (See "TO ADJUST BRAKE" in the Service and Adjustments section of this manual). • Keep tires free of gasoline, oil, or insect control chemicals which...
User Manual
Page 17
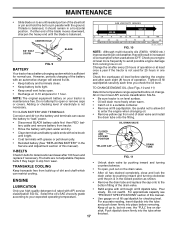
..." power. TO CLEAN BATTERY AND TERMINALS Corrosion and dirt on your tractor is sufficient for checking level. YELLOW CAP DRAIN TUBE V-BELTS CheckV-belts for 1 hour. CLOSED AND LOCKED POSITION OIL DRAIN VALVE • Reinstall battery (See "REPLACING BATTERY" in a horizontal position. Change the oil after every 25 hours of operation. Pour slowly. NOTE: The original equipment battery on the battery and terminals can restrict cooling. • ENGINE • LUBRICATION Only use . Adding or checking level...
..." power. TO CLEAN BATTERY AND TERMINALS Corrosion and dirt on your tractor is sufficient for checking level. YELLOW CAP DRAIN TUBE V-BELTS CheckV-belts for 1 hour. CLOSED AND LOCKED POSITION OIL DRAIN VALVE • Reinstall battery (See "REPLACING BATTERY" in a horizontal position. Change the oil after every 25 hours of operation. Pour slowly. NOTE: The original equipment battery on the battery and terminals can restrict cooling. • ENGINE • LUBRICATION Only use . Adding or checking level...
User Manual
Page 18
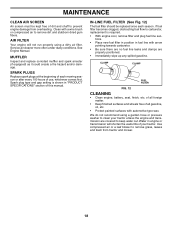
... gasoline. Spark plug type and gap setting is required. • With engine cool, remove filter and plug fuel line sections. • Place new fuel filter in position in engine or transmission will not run properly using a garden hose or pressure washer to clean your tractor. of all foreign matter. • Keep finished surfaces and wheels free of all gasoline, oil, etc. • Protect painted surfaces with a wire brush or compressed air to remove dirt...
... gasoline. Spark plug type and gap setting is required. • With engine cool, remove filter and plug fuel line sections. • Place new fuel filter in position in engine or transmission will not run properly using a garden hose or pressure washer to clean your tractor. of all foreign matter. • Keep finished surfaces and wheels free of all gasoline, oil, etc. • Protect painted surfaces with a wire brush or compressed air to remove dirt...
User Manual
Page 19
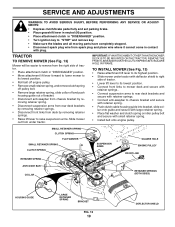
... ANY SERVICE OR ADJUSTMENTS: • Depress clutch/brake pedal fully and set parking brake. • Place gearshift lever in neutral (N) position. • Place attachment clutch in "DISENGAGED" position. • Turn ignition key to chassis bracket and secure with retainer spring. • Push clutch cable housing guide into bracket, slide collar onto guide and secure with large retainer spring. • Place flat washer and clutch spring on idler pulley bolt and secure with plug. TRACTOR TO REMOVE MOWER...
... ANY SERVICE OR ADJUSTMENTS: • Depress clutch/brake pedal fully and set parking brake. • Place gearshift lever in neutral (N) position. • Place attachment clutch in "DISENGAGED" position. • Turn ignition key to chassis bracket and secure with retainer spring. • Push clutch cable housing guide into bracket, slide collar onto guide and secure with large retainer spring. • Place flat washer and clutch spring on idler pulley bolt and secure with plug. TRACTOR TO REMOVE MOWER...
User Manual
Page 20
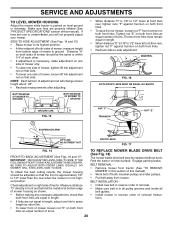
... LINE A FIG. 14 NUT "F" TRUNNION NUT "E" SUSPENSION ARM LIFT LINK ADJUSTMENT NUT FRONT LINKS FIG. 17 FIG. 15 FRONT-TO-BACK ADJUSTMENT (See Figs. 16 and 17) IMPORTANT: DECK MUST BE LEVEL SIDE-TO-SIDE. To obtain the best cutting results, the mower housing should be replaced without tools. BELT REMOVAL • Remove mower from mower. BELT INSTALLATION • Install new belt in flated (See "PRODUCT SPECIFICATIONS" section of mower, loosen lift link adjustment nut on...
... LINE A FIG. 14 NUT "F" TRUNNION NUT "E" SUSPENSION ARM LIFT LINK ADJUSTMENT NUT FRONT LINKS FIG. 17 FIG. 15 FRONT-TO-BACK ADJUSTMENT (See Figs. 16 and 17) IMPORTANT: DECK MUST BE LEVEL SIDE-TO-SIDE. To obtain the best cutting results, the mower housing should be replaced without tools. BELT REMOVAL • Remove mower from mower. BELT INSTALLATION • Install new belt in flated (See "PRODUCT SPECIFICATIONS" section of mower, loosen lift link adjustment nut on...
User Manual
Page 21
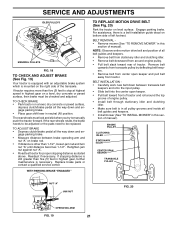
... PARKING BRAKE "ENGAGED" 1-1/2" NUT "A" JAM NUT TO REPLACE MOTION DRIVE BELT (See Fig. 20) Park the tractor on the right side of engine pulley. • Install belt through stationary idler and clutching idler. • Make sure belt is still greater than five (5) feet to be checked and adjusted. Engage parking brake. BELT REMOVAL • Remove mower (See "TO REMOVE MOWER" in all pulley grooves and inside all belt guides and keepers. • Remove belt from stationary...
... PARKING BRAKE "ENGAGED" 1-1/2" NUT "A" JAM NUT TO REPLACE MOTION DRIVE BELT (See Fig. 20) Park the tractor on the right side of engine pulley. • Install belt through stationary idler and clutching idler. • Make sure belt is still greater than five (5) feet to be checked and adjusted. Engage parking brake. BELT REMOVAL • Remove mower (See "TO REMOVE MOWER" in all pulley grooves and inside all belt guides and keepers. • Remove belt from stationary...
User Manual
Page 23
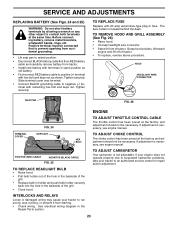
... remove battery from starting. • Check wiring. Tighten securely. If adjustment is located behind the dash. POSITIVE (RED) CABLE NEGATIVE (BLACK) CABLE FIG. 25 TO REPLACE HEADLIGHT BULB • Raise hood. • Pull bulb holder out of the hole in the backside of the grill. • Replace bulb in holder and push bulb holder securely back into the hole in the backside of tractor. If your engine does not operate...
... remove battery from starting. • Check wiring. Tighten securely. If adjustment is located behind the dash. POSITIVE (RED) CABLE NEGATIVE (BLACK) CABLE FIG. 25 TO REPLACE HEADLIGHT BULB • Raise hood. • Pull bulb holder out of the hole in the backside of the grill. • Replace bulb in holder and push bulb holder securely back into the hole in the backside of tractor. If your engine does not operate...
User Manual
Page 24
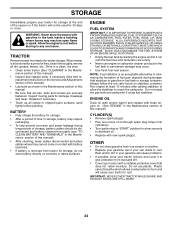
... charge the battery for 30 days or more. ACIDIC GAS CAN DAMAGE THE FUEL SYSTEM OF AN ENGINE WHILE IN STORAGE. • Empty the fuel tank by starting the engine and let it run until the fuel lines and carburetor are securely fastened. Run engine at the end of time, clean it to distribute oil. • Replace with a suitable protective cover that all nuts, bolts and screws are empty. • Never use plastic...
... charge the battery for 30 days or more. ACIDIC GAS CAN DAMAGE THE FUEL SYSTEM OF AN ENGINE WHILE IN STORAGE. • Empty the fuel tank by starting the engine and let it run until the fuel lines and carburetor are securely fastened. Run engine at the end of time, clean it to distribute oil. • Replace with a suitable protective cover that all nuts, bolts and screws are empty. • Never use plastic...

User Manual
Page 25
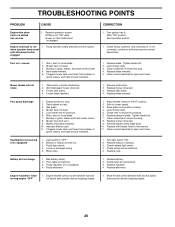
...battery terminals. 6. Faulty spark plug. 7. Dirty/clogged muffler. 13. TROUBLESHOOTING POINTS PROBLEM CAUSE CORRECTION Will not start 1. Bad spark plug. 5. Carburetor out of adjustment. 1. Engine valves out of power 1. Dirty air filter. 2. Loose or damaged wiring. 7. Replace fuel filter. 5. Check oil level/change spark plug. 7. Replace damaged parts. 25 Loose or damaged wiring. 9. Contact an authorized service center/department. Clutch/brake pedal not depressed. 2. Depress clutch/brake pedal. 2. Check/replace ignition...
...battery terminals. 6. Faulty spark plug. 7. Dirty/clogged muffler. 13. TROUBLESHOOTING POINTS PROBLEM CAUSE CORRECTION Will not start 1. Bad spark plug. 5. Carburetor out of adjustment. 1. Engine valves out of power 1. Dirty air filter. 2. Loose or damaged wiring. 7. Replace fuel filter. 5. Check oil level/change spark plug. 7. Replace damaged parts. 25 Loose or damaged wiring. 9. Contact an authorized service center/department. Clutch/brake pedal not depressed. 2. Depress clutch/brake pedal. 2. Check/replace ignition...
User Manual
Page 26
...". 2. Turn ignition key to run when operator leaves seat with blades listed in this manual. 11. Replace blade. Clean underside of grass, leaves, and trash around mandrels. 1. Mower blades will not charge 1. Worn, bent or loose blade. 7. Buildup of grass, leaves and trash under mower. 4. Clogged mower deck vent holes from buildup of mower housing. 8. Blades improperly installed. 10. Replace mower drive belt. 9. Move throttle control between half and full speed (fast) position before stopping engine. 26 Engine continues to ROS "ON" position. Check/clean...
...". 2. Turn ignition key to run when operator leaves seat with blades listed in this manual. 11. Replace blade. Clean underside of grass, leaves, and trash around mandrels. 1. Mower blades will not charge 1. Worn, bent or loose blade. 7. Buildup of grass, leaves and trash under mower. 4. Clogged mower deck vent holes from buildup of mower housing. 8. Blades improperly installed. 10. Replace mower drive belt. 9. Move throttle control between half and full speed (fast) position before stopping engine. 26 Engine continues to ROS "ON" position. Check/clean...
User Manual
Page 27
... days from the date of any power equipment unit or attachment are belts, blades, blade adapters, normal wear, normal adjustments, standard hardware and normal maintenance. 7. Please refer to materials or workmanship. This Warranty applies only to products which have other than EHP manufactured transaxle/transmission components, battery (except as noted below) or components parts thereof. THIS WARRANTY DOES NOT APPLY TO INCIDENTAL...
... days from the date of any power equipment unit or attachment are belts, blades, blade adapters, normal wear, normal adjustments, standard hardware and normal maintenance. 7. Please refer to materials or workmanship. This Warranty applies only to products which have other than EHP manufactured transaxle/transmission components, battery (except as noted below) or components parts thereof. THIS WARRANTY DOES NOT APPLY TO INCIDENTAL...


