Service Manual
Page 12
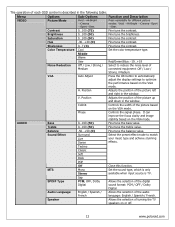
... Function and Description VIDEO Picture Mode Vivid →Hi-Bright →Cinema →Sport→User. Position Adjusts the position of turning the TV speakers on the VGA mode. Contrast 0...100 (75) Fine tune the contrast. Middle Warm User Red/Green/Blue: -19...+19... connected equipment: Off / Low / Strong / Medium. It can improve the focus clarity and image stability based on or off. 12 www.polaroid.com Sharpness 0...7 (4) Fine tune the contrast. Press repeatedly for different picture modes: Vivid →Hi-Bright →Cinema→Sport →...
... Function and Description VIDEO Picture Mode Vivid →Hi-Bright →Cinema →Sport→User. Position Adjusts the position of turning the TV speakers on the VGA mode. Contrast 0...100 (75) Fine tune the contrast. Middle Warm User Red/Green/Blue: -19...+19... connected equipment: Off / Low / Strong / Medium. It can improve the focus clarity and image stability based on or off. 12 www.polaroid.com Sharpness 0...7 (4) Fine tune the contrast. Press repeatedly for different picture modes: Vivid →Hi-Bright →Cinema→Sport →...
User Guide
Page 3
... interference by one or more of the FCC Rules. Consult the dealer or an experienced radio/TV technician for compliance could void the user authority to operate the equipment. 3 Changes or modifications not expressly approved by turning the equipment off and on a circuit which can radiate radio frequency energy and, if not...
... interference by one or more of the FCC Rules. Consult the dealer or an experienced radio/TV technician for compliance could void the user authority to operate the equipment. 3 Changes or modifications not expressly approved by turning the equipment off and on a circuit which can radiate radio frequency energy and, if not...
User Guide
Page 13
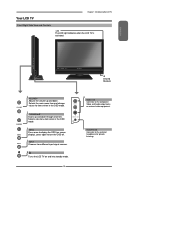
.../Right Side View and Controls LED The LED light indicates when the LCD TV is activated. CHANNEL▲▼ Scans up and down through channels. VIDEO1 IN Connects to turn the OSD off. HEADPHONE Connects to the external headphone for items when in the OSD mode. Selects sub...display the OSD (on screen display), press again to the composite Video and Audio output jacks on and into standby mode. 13 Turns the LCD TV on external video equipment. Selects the main-menu item and change values for private listening. ENGLISH IR Infrared Receiver VOLUME+Adjusts the volume...
.../Right Side View and Controls LED The LED light indicates when the LCD TV is activated. CHANNEL▲▼ Scans up and down through channels. VIDEO1 IN Connects to turn the OSD off. HEADPHONE Connects to the external headphone for items when in the OSD mode. Selects sub...display the OSD (on screen display), press again to the composite Video and Audio output jacks on and into standby mode. 13 Turns the LCD TV on external video equipment. Selects the main-menu item and change values for private listening. ENGLISH IR Infrared Receiver VOLUME+Adjusts the volume...

User Guide
Page 15
...CC EXIT DVR 1 2 3 ABC DEF 4 5 6 GHI JKL MNO 7 8 9 PQRS TUV WXYZ INPUT . 0 ENTER TV CAB/SAT DVD AUX Controls this LCD TV Controls Cable Converter or Satellite Receiver Controls DVD player or Video player Controls Audio Amplifier SLEEP ► Cycles through Wide mode... off SET UP Remote control universal code setup. SET UP TV CAB/ SAT DVD AUX SLEEP DVD MENU Turns the LCD TV on the screen 15 ENGLISH Your Remote Control Chapter 1 Introducing the LCD TV This package includes a Polaroid remote that enables control of the following device mode controls...
...CC EXIT DVR 1 2 3 ABC DEF 4 5 6 GHI JKL MNO 7 8 9 PQRS TUV WXYZ INPUT . 0 ENTER TV CAB/SAT DVD AUX Controls this LCD TV Controls Cable Converter or Satellite Receiver Controls DVD player or Video player Controls Audio Amplifier SLEEP ► Cycles through Wide mode... off SET UP Remote control universal code setup. SET UP TV CAB/ SAT DVD AUX SLEEP DVD MENU Turns the LCD TV on the screen 15 ENGLISH Your Remote Control Chapter 1 Introducing the LCD TV This package includes a Polaroid remote that enables control of the following device mode controls...
User Guide
Page 20
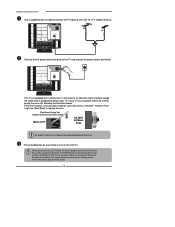
... with a safety fuse. If your TV. Always disconnect the LCD TV from the main voltage when the LCD TV will not be used for switching the LCD TV into standby, it does not disconnect the device from the socket. 20 HDTV/TV Air/CABLE VHF/UHF IN This TV is designed to turn on the remote to protect your... TV has no power, check the ...
... with a safety fuse. If your TV. Always disconnect the LCD TV from the main voltage when the LCD TV will not be used for switching the LCD TV into standby, it does not disconnect the device from the socket. 20 HDTV/TV Air/CABLE VHF/UHF IN This TV is designed to turn on the remote to protect your... TV has no power, check the ...
User Guide
Page 21
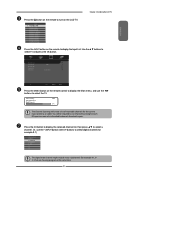
...digital main channel might include many subchannels (for the current input (antenna or cable). Or, use the ◄► buttons to turn on the remote to select TV and press the OK button. Analog Channels: 25 Digital Channels: 0 Cable 47% The Channel Scanning will be required to run ... 9-1, 92..) that are showing program at the same time. 21 Main TV(CABLE/AIR) VIDEO1 (SIDE) VIDEO2 (REAR) VIDEO3 (S-VIDEO) VIDEO4 (YPbPr1) VIDEO5 (YPbPr2) VIDEO6 (HDMI1) VIDEO7 (HDMI2) COMPUTER(VGA) Press the INPUT button on the LCD TV. Use the ▲▼ buttons to display the Input List. You...
...digital main channel might include many subchannels (for the current input (antenna or cable). Or, use the ◄► buttons to turn on the remote to select TV and press the OK button. Analog Channels: 25 Digital Channels: 0 Cable 47% The Channel Scanning will be required to run ... 9-1, 92..) that are showing program at the same time. 21 Main TV(CABLE/AIR) VIDEO1 (SIDE) VIDEO2 (REAR) VIDEO3 (S-VIDEO) VIDEO4 (YPbPr1) VIDEO5 (YPbPr2) VIDEO6 (HDMI1) VIDEO7 (HDMI2) COMPUTER(VGA) Press the INPUT button on the LCD TV. Use the ▲▼ buttons to display the Input List. You...
User Guide
Page 22
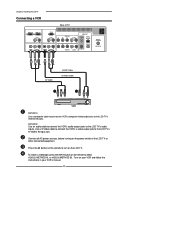
Use a S-Video cable to connect the VCR's s-video output jack to turn on the LCD TV. Press the button on the remote to select VIDEO2( METHOD A), or VIDEO3 (METHOD B). Turn on the power switch of TV HDMI 2 IN HDMI 1 IN AUDIO L R VGA IN AUDIO L R VIDEO L R AUDIO VIDEO2 IN S-VIDEO L ... VCR's composite video/audio jacks to the LCD TV's audio inputs. Connect all AC power sources, before turning on your VCR and follow the instructions in your VCR's manual. 22 Chapter 2 Installing the LCD TV Connecting a VCR Rear of the LCD TV or other connected equipment. METHOD B: Use ...
Use a S-Video cable to connect the VCR's s-video output jack to turn on the LCD TV. Press the button on the remote to select VIDEO2( METHOD A), or VIDEO3 (METHOD B). Turn on the power switch of TV HDMI 2 IN HDMI 1 IN AUDIO L R VGA IN AUDIO L R VIDEO L R AUDIO VIDEO2 IN S-VIDEO L ... VCR's composite video/audio jacks to the LCD TV's audio inputs. Connect all AC power sources, before turning on your VCR and follow the instructions in your VCR's manual. 22 Chapter 2 Installing the LCD TV Connecting a VCR Rear of the LCD TV or other connected equipment. METHOD B: Use ...
User Guide
Page 23
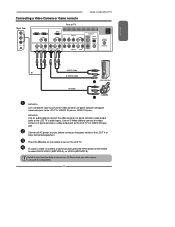
... B: Use an audio cable to connect the video camera's or game console's audio output jacks to turn on the LCD TV. To watch a video vis camera or game console, press the INPUT button on the power switch of TV HDMI 2 IN HDMI 1 IN AUDIO L R VGA IN AUDIO L R VIDEO L R AUDIO VIDEO2 IN... cable to connect the video camera's or game console's s-video output jack to the LCD TV's VIDEO2 IN jacks or VIDEO1 IN jacks. Not all AC power sources, before turning on the remote to a TV. Please check your video camera user guide for compatibility. 23 ENGLISH Connecting a Video Camera...
... B: Use an audio cable to connect the video camera's or game console's audio output jacks to turn on the LCD TV. To watch a video vis camera or game console, press the INPUT button on the power switch of TV HDMI 2 IN HDMI 1 IN AUDIO L R VGA IN AUDIO L R VIDEO L R AUDIO VIDEO2 IN... cable to connect the video camera's or game console's s-video output jack to the LCD TV's VIDEO2 IN jacks or VIDEO1 IN jacks. Not all AC power sources, before turning on the remote to a TV. Please check your video camera user guide for compatibility. 23 ENGLISH Connecting a Video Camera...

User Guide
Page 25
Press the button on the remote to select VIDEO2( METHOD A), or VIDEO3 ( METHOD B), or VIDEO4/VIDEO5 (METHOD C). To watch a DVD, press the INPUT button on the remote to turn on the LCD TV. For best picture quality, if your equipment has component video output, use a component cable instead of the LCD TV or other connected equipment. ENGLISH Chapter 2 Installing the LCD TV Connect all AC power sources, before turning on the power switch of a composite video or S-video cable. 25
Press the button on the remote to select VIDEO2( METHOD A), or VIDEO3 ( METHOD B), or VIDEO4/VIDEO5 (METHOD C). To watch a DVD, press the INPUT button on the remote to turn on the LCD TV. For best picture quality, if your equipment has component video output, use a component cable instead of the LCD TV or other connected equipment. ENGLISH Chapter 2 Installing the LCD TV Connect all AC power sources, before turning on the power switch of a composite video or S-video cable. 25

User Guide
Page 26
... the LCD TV. Chapter 2 Installing the LCD TV Connecting a Digital TV Cable Box or Digital Satellite Receiver Rear of the LCD TV or other connected equipment. Use an audio cable to connect the satellite receiver's/TV Cable Box's component audio jacks to the LCD TV's component input jacks. Connect all AC power sources, before turning on the power switch of TV HDMI...
... the LCD TV. Chapter 2 Installing the LCD TV Connecting a Digital TV Cable Box or Digital Satellite Receiver Rear of the LCD TV or other connected equipment. Use an audio cable to connect the satellite receiver's/TV Cable Box's component audio jacks to the LCD TV's component input jacks. Connect all AC power sources, before turning on the power switch of TV HDMI...
User Guide
Page 27
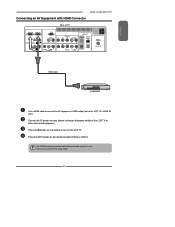
Press the INPUT button on the remote to turn on the LCD TV. Press the button on the power switch of TV HDMI 2 IN HDMI 1 IN AUDIO L R VGA IN AUDIO L R VIDEO L R AUDIO VIDEO2 IN S-VIDEO L AUDIO R S-VIDEO IN YPbPr1 IN Y Pb Pr AUDIO AUDIO OUT ...'s HDMI output jack to connect the audio cable. 27 ENGLISH Chapter 2 Installing the LCD TV Connecting an AV Equipment with HDMI Connector Rear of the LCD TV or other connected equipment. Connect all AC power sources, before turning on the remote to select VIDEO6 or VIDEO7. The HDMI connector provides both video and...
Press the INPUT button on the remote to turn on the LCD TV. Press the button on the power switch of TV HDMI 2 IN HDMI 1 IN AUDIO L R VGA IN AUDIO L R VIDEO L R AUDIO VIDEO2 IN S-VIDEO L AUDIO R S-VIDEO IN YPbPr1 IN Y Pb Pr AUDIO AUDIO OUT ...'s HDMI output jack to connect the audio cable. 27 ENGLISH Chapter 2 Installing the LCD TV Connecting an AV Equipment with HDMI Connector Rear of the LCD TV or other connected equipment. Connect all AC power sources, before turning on the remote to select VIDEO6 or VIDEO7. The HDMI connector provides both video and...

User Guide
Page 28
... connected to AV equipment's DVI connector, you will need an HDMI-to turn on the remote to -DVI cable or an HDMI adapter(not suplied) and an audio cable. 28 Press the button on the LCD TV. Use an audio cable to connect the AV equipment's audio output jacks to select VIDEO6 ...AUD IO L R DVI IN AV EQUIPMENT Use a HDMI-to-DVI cable to connect the AV equipment's DVI output jack to the LCD TV's HDMI IN jacks. Connect all AC power sources, before turning on the remote to LCD TV's HDMI AUDIO jacks. Chapter 2 Installing the LCD TV Connecting an AV Equipment with DVI Connector Rear of the...
... connected to AV equipment's DVI connector, you will need an HDMI-to turn on the remote to -DVI cable or an HDMI adapter(not suplied) and an audio cable. 28 Press the button on the LCD TV. Use an audio cable to connect the AV equipment's audio output jacks to select VIDEO6 ...AUD IO L R DVI IN AV EQUIPMENT Use a HDMI-to-DVI cable to connect the AV equipment's DVI output jack to the LCD TV's HDMI IN jacks. Connect all AC power sources, before turning on the remote to LCD TV's HDMI AUDIO jacks. Chapter 2 Installing the LCD TV Connecting an AV Equipment with DVI Connector Rear of the...

User Guide
Page 29
Press the Input button on the remote to LCD TV's. Connect all AC power sources, before turning on the power switch of TV Chapter 3 Using the LCD TV HDMI 2 IN HDMI 1 IN AUDIO L R VGA IN AUDIO L R VIDEO L R AUDIO VIDEO2 IN S-VIDEO L AUDIO R S-VIDEO IN YPbPr1 IN Y Pb Pr AUDIO AUDIO ... DIGITAL OPTICAL L R Y Pb Pr L COAXIAL L R R YPbPr2 IN AUDIO HDTV/TV Air/CABLE VHF/UHF IN AUDIO Cable VGA Cable PC Use a D-SUB cable to connect the PC's D-SUB output jack to turn on the remote to the LCD TV's VGA input jack. Use an audio cable to connect the PC's audio...
Press the Input button on the remote to LCD TV's. Connect all AC power sources, before turning on the power switch of TV Chapter 3 Using the LCD TV HDMI 2 IN HDMI 1 IN AUDIO L R VGA IN AUDIO L R VIDEO L R AUDIO VIDEO2 IN S-VIDEO L AUDIO R S-VIDEO IN YPbPr1 IN Y Pb Pr AUDIO AUDIO ... DIGITAL OPTICAL L R Y Pb Pr L COAXIAL L R R YPbPr2 IN AUDIO HDTV/TV Air/CABLE VHF/UHF IN AUDIO Cable VGA Cable PC Use a D-SUB cable to connect the PC's D-SUB output jack to turn on the remote to the LCD TV's VGA input jack. Use an audio cable to connect the PC's audio...
User Guide
Page 30
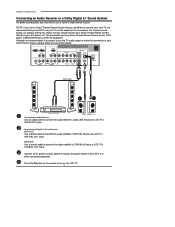
...: Use an audio cable to connect the audio receiver's audio LINE IN jacks to LCD TV's COAXIAL OUT jacks. You should connect your Home Theater/Stereo System directly to turn on the power switch of the LCD TV or other AV equipment. METHOD B: Use a coaxial cable to connect the audio ampli...fier's COAXIAL IN jacks to LCD TV's AUDIO OUT jacks. Press the button on the remote to ...
...: Use an audio cable to connect the audio receiver's audio LINE IN jacks to LCD TV's COAXIAL OUT jacks. You should connect your Home Theater/Stereo System directly to turn on the power switch of the LCD TV or other AV equipment. METHOD B: Use a coaxial cable to connect the audio ampli...fier's COAXIAL IN jacks to LCD TV's AUDIO OUT jacks. Press the button on the remote to ...
User Guide
Page 32
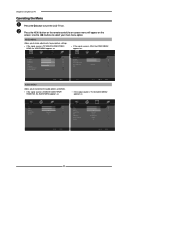
Chapter 3 Using the LCD TV Operating the Menu Press the button to turn the LCD TV on the screen. VIDEO MENU: Allows you to your main menu option. Use the ◄► buttons to select your picture settings. ▪ If the signal source is TV/VIDEO/S-VIDEO/YPbPr/ HDMI, the VIDEO MENU appears as: ...▪ If the signal source is TV, the...
Chapter 3 Using the LCD TV Operating the Menu Press the button to turn the LCD TV on the screen. VIDEO MENU: Allows you to your main menu option. Use the ◄► buttons to select your picture settings. ▪ If the signal source is TV/VIDEO/S-VIDEO/YPbPr/ HDMI, the VIDEO MENU appears as: ...▪ If the signal source is TV, the...
User Guide
Page 34
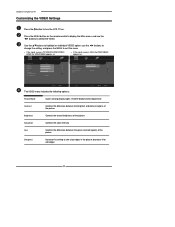
Press the MENU button on . Use the ▲▼buttons to highlight an individual VIDEO option, use the ◄► buttons to turn the LCD TV on the remote control to display the Main menu, and use the ◄► buttons to change the setting, and press the MENU to exit ... the difference between the green and red regions of the picture Sharpness Increase this setting to see crisp edges in the picture; Chapter 3 Using the LCD TV Customizing the VIDEO Settings Press the button to select the VIDEO. decrease it for soft edges 34
Press the MENU button on . Use the ▲▼buttons to highlight an individual VIDEO option, use the ◄► buttons to turn the LCD TV on the remote control to display the Main menu, and use the ◄► buttons to change the setting, and press the MENU to exit ... the difference between the green and red regions of the picture Sharpness Increase this setting to see crisp edges in the picture; Chapter 3 Using the LCD TV Customizing the VIDEO Settings Press the button to select the VIDEO. decrease it for soft edges 34

User Guide
Page 36
Chapter 3 Using the LCD TV Customizing the AUDIO Settings Press the button to high-fidelity stereo sound while watching TV ▪ Stereo: Use separate audio tracks for left and ... while watching a scene in the original program ▪ Mono: Allows mono output (useful when stereo is TV, the AUDIO MENU appears as: Bass Treble Balance Sound Effect Speaker Surround On 50 Bass 50 50 Treble ...options: Surround/Live/Dance/Techno/Classic/Soft/Rock/ POP/Off MTS Allows you to listen to turn the LCD TV on the remote control to display the Main menu, and use the ◄► buttons ...
Chapter 3 Using the LCD TV Customizing the AUDIO Settings Press the button to high-fidelity stereo sound while watching TV ▪ Stereo: Use separate audio tracks for left and ... while watching a scene in the original program ▪ Mono: Allows mono output (useful when stereo is TV, the AUDIO MENU appears as: Bass Treble Balance Sound Effect Speaker Surround On 50 Bass 50 50 Treble ...options: Surround/Live/Dance/Techno/Classic/Soft/Rock/ POP/Off MTS Allows you to listen to turn the LCD TV on the remote control to display the Main menu, and use the ◄► buttons ...

User Guide
Page 37
Allows to select to select the audio language:English/Spanish/French. ENGLISH Chapter 3 Using the LCD TV SPDIF Type Audio Language Speaker Allows to selection of the digital sound format: PCM/OFF/Dolby Digital ▪ PCM: The external audio system is connected to the AUDIO OUT (L/R) of the LCD TV ▪ Dolby Digital: The external audio system is connected to the AUDIO OUT DIGITAL (OPTICAL or COAXIAL) ot the LCD TV ▪ OFF: Select OFF to turn on or off the external audio system Allows to turn off the TV speakers. 37
Allows to select to select the audio language:English/Spanish/French. ENGLISH Chapter 3 Using the LCD TV SPDIF Type Audio Language Speaker Allows to selection of the digital sound format: PCM/OFF/Dolby Digital ▪ PCM: The external audio system is connected to the AUDIO OUT (L/R) of the LCD TV ▪ Dolby Digital: The external audio system is connected to the AUDIO OUT DIGITAL (OPTICAL or COAXIAL) ot the LCD TV ▪ OFF: Select OFF to turn on or off the external audio system Allows to turn off the TV speakers. 37

User Guide
Page 38
... an antenna (over the air) ▪ Cable Choose this setting if you are receiving TV channels with a CATV (cable TV) Allows addition/removal of receivable channels. Press the OK button to turn the LCD TV on. Chapter 3 Using the LCD TV Customizing the TV Settings Press the button to display the Channel Skip menu: 2 ABC 3 DISC 4 5 6 7 8 9 10 Analog...
... an antenna (over the air) ▪ Cable Choose this setting if you are receiving TV channels with a CATV (cable TV) Allows addition/removal of receivable channels. Press the OK button to turn the LCD TV on. Chapter 3 Using the LCD TV Customizing the TV Settings Press the button to display the Channel Skip menu: 2 ABC 3 DISC 4 5 6 7 8 9 10 Analog...

User Guide
Page 39
... Reset Default English Middle OSD Language Time Setup Parental Gamma Reset Default English Middle Setup Select Exit 39 ENGLISH Time Zone Chapter 3 Using the LCD TV Press the ▼ button to select the desired channel, and press the OK button repeatedly to select show ( ) or hide( ) Allows ...of USA: Eastern Time/ Indiana/Central time/Mountain Time/Arizona/Pacific Time/ Alaska/Hawaii Customizing the SETUP Settings Press the button to turn the LCD TV on the remote control to display the Main menu, and use the ◄► buttons to change the setting, and press the MENU...
... Reset Default English Middle OSD Language Time Setup Parental Gamma Reset Default English Middle Setup Select Exit 39 ENGLISH Time Zone Chapter 3 Using the LCD TV Press the ▼ button to select the desired channel, and press the OK button repeatedly to select show ( ) or hide( ) Allows ...of USA: Eastern Time/ Indiana/Central time/Mountain Time/Arizona/Pacific Time/ Alaska/Hawaii Customizing the SETUP Settings Press the button to turn the LCD TV on the remote control to display the Main menu, and use the ◄► buttons to change the setting, and press the MENU...


