
Service Manual
Page 6
... Maximum Pixel Clock Connector Format Level / Impedance Format Level / Impedance Format Level / Impedance Power Source Sound Output HDMI DVI 1.0 0.5~3.0Vp-p/100 Ohm (Differential),50 Ohm (Single ending) Single Link Fh = 31~60 kHz Fv = ...56~76 Hz 135 MHz Compliant with Revision 1.0 HDMI x 1 Analog HD15 PC Signal (RGB) R, G, B Analog 0.7Vp-p / 75Ω Compliant with Revision 1.0 H/V separate 3V TTL level.../Cb, Pr/Cr: 0.7 ± 0.035Vp-p / 75Ω AC100 - 240 V, 60/50 Hz 10W X2, 8 Ohm. 6 www.polaroid.com
... Maximum Pixel Clock Connector Format Level / Impedance Format Level / Impedance Format Level / Impedance Power Source Sound Output HDMI DVI 1.0 0.5~3.0Vp-p/100 Ohm (Differential),50 Ohm (Single ending) Single Link Fh = 31~60 kHz Fv = ...56~76 Hz 135 MHz Compliant with Revision 1.0 HDMI x 1 Analog HD15 PC Signal (RGB) R, G, B Analog 0.7Vp-p / 75Ω Compliant with Revision 1.0 H/V separate 3V TTL level.../Cb, Pr/Cr: 0.7 ± 0.035Vp-p / 75Ω AC100 - 240 V, 60/50 Hz 10W X2, 8 Ohm. 6 www.polaroid.com
Service Manual
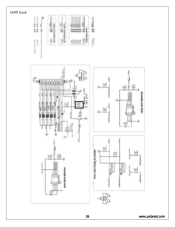
Page 36
HDMI Input 36 www.polaroid.com
HDMI Input 36 www.polaroid.com
User Guide
Page 2
... in the instruction manual. Changes are trademarks or registered trademarks of HDMI Licensing LLC. This TV incorporates High-Definition Multimedia Interface (HDMITM) technology. The presence of these materials... may, if not disposed of properly. HDMI, the HDMI logo and High-Definition Multimedia Interface are periodically made to properly dispose of Dolby Laboratories. Changes, technical inaccuracies, and typographic errors will be disposed of Polaroid...
... in the instruction manual. Changes are trademarks or registered trademarks of HDMI Licensing LLC. This TV incorporates High-Definition Multimedia Interface (HDMITM) technology. The presence of these materials... may, if not disposed of properly. HDMI, the HDMI logo and High-Definition Multimedia Interface are periodically made to properly dispose of Dolby Laboratories. Changes, technical inaccuracies, and typographic errors will be disposed of Polaroid...
User Guide
Page 7
... 4 Antenna Safety Instructions 6 Chapter 1 Introducing the LCD TV Key Features ...8 Package Contents ...9 Setting Up Your LCD TV 11 Your LCD TV...13 Your Remote Control 15 Chapter 2 Installing the LCD TV Connecting a TV Cable or an Antenna 17 Connecting a VCR ...22... Connecting a Video Camera or Game Console 23 Connecting a DVD Player 24 Connecting a Digital TV Cable Box or Digital Satellite Receiver 26 Connecting an AV Equipment with HDMI...
... 4 Antenna Safety Instructions 6 Chapter 1 Introducing the LCD TV Key Features ...8 Package Contents ...9 Setting Up Your LCD TV 11 Your LCD TV...13 Your Remote Control 15 Chapter 2 Installing the LCD TV Connecting a TV Cable or an Antenna 17 Connecting a VCR ...22... Connecting a Video Camera or Game Console 23 Connecting a DVD Player 24 Connecting a Digital TV Cable Box or Digital Satellite Receiver 26 Connecting an AV Equipment with HDMI...
User Guide
Page 8
... the LCD TV Chapter 1 Introducing the LCD TV Key Features Various Audio/Video terminals for external equipment connection ▪ 2 sets of composite A/V input terminals ▪ 1 set of S-VIDEO terminals ▪ 2 sets of component Video input terminals ▪ 1 VGA/ Audio input terminals ▪ 2 HDMI/Audio ... function can digitally reduce image noise to provide better picture quality. High Definition Multimedia Interface (HDMI) ▪ High Definition Multimedia Interface (HDMI) is a small, user-friendly interconnect that can automatically detect content derived from film...
... the LCD TV Chapter 1 Introducing the LCD TV Key Features Various Audio/Video terminals for external equipment connection ▪ 2 sets of composite A/V input terminals ▪ 1 set of S-VIDEO terminals ▪ 2 sets of component Video input terminals ▪ 1 VGA/ Audio input terminals ▪ 2 HDMI/Audio ... function can digitally reduce image noise to provide better picture quality. High Definition Multimedia Interface (HDMI) ▪ High Definition Multimedia Interface (HDMI) is a small, user-friendly interconnect that can automatically detect content derived from film...
User Guide
Page 14
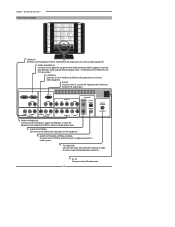
... on external video equipment. AC IN Connects to the composite VIDEO and AUDIO(L/R) output jacks on external video equipment. Chapter 1 Introducing the LCD TV Rear View and Jacks VIDEO2 IN Connects to the AC power cord. 14 VGA IN Connects the PC, or other AV equipment with component... Connects to the DVD player, Digital Set-Top-Box, or other AV equipment with HDMI connector.HDMI supports enhanced, high-definition video and two-channel digital audio. The AUDIO(L/R) of HDMI IN is for DVI connection. HDMI 2 IN HDMI 1 IN AUDIO L R VGA IN AUDIO L R YPbPr1 IN Y Pb Pr...
... on external video equipment. AC IN Connects to the composite VIDEO and AUDIO(L/R) output jacks on external video equipment. Chapter 1 Introducing the LCD TV Rear View and Jacks VIDEO2 IN Connects to the AC power cord. 14 VGA IN Connects the PC, or other AV equipment with component... Connects to the DVD player, Digital Set-Top-Box, or other AV equipment with HDMI connector.HDMI supports enhanced, high-definition video and two-channel digital audio. The AUDIO(L/R) of HDMI IN is for DVI connection. HDMI 2 IN HDMI 1 IN AUDIO L R VGA IN AUDIO L R YPbPr1 IN Y Pb Pr...
User Guide
Page 22
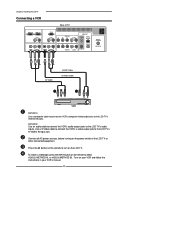
...cable to connect the VCR's audio output jacks to the LCD TV's VIDEO2 IN jacks. Connect all AC power sources, before turning on your VCR and follow the instructions in your VCR's manual. 22 Turn on the power switch of TV HDMI 2 IN HDMI 1 IN AUDIO L R VGA IN AUDIO L R VIDEO... S-VIDEO Cable METHOD A: Use a composite cable to connect the VCR's composite video/audio jacks to the LCD TV's audio inputs. Chapter 2 Installing the LCD TV Connecting a VCR Rear of the LCD TV or other connected equipment. Use a S-Video cable to connect the VCR's s-video output jack to select VIDEO2...
...cable to connect the VCR's audio output jacks to the LCD TV's VIDEO2 IN jacks. Connect all AC power sources, before turning on your VCR and follow the instructions in your VCR's manual. 22 Turn on the power switch of TV HDMI 2 IN HDMI 1 IN AUDIO L R VGA IN AUDIO L R VIDEO... S-VIDEO Cable METHOD A: Use a composite cable to connect the VCR's composite video/audio jacks to the LCD TV's audio inputs. Chapter 2 Installing the LCD TV Connecting a VCR Rear of the LCD TV or other connected equipment. Use a S-Video cable to connect the VCR's s-video output jack to select VIDEO2...
User Guide
Page 23
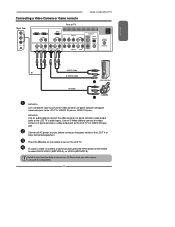
... the button on the remote to turn on the remote to the LCD TV's VIDEO2 IN jacks or VIDEO1 IN jacks. Not all AC power sources, before turning on the power switch of TV HDMI 2 IN HDMI 1 IN AUDIO L R VGA IN AUDIO L R VIDEO L R AUDIO VIDEO2 IN S-VIDEO L AUDIO R S-VIDEO IN YPbPr1 IN ...audio cable to connect the video camera's or game console's audio output jacks to the LCD TV's S-VIDEO IN input jack. To watch a video vis camera or game console, press the INPUT button on the LCD TV. Please check your video camera user guide for compatibility. 23 ENGLISH Connecting a Video ...
... the button on the remote to turn on the remote to the LCD TV's VIDEO2 IN jacks or VIDEO1 IN jacks. Not all AC power sources, before turning on the power switch of TV HDMI 2 IN HDMI 1 IN AUDIO L R VGA IN AUDIO L R VIDEO L R AUDIO VIDEO2 IN S-VIDEO L AUDIO R S-VIDEO IN YPbPr1 IN ...audio cable to connect the video camera's or game console's audio output jacks to the LCD TV's S-VIDEO IN input jack. To watch a video vis camera or game console, press the INPUT button on the LCD TV. Please check your video camera user guide for compatibility. 23 ENGLISH Connecting a Video ...

User Guide
Page 24
...player are sometimes labeled YPbPr, or YCbCr. METHOD C: Use a component cable to connect the DVD player's component output jacks to the LCD TV's S-VIDEO IN input jack. For an explanation of TV HDMI 2 IN HDMI 1 IN AUDIO L R VGA IN AUDIO L R L R VIDEO AUDIO VIDEO2 IN S-VIDEO L AUDIO R S-VIDEO IN YPbPr1 IN...Use a composite cable to connect the DVD player's composite video/audio jacks to the LCD TV's VIDEO2 IN jacks. Use an S-Video cable to connect the DVD player's s-video output jack to the LCD TV's YPbPr1 IN or YPbPr2 IN input jacks. Use an audio cable to connect the...
...player are sometimes labeled YPbPr, or YCbCr. METHOD C: Use a component cable to connect the DVD player's component output jacks to the LCD TV's S-VIDEO IN input jack. For an explanation of TV HDMI 2 IN HDMI 1 IN AUDIO L R VGA IN AUDIO L R L R VIDEO AUDIO VIDEO2 IN S-VIDEO L AUDIO R S-VIDEO IN YPbPr1 IN...Use a composite cable to connect the DVD player's composite video/audio jacks to the LCD TV's VIDEO2 IN jacks. Use an S-Video cable to connect the DVD player's s-video output jack to the LCD TV's YPbPr1 IN or YPbPr2 IN input jacks. Use an audio cable to connect the...

User Guide
Page 26
...LCD TV Connecting a Digital TV Cable Box or Digital Satellite Receiver Rear of the LCD TV or other connected equipment. Press the button on the remote to select VIDEO4/VIDEO5. 26 To watch programs via satellite receiver or TV Cable Box, press the INPUT button on the remote to turn on the power switch of TV HDMI 2 IN HDMI...COAXIAL L R R YPbPr2 IN AUDIO HDTV/TV Air/CABLE VHF/UHF IN Pb Pr COMPONENT/AUDIO Cable Pb Pr Use a component cable to connect the satellite receiver's/TV Cable Box's component (YPbPr1) output jacks to the LCD TV's audio input jacks. Connect all AC power...
...LCD TV Connecting a Digital TV Cable Box or Digital Satellite Receiver Rear of the LCD TV or other connected equipment. Press the button on the remote to select VIDEO4/VIDEO5. 26 To watch programs via satellite receiver or TV Cable Box, press the INPUT button on the remote to turn on the power switch of TV HDMI 2 IN HDMI...COAXIAL L R R YPbPr2 IN AUDIO HDTV/TV Air/CABLE VHF/UHF IN Pb Pr COMPONENT/AUDIO Cable Pb Pr Use a component cable to connect the satellite receiver's/TV Cable Box's component (YPbPr1) output jacks to the LCD TV's audio input jacks. Connect all AC power...
User Guide
Page 27
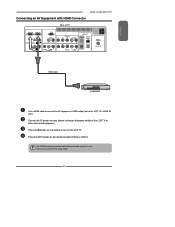
... to select VIDEO6 or VIDEO7. Press the INPUT button on the LCD TV. The HDMI connector provides both video and audio signals, it's not necessary to the LCD TV's HDMI IN jacks. ENGLISH Chapter 2 Installing the LCD TV Connecting an AV Equipment with HDMI Connector Rear of the LCD TV or other connected equipment. Connect all AC power sources, before turning...
... to select VIDEO6 or VIDEO7. Press the INPUT button on the LCD TV. The HDMI connector provides both video and audio signals, it's not necessary to the LCD TV's HDMI IN jacks. ENGLISH Chapter 2 Installing the LCD TV Connecting an AV Equipment with HDMI Connector Rear of the LCD TV or other connected equipment. Connect all AC power sources, before turning...

User Guide
Page 28
...(not suplied) and an audio cable. 28 If the LCD TV is connected to AV equipment's DVI connector, you will need an HDMI-to LCD TV's HDMI AUDIO jacks. Chapter 2 Installing the LCD TV Connecting an AV Equipment with DVI Connector Rear of the LCD TV or other connected equipment. Press the button on the remote to the LCD TV's HDMI IN jacks.
...(not suplied) and an audio cable. 28 If the LCD TV is connected to AV equipment's DVI connector, you will need an HDMI-to LCD TV's HDMI AUDIO jacks. Chapter 2 Installing the LCD TV Connecting an AV Equipment with DVI Connector Rear of the LCD TV or other connected equipment. Press the button on the remote to the LCD TV's HDMI IN jacks.

User Guide
Page 29
Press the button on the remote to select COMPUTER. 29 Press the Input button on the remote to turn on the power switch of TV Chapter 3 Using the LCD TV HDMI 2 IN HDMI 1 IN AUDIO L R VGA IN AUDIO L R VIDEO L R AUDIO VIDEO2 IN S-VIDEO L AUDIO R S-VIDEO IN YPbPr1 IN ...Y Pb Pr AUDIO AUDIO OUT STEREO DIGITAL OPTICAL L R Y Pb Pr L COAXIAL L R R YPbPr2 IN AUDIO HDTV/TV Air/CABLE VHF/UHF IN AUDIO Cable VGA Cable PC...
Press the button on the remote to select COMPUTER. 29 Press the Input button on the remote to turn on the power switch of TV Chapter 3 Using the LCD TV HDMI 2 IN HDMI 1 IN AUDIO L R VGA IN AUDIO L R VIDEO L R AUDIO VIDEO2 IN S-VIDEO L AUDIO R S-VIDEO IN YPbPr1 IN ...Y Pb Pr AUDIO AUDIO OUT STEREO DIGITAL OPTICAL L R Y Pb Pr L COAXIAL L R R YPbPr2 IN AUDIO HDTV/TV Air/CABLE VHF/UHF IN AUDIO Cable VGA Cable PC...
User Guide
Page 30
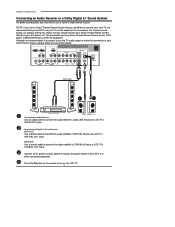
...all AC power sources, before turning on the power switch of the LCD TV or other AV equipment. You should connect your TV's audio output for this connection to LCD TV's OPTICAL OUT jacks. Press the button on the LCD TV. 30 METHOD B: Use a coaxial cable to connect the audio ... best sound quality, our product testing has shown that you should connect your Home Theater/Stereo System to turn on the remote to your A/V device. HDMI 2 IN HDMI 1 IN AUDIO L R VGA IN AUDIO L R L R VIDEO AUDIO VIDEO2 IN S-VIDEO L AUDIO R S-VIDEO IN YPbPr1 IN Y Pb Pr AUDIO AUDIO...
...all AC power sources, before turning on the power switch of the LCD TV or other AV equipment. You should connect your TV's audio output for this connection to LCD TV's OPTICAL OUT jacks. Press the button on the LCD TV. 30 METHOD B: Use a coaxial cable to connect the audio ... best sound quality, our product testing has shown that you should connect your Home Theater/Stereo System to turn on the remote to your A/V device. HDMI 2 IN HDMI 1 IN AUDIO L R VGA IN AUDIO L R L R VIDEO AUDIO VIDEO2 IN S-VIDEO L AUDIO R S-VIDEO IN YPbPr1 IN Y Pb Pr AUDIO AUDIO...
User Guide
Page 32
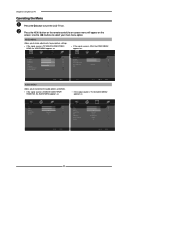
... customize the audio options and effects. ▪ If the signal source is VIDEO/S-VIDEO/YPbPr/ HDMI/VGA, the AUDIO MENU appears as: Video Select Exit ▪ If the signal source is TV, the AUDIO MENU appears as : Picture Mode User Picture Mode User Contrast 50 Contrast 50 Brightness...screen menu will appear on . Chapter 3 Using the LCD TV Operating the Menu Press the button to turn the LCD TV on the screen. Use the ◄► buttons to select your picture settings. ▪ If the signal source is TV/VIDEO/S-VIDEO/YPbPr/ HDMI, the VIDEO MENU appears as: ▪ If ...
... customize the audio options and effects. ▪ If the signal source is VIDEO/S-VIDEO/YPbPr/ HDMI/VGA, the AUDIO MENU appears as: Video Select Exit ▪ If the signal source is TV, the AUDIO MENU appears as : Picture Mode User Picture Mode User Contrast 50 Contrast 50 Brightness...screen menu will appear on . Chapter 3 Using the LCD TV Operating the Menu Press the button to turn the LCD TV on the screen. Use the ◄► buttons to select your picture settings. ▪ If the signal source is TV/VIDEO/S-VIDEO/YPbPr/ HDMI, the VIDEO MENU appears as: ▪ If ...
User Guide
Page 33
...option of the item. Channel Scan Tuner Mode Channel Skip Time Zone Cable Eastern Time Chapter 3 Using the LCD TV TV Select Exit SETUP MENU: Allows you to exit the menu. 33 ENGLISH TV MENU: Allows you to set up a variety of features: Language, Closed Caption, factory reset, Parental ...Control sleep timer. ▪ If the signal source is TV/VIDOE/S-VIDEO/YPbPr, the SETUP MENU appears as: ▪ If the signal source is HDMI/VGA, the SETUP MENU appears as: OSD Language Time Setup Closed Caption Parental Gamma Reset Default English...
...option of the item. Channel Scan Tuner Mode Channel Skip Time Zone Cable Eastern Time Chapter 3 Using the LCD TV TV Select Exit SETUP MENU: Allows you to exit the menu. 33 ENGLISH TV MENU: Allows you to set up a variety of features: Language, Closed Caption, factory reset, Parental ...Control sleep timer. ▪ If the signal source is TV/VIDOE/S-VIDEO/YPbPr, the SETUP MENU appears as: ▪ If the signal source is HDMI/VGA, the SETUP MENU appears as: OSD Language Time Setup Closed Caption Parental Gamma Reset Default English...
User Guide
Page 34
... Settings Press the button to turn the LCD TV on the remote control to display the Main menu, and use the ◄► buttons to change the setting, and press the MENU to exit the menu ▪ If the signal source is TV/VIDEO/S-VIDEO/YPbPr/ HDMI, the VIDEO MENU appears as: ▪ If...
... Settings Press the button to turn the LCD TV on the remote control to display the Main menu, and use the ◄► buttons to change the setting, and press the MENU to exit the menu ▪ If the signal source is TV/VIDEO/S-VIDEO/YPbPr/ HDMI, the VIDEO MENU appears as: ▪ If...

User Guide
Page 36
...;▼buttons to highlight an individual AUDIO option, use the ◄► buttons to turn the LCD TV on the remote control to display the Main menu, and use the ◄► buttons to ...menu ▪ If the signal source is VIDEO/S-VIDEO/YPbPr/ HDMI/VGA, the AUDIO MENU appears as: ▪ If the signal source is TV, the AUDIO MENU appears as: Bass Treble Balance Sound Effect...Classic/Soft/Rock/ POP/Off MTS Allows you to listen to high-fidelity stereo sound while watching TV ▪ Stereo: Use separate audio tracks for left and right speakers, if available ▪ SAP:...
...;▼buttons to highlight an individual AUDIO option, use the ◄► buttons to turn the LCD TV on the remote control to display the Main menu, and use the ◄► buttons to ...menu ▪ If the signal source is VIDEO/S-VIDEO/YPbPr/ HDMI/VGA, the AUDIO MENU appears as: ▪ If the signal source is TV, the AUDIO MENU appears as: Bass Treble Balance Sound Effect...Classic/Soft/Rock/ POP/Off MTS Allows you to listen to high-fidelity stereo sound while watching TV ▪ Stereo: Use separate audio tracks for left and right speakers, if available ▪ SAP:...

User Guide
Page 39
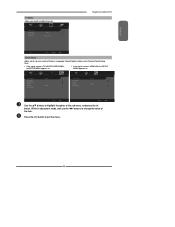
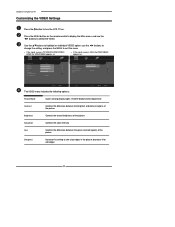
...If the signal source is HDMI/VGA, the SETUP MENU appears as: OSD Language Time Setup Closed Caption Parental Gamma Reset Default English Middle OSD Language Time Setup Parental Gamma Reset Default English Middle Setup Select Exit 39 ENGLISH Time Zone Chapter 3 Using the LCD TV Press the ▼ button ... Eastern Time/ Indiana/Central time/Mountain Time/Arizona/Pacific Time/ Alaska/Hawaii Customizing the SETUP Settings Press the button to turn the LCD TV on the remote control to display the Main menu, and use the ◄► buttons to change the setting, and press the MENU...
...If the signal source is HDMI/VGA, the SETUP MENU appears as: OSD Language Time Setup Closed Caption Parental Gamma Reset Default English Middle OSD Language Time Setup Parental Gamma Reset Default English Middle Setup Select Exit 39 ENGLISH Time Zone Chapter 3 Using the LCD TV Press the ▼ button ... Eastern Time/ Indiana/Central time/Mountain Time/Arizona/Pacific Time/ Alaska/Hawaii Customizing the SETUP Settings Press the button to turn the LCD TV on the remote control to display the Main menu, and use the ◄► buttons to change the setting, and press the MENU...


