
User Guide
Page 8
...battery-operated equipment, observe these basic safety precautions: 1 FOLLOW ALL OF THESE INSTRUCTIONS. 2 CLOSELY SUPERVISE CAMERA WHEN IT IS BEING USED BY OR NEAR CHILDREN. 3 DO NOT USE CAMERA IF IT HAS BEEN DROPPED OR DAMAGED - PLEASE KEEP THESE INSTRUCTIONS SERVICE OR REPAIR WORK MUST BE DONE... ONLY BY AN AUTHORIZED POLAROID SERVICE CENTER. UNTIL IT HAS BEEN EXAMINED AT AN AUTHORIZED POLAROID SERVICE CENTER. 4 TO AVOID ELECTRICAL SHOCK HAZARDS...
...battery-operated equipment, observe these basic safety precautions: 1 FOLLOW ALL OF THESE INSTRUCTIONS. 2 CLOSELY SUPERVISE CAMERA WHEN IT IS BEING USED BY OR NEAR CHILDREN. 3 DO NOT USE CAMERA IF IT HAS BEEN DROPPED OR DAMAGED - PLEASE KEEP THESE INSTRUCTIONS SERVICE OR REPAIR WORK MUST BE DONE... ONLY BY AN AUTHORIZED POLAROID SERVICE CENTER. UNTIL IT HAS BEEN EXAMINED AT AN AUTHORIZED POLAROID SERVICE CENTER. 4 TO AVOID ELECTRICAL SHOCK HAZARDS...

User Guide
Page 9
Contents The camera The camera 2 The control panel 3 Using the camera Open the camera 4 Check the control panel 4 Load the film 4 Position your subject 4 Take the picture 5 To remove an empty film pack 5 Features The autofocus system 6 The viewfinder displays 7 The programmed flash 8 The recharge indicator 8 Flash range 9 The exposure control 9 The self-timer 11 Photographing...
Contents The camera The camera 2 The control panel 3 Using the camera Open the camera 4 Check the control panel 4 Load the film 4 Position your subject 4 Take the picture 5 To remove an empty film pack 5 Features The autofocus system 6 The viewfinder displays 7 The programmed flash 8 The recharge indicator 8 Flash range 9 The exposure control 9 The self-timer 11 Photographing...
User Guide
Page 10
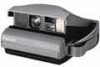
g Programmed flash h Self-timer indicator i Patented Quintic lens (three element, 125mm lens system.) Ten-zone focusing from the flash, indoors and outdoors). b Film door release l Viewfinder c Film door d Film exit slot e Photocell-silicon ...photodiodes (measures light from the scene and light from 2 feet (0.6m ) to your subject). n Tripod socket (underneath the camera). f Film shade (protects the picture from light as it exits the camera). To delay ejecting the picture, hold the shutter button down). o Two-stage shutter button (press halfway to take the ...
g Programmed flash h Self-timer indicator i Patented Quintic lens (three element, 125mm lens system.) Ten-zone focusing from the flash, indoors and outdoors). b Film door release l Viewfinder c Film door d Film exit slot e Photocell-silicon ...photodiodes (measures light from the scene and light from 2 feet (0.6m ) to your subject). n Tripod socket (underneath the camera). f Film shade (protects the picture from light as it exits the camera). To delay ejecting the picture, hold the shutter button down). o Two-stage shutter button (press halfway to take the ...
User Guide
Page 11
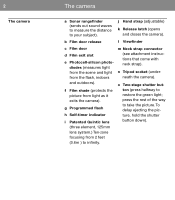
... want to show how many pictures are left in meters). f Exposure control (adjust it to turn off the autofocus system). h Picture counter (counts down when you can take a picture). The control panel The camera 3 a Feet or meters selector (slide it down to turn off the flash). b Audio signal switch (slide it...
... want to show how many pictures are left in meters). f Exposure control (adjust it to turn off the autofocus system). h Picture counter (counts down when you can take a picture). The control panel The camera 3 a Feet or meters selector (slide it down to turn off the flash). b Audio signal switch (slide it...
User Guide
Page 12
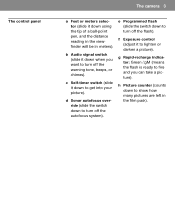
...lm (pictures 5, 6) 4 Position your subject should also be used with this camera. When you have finished using the camera, close the camera (picture 4): When you want the camera to protect the lens. Use only Polaroid Spectra color film. To close it to be fully automatic, be sure all ...the way into the camera. Note: When the switches are not in ...
...lm (pictures 5, 6) 4 Position your subject should also be used with this camera. When you have finished using the camera, close the camera (picture 4): When you want the camera to protect the lens. Use only Polaroid Spectra color film. To close it to be fully automatic, be sure all ...the way into the camera. Note: When the switches are not in ...
User Guide
Page 13
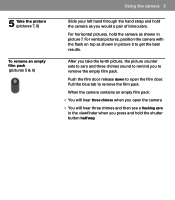
... counter sets to zero and three chimes sound to remind you would a pair of binoculars. Push the film door release down to open the camera • You will hear three chimes and then see a flashing zero in the viewfinder when you open the film door. For... flash on top as shown in picture 8 to get the best results. Pull the blue tab to remove the film pack. When the camera contains an empty film pack: • You wilI hear three chimes when you press and hold the shutter button halfway 5 Take the picture (pictures...
... counter sets to zero and three chimes sound to remind you would a pair of binoculars. Push the film door release down to open the camera • You will hear three chimes and then see a flashing zero in the viewfinder when you open the film door. For... flash on top as shown in picture 8 to get the best results. Pull the blue tab to remove the film pack. When the camera contains an empty film pack: • You wilI hear three chimes when you press and hold the shutter button halfway 5 Take the picture (pictures...
User Guide
Page 14
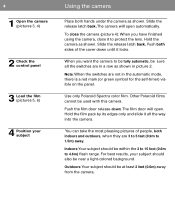
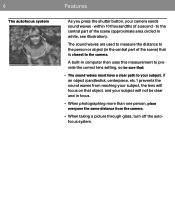
6 The autofocus system Features As you press the shutter button, your subject will not be sure that object, and your camera sends sound waves - The sound waves are used to measure the distance to the person or object (in the central part of a second - within... scene) that is closest to your subject. If an object (candlestick, centerpiece, etc.1 prevents the sound waves from the camera. • When taking a picture through glass, turn off the autofocus system. A built-in computer then uses this measurement to the central part of the scene (approximate area circled in focus. &#...
6 The autofocus system Features As you press the shutter button, your subject will not be sure that object, and your camera sends sound waves - The sound waves are used to measure the distance to the person or object (in the central part of a second - within... scene) that is closest to your subject. If an object (candlestick, centerpiece, etc.1 prevents the sound waves from the camera. • When taking a picture through glass, turn off the autofocus system. A built-in computer then uses this measurement to the central part of the scene (approximate area circled in focus. &#...
User Guide
Page 15
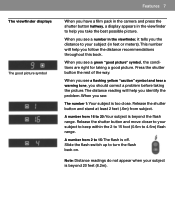
... your subject is beyond 20 feet (6.2m). Features 7 The viewfinder displays The good picture symbol When you have a film pack in the camera and press the shutter button halfway, a display appears in feet or meters).
... your subject is beyond 20 feet (6.2m). Features 7 The viewfinder displays The good picture symbol When you have a film pack in the camera and press the shutter button halfway, a display appears in feet or meters).
User Guide
Page 16
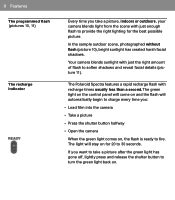
... sunlight with just the right amount of flash to 30 seconds. If you want to take a picture, indoors or outdoors, your camera blends light from the scene with recharge times usually less than a second. The green light on the control panel will come on and the &#...recharge indicator Every time you take a picture after the green light has gone off, lightly press and release the shutter button to fire. The Polaroid Spectra features a rapid recharge flash with just enough flash to provide the right lighting for 20 to soften shadows and reveal facial details (...
... sunlight with just the right amount of flash to 30 seconds. If you want to take a picture, indoors or outdoors, your camera blends light from the scene with recharge times usually less than a second. The green light on the control panel will come on and the &#...recharge indicator Every time you take a picture after the green light has gone off, lightly press and release the shutter button to fire. The Polaroid Spectra features a rapid recharge flash with just enough flash to provide the right lighting for 20 to soften shadows and reveal facial details (...
User Guide
Page 17
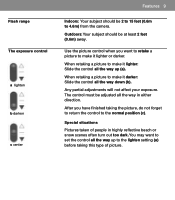
When retaking a picture to 4.6m) from the camera. Flash range The exposure control a lighten b darken c center Features 9 Indoors: Your subject should be at least 2 feet (0.6m) away. Use the picture control when you ...
When retaking a picture to 4.6m) from the camera. Flash range The exposure control a lighten b darken c center Features 9 Indoors: Your subject should be at least 2 feet (0.6m) away. Use the picture control when you ...
User Guide
Page 19
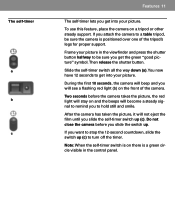
... a flashing red light (b) on and the beeps will become a steady signal to remind you to be sure the camera is positioned over one of the camera. Do not close the camera before the camera takes the picture, the red light will not eject the film until you get into your picture. Then... (c) to get the green "good picture" symbol. The self-timer a b c Features 11 The self-timer lets you slide the self-timer switch up (c). After the camera has taken the picture, it will stay on the front of the tripod's legs for proper support. Slide the self-timer switch all the way...
... a flashing red light (b) on and the beeps will become a steady signal to remind you to be sure the camera is positioned over one of the camera. Do not close the camera before the camera takes the picture, the red light will not eject the film until you get into your picture. Then... (c) to get the green "good picture" symbol. The self-timer a b c Features 11 The self-timer lets you slide the self-timer switch up (c). After the camera has taken the picture, it will stay on the front of the tripod's legs for proper support. Slide the self-timer switch all the way...
User Guide
Page 20
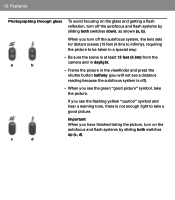
... sliding both switches down, as shown (a, b). 12 Features Photographing through glass To avoid focusing on the autofocus and flash systems by sliding both switches up (c, d). c d Important When you have finished taking the picture, turn off ). • When you will not see the ...there is not enough light to be taken in a special way: a b • Be sure the scene is at least 15 feet (4.6m) from the camera and in daylight. • Frame the picture in the viewfinder and press the shutter button halfway (you see a distance reading because the autofocus...
... sliding both switches down, as shown (a, b). 12 Features Photographing through glass To avoid focusing on the autofocus and flash systems by sliding both switches up (c, d). c d Important When you have finished taking the picture, turn off ). • When you will not see the ...there is not enough light to be taken in a special way: a b • Be sure the scene is at least 15 feet (4.6m) from the camera and in daylight. • Frame the picture in the viewfinder and press the shutter button halfway (you see a distance reading because the autofocus...

User Guide
Page 21
...the picture from hot surfaces like the hood of development, handle the picture gently. For best results, use silicone-treated eyeglass tissues. Do not use Spectra film between 55°F (13°C) and 95°F (35°C). The development process takes place inside the film; Fanning or...picture by its wide white border. During the first 60 seconds of a car. Wind can also affect development as the picture exits the camera. See film box for more details. Hold the developing picture by holding the shutter button down until you can be stacked. Note: ...
...the picture from hot surfaces like the hood of development, handle the picture gently. For best results, use silicone-treated eyeglass tissues. Do not use Spectra film between 55°F (13°C) and 95°F (35°C). The development process takes place inside the film; Fanning or...picture by its wide white border. During the first 60 seconds of a car. Wind can also affect development as the picture exits the camera. See film box for more details. Hold the developing picture by holding the shutter button down until you can be stacked. Note: ...
User Guide
Page 22
...you are often due to 8 p.m., Eastern time: Tel: 1-800-343-5000 TDD: 1-800-448-6708 México Polaroid de México Paseo de la Reforma No. 195 Col. Polaroid Customer Care Center 201 Burlington Road Bedford, Massachusetts 01731 Representatives available weekdays from 8 a.m. Tel: (05) 703-1111 Canada... Polaroid Canada, Inc. 350 Carlingview Drive Rexdale, Ontario M9W 5G6 Tel: (416) 675-3680 Toll free: 800-268-6970 to incorrect use of the camera. If you write, please explain the nature of the problem and, if ...
...you are often due to 8 p.m., Eastern time: Tel: 1-800-343-5000 TDD: 1-800-448-6708 México Polaroid de México Paseo de la Reforma No. 195 Col. Polaroid Customer Care Center 201 Burlington Road Bedford, Massachusetts 01731 Representatives available weekdays from 8 a.m. Tel: (05) 703-1111 Canada... Polaroid Canada, Inc. 350 Carlingview Drive Rexdale, Ontario M9W 5G6 Tel: (416) 675-3680 Toll free: 800-268-6970 to incorrect use of the camera. If you write, please explain the nature of the problem and, if ...

User Guide
Page 23
... exclusion of consequential damages, so the foregoing exclusion may also have other proof of your camera is guaranteed for such repairs. Without this information, the warranty period will be determined by a Polaroid Service Center (see p. 37) U.S.A.: This warranty gives you specific legal rights,...replacement of the purchase date. The warranty does not cover damage caused by accident, misuse, or tampering with a fully reconditioned camera. This warranty excludes all consequential damages. Warranty U.S.A.: Full five-year Mexico: Full five-year Guide to better pictures 15...
... exclusion of consequential damages, so the foregoing exclusion may also have other proof of your camera is guaranteed for such repairs. Without this information, the warranty period will be determined by a Polaroid Service Center (see p. 37) U.S.A.: This warranty gives you specific legal rights,...replacement of the purchase date. The warranty does not cover damage caused by accident, misuse, or tampering with a fully reconditioned camera. This warranty excludes all consequential damages. Warranty U.S.A.: Full five-year Mexico: Full five-year Guide to better pictures 15...
User Guide
Page 24
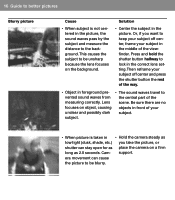
... your subject off center, frame your subject in the middle of the viewfinder. Cam- era movement can stay open for as place the camera on a firm long as low light (dusk, shade, etc.) you want to keep your subject. • When picture is not centered ...; Center the subject in the picture. 16 Guide to better pictures Blurry picture Cause Solution • When subject is taken in • Hold the camera steady as 2.8 seconds. Be sure there are no objects in foreground prevented sound waves from measuring correctly. support. Press and hold the shutter button halfway...
... your subject off center, frame your subject in the middle of the viewfinder. Cam- era movement can stay open for as place the camera on a firm long as low light (dusk, shade, etc.) you want to keep your subject. • When picture is not centered ...; Center the subject in the picture. 16 Guide to better pictures Blurry picture Cause Solution • When subject is taken in • Hold the camera steady as 2.8 seconds. Be sure there are no objects in foreground prevented sound waves from measuring correctly. support. Press and hold the shutter button halfway...
User Guide
Page 25
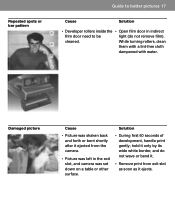
...do not remove film). Repeated spots or bar pattern Guide to be light (do not wave or bend it. • Remove print from the camera. • Picture was left in indirect film door need to better pictures 17 Cause Solution • Developer rollers inside the • Open ...film door in the exit slot, and camera was set down on a table or other surface. • During first 60 seconds of development, handle print gently; While turning rollers, clean ...
...do not remove film). Repeated spots or bar pattern Guide to be light (do not wave or bend it. • Remove print from the camera. • Picture was left in indirect film door need to better pictures 17 Cause Solution • Developer rollers inside the • Open ...film door in the exit slot, and camera was set down on a table or other surface. • During first 60 seconds of development, handle print gently; While turning rollers, clean ...
User Guide
Page 26
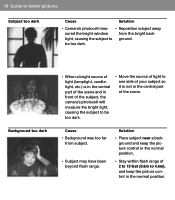
... too far from the bright back- light, causing the subject to be too dark. 18 Guide to better pictures Subject too dark Cause Solution • Camera's photocell mea- • Reposition subject away sured the bright window from subject. • Subject may have been beyond flash range. Solution • Place subject...; Stay within flash range of 2 to 15 feet (0.6m to 4.6m), and keep the picture control in the central part of the subject, the camera's photocell will measure the bright light, causing the subject to ground.
... too far from the bright back- light, causing the subject to be too dark. 18 Guide to better pictures Subject too dark Cause Solution • Camera's photocell mea- • Reposition subject away sured the bright window from subject. • Subject may have been beyond flash range. Solution • Place subject...; Stay within flash range of 2 to 15 feet (0.6m to 4.6m), and keep the picture control in the central part of the subject, the camera's photocell will measure the bright light, causing the subject to ground.
User Guide
Page 27
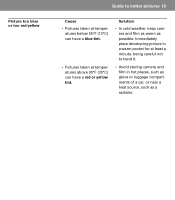
Solution • In cold weather, keep camera and film as warm as a radiator. Immediately place developing picture in hot places, such as glove or luggage compartments of a car, or near a heat ... below 55°F (13°C) can have a red or yellow tint. Picture too blue or too red/yellow Guide to bend it. • Avoid storing camera and film in a warm pocket for at least a minute, being careful not to better pictures 19 Cause • Pictures taken at temperatures above 95...
Solution • In cold weather, keep camera and film as warm as a radiator. Immediately place developing picture in hot places, such as glove or luggage compartments of a car, or near a heat ... below 55°F (13°C) can have a red or yellow tint. Picture too blue or too red/yellow Guide to bend it. • Avoid storing camera and film in a warm pocket for at least a minute, being careful not to better pictures 19 Cause • Pictures taken at temperatures above 95...
User Guide
Page 28
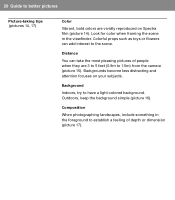
... are vividly reproduced on your subjects. Composition When photographing landscapes, include something in the viewfinder. Backgrounds become less distracting and attention focuses on Spectra film (picture 14). Background Indoors, try to have a light-colored background. Outdoors, keep the background simple (picture 16). Colorful props such as toys or... the scene. 20 Guide to better pictures Picture-taking tips (pictures 14, 17) Color Vibrant, bold colors are 3 to 5 feet (0.9m to 1.5m) from the camera (picture 15).
... are vividly reproduced on your subjects. Composition When photographing landscapes, include something in the viewfinder. Backgrounds become less distracting and attention focuses on Spectra film (picture 14). Background Indoors, try to have a light-colored background. Outdoors, keep the background simple (picture 16). Colorful props such as toys or... the scene. 20 Guide to better pictures Picture-taking tips (pictures 14, 17) Color Vibrant, bold colors are 3 to 5 feet (0.9m to 1.5m) from the camera (picture 15).


