User Guide
Page 8
... CENTER. 4 TO AVOID ELECTRICAL SHOCK HAZARDS, DO NOT DISASSEMBLE CAMERA. SERVICE OR REPAIR WORK MUST BE DONE ONLY BY AN AUTHORIZED POLAROID SERVICE CENTER. DO NOT IMMERSE IN WATER OR OTHER FLUIDS. INCORRECT REASSEMBLY CAN CAUSE ELECTRICAL SHOCK WHEN CAMERA IS USED AGAIN. IMPORTANT SAFEGUARDS As with any battery-operated equipment, observe these basic...
... CENTER. 4 TO AVOID ELECTRICAL SHOCK HAZARDS, DO NOT DISASSEMBLE CAMERA. SERVICE OR REPAIR WORK MUST BE DONE ONLY BY AN AUTHORIZED POLAROID SERVICE CENTER. DO NOT IMMERSE IN WATER OR OTHER FLUIDS. INCORRECT REASSEMBLY CAN CAUSE ELECTRICAL SHOCK WHEN CAMERA IS USED AGAIN. IMPORTANT SAFEGUARDS As with any battery-operated equipment, observe these basic...

User Guide
Page 9
Contents The camera The camera 2 The control panel 3 Using the camera Open the camera 4 Check the control panel 4 Load the film 4 Position your subject 4 Take the picture 5 To remove an empty film pack 5 Features The autofocus system 6 The viewfinder displays 7 The programmed flash 8 The recharge indicator 8 Flash range 9 The exposure control 9 The self-timer 11 Photographing through...
Contents The camera The camera 2 The control panel 3 Using the camera Open the camera 4 Check the control panel 4 Load the film 4 Position your subject 4 Take the picture 5 To remove an empty film pack 5 Features The autofocus system 6 The viewfinder displays 7 The programmed flash 8 The recharge indicator 8 Flash range 9 The exposure control 9 The self-timer 11 Photographing through...
User Guide
Page 11
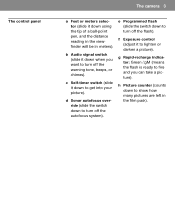
The control panel The camera 3 a Feet or meters selector (slide it down using the tip of a ball-point pen, and the distance reading in the viewfinder will be in the film pack). g Rapid-recharge indicator: ...;ash). h Picture counter (counts down to show how many pictures are left in meters). c Self-timer switch (slide it down to turn off the autofocus system). b Audio signal switch (slide it down to get into your picture). d Sonar autofocus override (slide the switch down when you can take a picture).
The control panel The camera 3 a Feet or meters selector (slide it down using the tip of a ball-point pen, and the distance reading in the viewfinder will be in the film pack). g Rapid-recharge indicator: ...;ash). h Picture counter (counts down to show how many pictures are left in meters). c Self-timer switch (slide it down to turn off the autofocus system). b Audio signal switch (slide it down to get into your picture). d Sonar autofocus override (slide the switch down when you can take a picture).
User Guide
Page 12
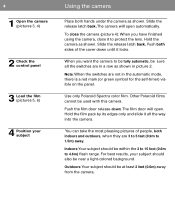
...camera will open automatically. Use only Polaroid Spectra color film. Indoors:Your subject should be at least 2 feet (0.6m) away from the camera. When you have finished using the camera, close the camera (picture 4): When you want the camera to 1.5m) away. For best results, your subject Using the camera... down .The film door will open . To close it to 4.6m) flash range. Other Polaroid films cannot be used with this camera. 4 1 Open the camera (pictures 3, 4) 2 Check the control panel 3 Load the film (pictures 5, 6) 4 Position your...
...camera will open automatically. Use only Polaroid Spectra color film. Indoors:Your subject should be at least 2 feet (0.6m) away from the camera. When you have finished using the camera, close the camera (picture 4): When you want the camera to 1.5m) away. For best results, your subject Using the camera... down .The film door will open . To close it to 4.6m) flash range. Other Polaroid films cannot be used with this camera. 4 1 Open the camera (pictures 3, 4) 2 Check the control panel 3 Load the film (pictures 5, 6) 4 Position your...
User Guide
Page 13
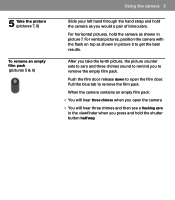
...pack: • You wilI hear three chimes when you press and hold the camera as shown in picture 8 to get the best results. 5 Take the picture (pictures 7, 8) To remove an empty film pack (pictures 5 & 9) Using the camera 5 Slide your left hand through the hand strap and hold the... camera as shown in picture 7. Push the film door release down to open the camera • You will hear three chimes and then see a flashing zero...
...pack: • You wilI hear three chimes when you press and hold the camera as shown in picture 8 to get the best results. 5 Take the picture (pictures 7, 8) To remove an empty film pack (pictures 5 & 9) Using the camera 5 Slide your left hand through the hand strap and hold the... camera as shown in picture 7. Push the film door release down to open the camera • You will hear three chimes and then see a flashing zero...
User Guide
Page 14
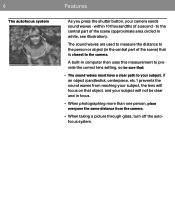
...lens setting, so be sure that is closest to your camera sends sound waves - If an object (candlestick, centerpiece, etc.1 prevents the sound waves from the camera. • When taking a picture through glass, turn off the autofocus system. to the person or object (in white, see illustration...). The sound waves are used to measure the distance to the central part of the scene (...
...lens setting, so be sure that is closest to your camera sends sound waves - If an object (candlestick, centerpiece, etc.1 prevents the sound waves from the camera. • When taking a picture through glass, turn off the autofocus system. to the person or object (in white, see illustration...). The sound waves are used to measure the distance to the central part of the scene (...
User Guide
Page 17
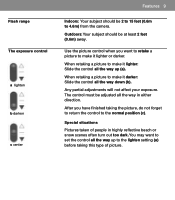
... (a) before taking the picture, do not forget to return the control to make it lighter or darker. Any partial adjustments will not affect your exposure. Use the picture control when you have finished taking this type of people in either direction. When retaking a picture to make it darker: Slide the... control all the way up to 4.6m) from the camera. After you want to set the control all the way in highly reflective beach or snow scenes often turn out too dark. When...
... (a) before taking the picture, do not forget to return the control to make it lighter or darker. Any partial adjustments will not affect your exposure. Use the picture control when you have finished taking this type of people in either direction. When retaking a picture to make it darker: Slide the... control all the way up to 4.6m) from the camera. After you want to set the control all the way in highly reflective beach or snow scenes often turn out too dark. When...
User Guide
Page 19
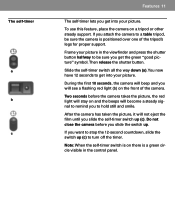
... red light will become a steady signal to remind you to hold still and smile. Slide the self-timer switch all the way down (a). After the camera has taken the picture, it will not eject the film until you will see a flashing red light (b) on and the beeps will stay... circle visible in the viewfinder and press the shutter button halfway to turn off the timer. To use this feature, place the camera on there is positioned over one of the camera. The self-timer a b c Features 11 The self-timer lets you get into your picture. If you want to stop...
... red light will become a steady signal to remind you to hold still and smile. Slide the self-timer switch all the way down (a). After the camera has taken the picture, it will not eject the film until you will see a flashing red light (b) on and the beeps will stay... circle visible in the viewfinder and press the shutter button halfway to turn off the timer. To use this feature, place the camera on there is positioned over one of the camera. The self-timer a b c Features 11 The self-timer lets you get into your picture. If you want to stop...

User Guide
Page 21
... development, handle the picture gently. Note: Keep the developing picture away from the wind. therefore, developing Spectra pictures can also affect development as the picture exits the camera. See film box for more details. Do not use Spectra film between 55°F (13°C) and 95°F (35°C). Hold the developing... care Guide to better pictures 13 It is important to avoid touching the lens. During the first 60 seconds of a car. For best results, use silicone-treated eyeglass tissues.
... development, handle the picture gently. Note: Keep the developing picture away from the wind. therefore, developing Spectra pictures can also affect development as the picture exits the camera. See film box for more details. Do not use Spectra film between 55°F (13°C) and 95°F (35°C). Hold the developing... care Guide to better pictures 13 It is important to avoid touching the lens. During the first 60 seconds of a car. For best results, use silicone-treated eyeglass tissues.
User Guide
Page 22
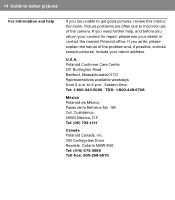
... 1-800-343-5000 TDD: 1-800-448-6708 México Polaroid de México Paseo de la Reforma No. 195 Col. lf you need further help If you are often due to incorrect use of the camera. Polaroid Customer Care Center 201 Burlington Road Bedford, Massachusetts 01731 Representatives available... weekdays from 8 a.m. Include your dealer or contact the nearest Polaroid office. Picture problems are unable to get good...
... 1-800-343-5000 TDD: 1-800-448-6708 México Polaroid de México Paseo de la Reforma No. 195 Col. lf you need further help If you are often due to incorrect use of the camera. Polaroid Customer Care Center 201 Burlington Road Bedford, Massachusetts 01731 Representatives available... weekdays from 8 a.m. Include your dealer or contact the nearest Polaroid office. Picture problems are unable to get good...
User Guide
Page 29
... 2 feet (0.6m ) to in fill flash designed to be used indoors and outdoors. Recharge time: from 10 to 50 thousandths of a second. Sonar autofocus system Computerized autofocus system uses sound waves to measure accurately the distance to your subject and set the lens. ... x 10.3cm) Image area: 3.60 x 2.90 inches (9.1 x 7.2cm) Film speed IS0 600/29° (approx.) Film type Polaroid Spectra color film only. Camera, film specifications Guide to better pictures 21 Aperture/shutter system specifications Apertures: from 2 to 15 feet (0.6m to 4.6m).
... 2 feet (0.6m ) to in fill flash designed to be used indoors and outdoors. Recharge time: from 10 to 50 thousandths of a second. Sonar autofocus system Computerized autofocus system uses sound waves to measure accurately the distance to your subject and set the lens. ... x 10.3cm) Image area: 3.60 x 2.90 inches (9.1 x 7.2cm) Film speed IS0 600/29° (approx.) Film type Polaroid Spectra color film only. Camera, film specifications Guide to better pictures 21 Aperture/shutter system specifications Apertures: from 2 to 15 feet (0.6m to 4.6m).


